Showing posts with label J-Cat's Faves. Show all posts

Wednesday, April 20, 2011

j-cat's balls


Wow, you have a dirty mind, I was just talking about matzo balls. I made the soup, J-Cat made the balls, we ended up eating it on Sunday instead of waiting until Passover actually began because I wound up sick. Good timing.

The key to great chicken soup is a great chicken stock, and there's really nothing to it. I had roasted a chicken earlier in the week, so the carcass made the stock, and stock made from a previously roasted chicken just always seems to have a deeper flavor than one made of a boiled whole chicken. If you plan ahead, I also recommend making the stock a day ahead, straining and refrigerating, then skimming off the fat that rises to the top the next morning. Use this fat to make the matzo balls and you will discover a whole new world of amazing balls. Recipe after the jump:


CHICKEN AND MATZO BALL SOUP

For the chicken stock:
1 small whole chicken, 3-3.5 pounds, or the leftover carcass and meat of a larger roasted chicken (I had the carcass and about half the meat of a 4.5 lb chicken)
2 medium carrots, cut in large chunks
2 celery stalks, cut in large chunks
1 medium onion, peeled and halved
10 black pepper corns

Place the chicken in a large stockpot and cover with cold water. If using a previously roasted chicken, remove majority of the cooked meat and set aside to add to the completed soup, adding just the carcass to the pot. Set heat on high and bring to a boil. Lower to a simmer, add the remaining ingredients, and cover. If using a raw chicken, cook 45 minutes until the meat is cooked and easily comes off the bone. Remove the chicken, pull off majority of the meat and set aside to add to the completed soup. Return the carcass to the pot and continue to simmer for another hour. Strain the stock and discard the solids. At this stage you can let the stock cool completely, then refrigerate for later use. When the stock is fully cold, skim off the fat and use in the matzo balls.

For the matzo balls:
3 eggs
2 tbsp chicken fat
1/2 cup water
1 cup matzo meal
1/2 tsp baking powder
salt and pepper to taste

Bring the chicken stock to a boil in a large stockpot. Mix the eggs, fat, and water together. Add the matzo meal, baking powder, salt and pepper, and mix well. Let stand for 10 minutes. Form small balls with your hands (easiest if they're wet) and drop into the boiling stock. Reduce heat to a simmer, cover pot, and cook for 30 minutes.

For the soup:
2 medium carrots, cut into rounds
2 stalks celery, sliced
1 medium onion, diced
1/4 cup fresh dill, chopped
leftover cooked chicken, shredded into bite-sized pieces
salt and freshly ground pepper, to taste

About 10 minutes into cooking the matzo balls, add the carrots, celery, and onion and continue cooking. About 5 minutes before the matzo balls are ready, add the chicken, fresh dill, and salt and pepper.

Continue Reading "j-cat's balls"

Sunday, March 13, 2011

keeeesh


Where have I been?! It's been a crazy month. Exciting and stressful and rather tiring. And I haven't been doing much cooking. But it was definitely time to get back in the kitchen, and what better way than cooking some Sunday brunch for mom and brother #2 and sissy and my new baby niece who can't actually eat food yet but should be very familiar with the smells of sauteed leeks by the time she can.

Brunch is a meal that I admit I have not made much of in my life. This is because I am not generally the type of person who wants to wake up in the morning and...do anything. Especially on the weekend. From Monday through Friday my alarm goes off and I roll over and hit snooze and groan and snuggle my Opaw closer and scratch behind her ears while she purrs. I curse the moment the alarm goes off again and I actually have to get up. And I promise my kitty that come Saturday I will stay in bed and scratch her ears for much much longer.

But this morning I had thoughts of leeks and goat cheese in a rich, smooth quiche. And despite the fact that we lost an hour on this damned Sunday morning, I dragged my ass up and made some pie crust, and got everything else prepped while it chilled. It was extremely worth it. WORTH IT. Best. Quiche. Ever. Recipe after the jump:


LEEK & GOAT CHEESE QUICHE

2 medium leeks, white part only, washed thoroughly and thinly sliced
2 tablespoons unsalted butter
2 large eggs
2 large egg yolks
1 1/2 cups half & half
1 teaspoon kosher salt
1/2 teaspoon freshly ground pepper
1 pinch freshly grated nutmeg
4 ounces goat cheese, crumbled
2 tablespoons chives, snipped
1 par-baked pie crust (recipe follows)

Preheat oven to 375 degrees. In a medium saute pan, melt butter and saute leeks over medium heat until softened, about 10 minutes. While the leeks are cooking, combine the remaining filling ingredients, minus the goat cheese. When the pie crust is par-baked until light golden brown, remove from the oven and spread the leeks in the bottom of the crust. Crumble the goat cheese over the leeks. Sprinkle the chives over the cheese. Place the crust on the center rack of the heated oven. Carefully pour the egg mixture into the shell. Bake the quiche for 30-35 minutes until the top is light brown and a knife inserted one inch from the edge comes out clean. The center should be just set but still slightly jiggly.

PERFECT PIE CRUST
Makes crust for 9-inch single crust pie.

1 1/4 all purpose flour
1/2 teaspoon kosher salt
6 tablespoons cold unsalted butter, cut into small dice
4 tablespoons cold leaf lard, cut into small pieces
2-5 tablespoons ice water

In a food processor, briefly pulse together the flour and salt. Add butter and pulse until mixture forms chickpea-size pieces (3 to 5 one-second pulses). Add ice water 1 tablespoon at a time, and pulse until mixture is just moist enough to hold together.

Form dough into a ball, wrap with plastic and flatten into a disk. Refrigerate at least 1 hour before rolling out and baking.

To par-bake, lightly spray one side of foil with cooking spray and line the crust with the foil. Fill with pie weights, dry beans or rice to weigh it down. Bake in a 375 degree oven for 10 minutes until lightly brown on the edges.

Continue Reading "keeeesh"

Monday, November 01, 2010

pumpkin for halloween. or squash, whatever.


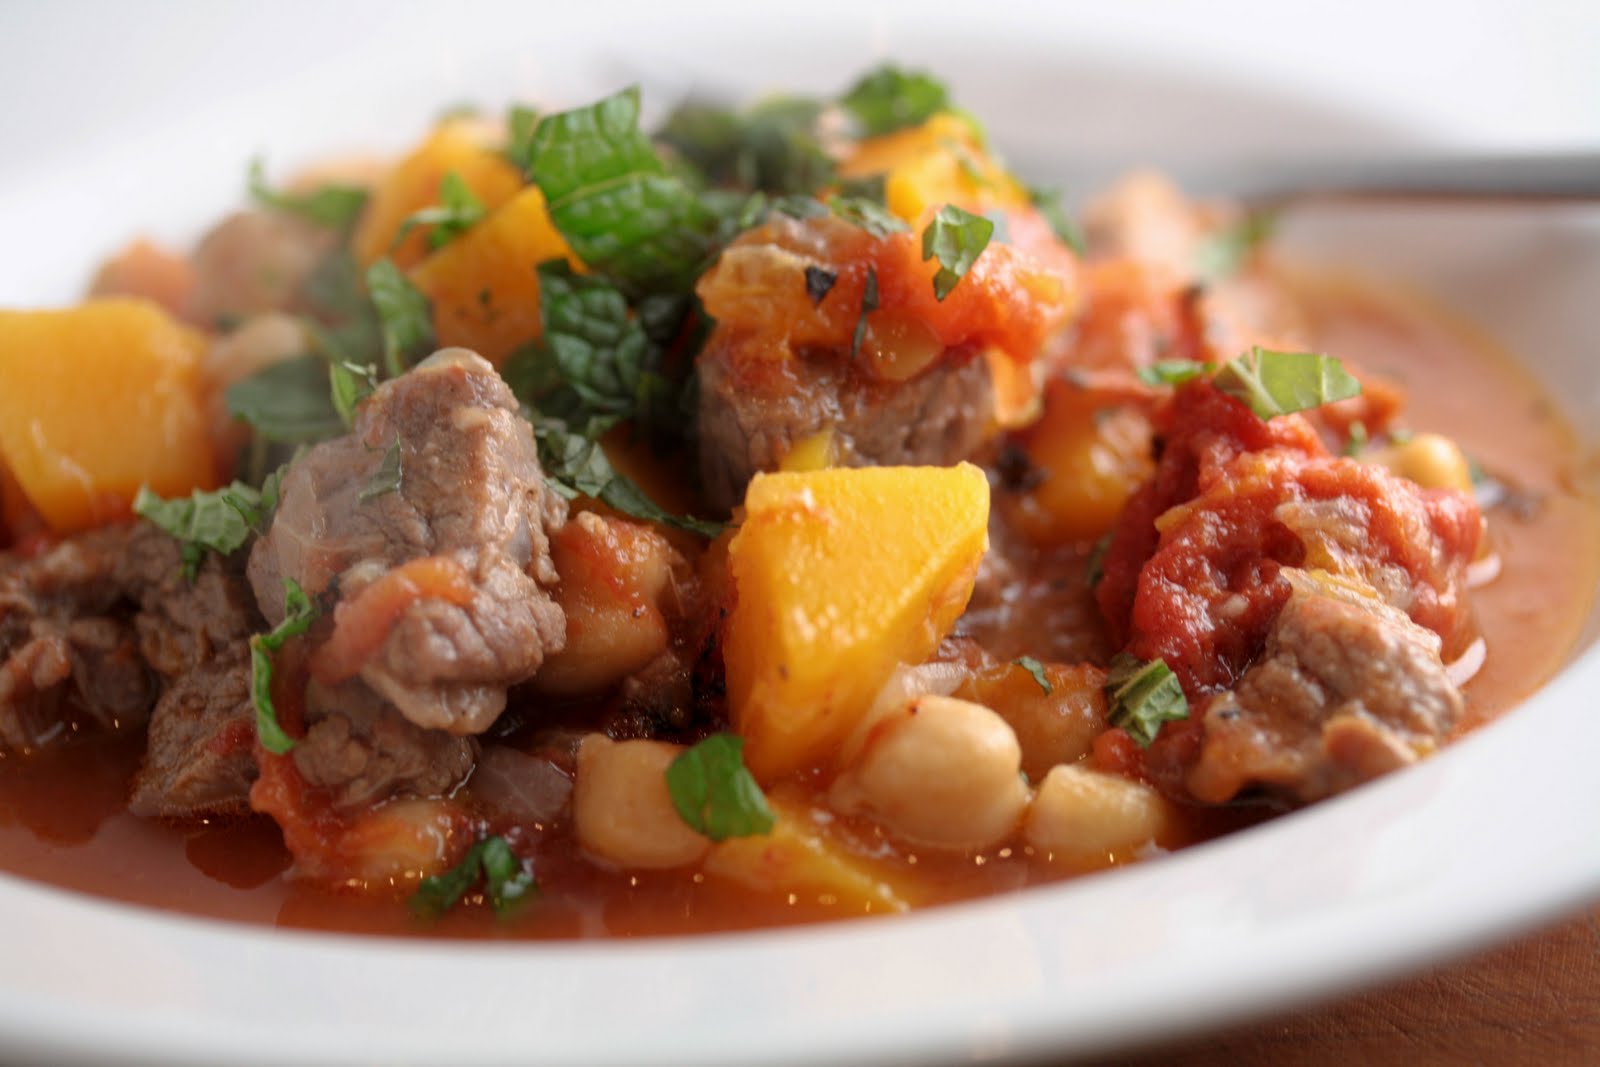
Other than the bag of mini-Kit Kats and a showing of Psycho at Film Forum on Friday night, Halloween passed in our household without much notice. We are fairly party pooper-ish about Halloween, due mostly to laziness about putting together costumes. When most of the world was out partying on Saturday night, we were out seeing that movie about Stephin Merritt and The Magnetic Fields. Stephin Merritt is kinda spooky. Then for Halloween proper, the extent of celebrating was including pumpkin in my Moroccan Lamb Stew. Technically it was butternut squash, but that's close enough. And Opaw hissed at least once. Happy Halloween!


My main catalyst for the lamb stew was a jar of preserved lemons that has been criminally neglected. I guess I go through stages and have a tendency to forget how magical they are. I want to dab preserved lemon behind my ears, the scent of them is so intoxicating.


I also really wanted to make some homemade harissa, because I always buy that stuff prepared and it's so silly to do so. I already have every ingredient in my house, and it takes all of 2 minutes to throw it together. Plus, I had the perfect little jar to pour it into, which brings me more satisfaction than one might think.


Tender lamb, chickpeas, squash, warm aleppo pepper, tomatoes for balance, golden raisins for a hint of sweetness, preserved lemons for tang, and a sprinkle of fresh mint to wake up the whole combination. The weather is finally cooling down, and this is the dish to warm you up. Recipe after the jump:


MOROCCAN LAMB STEW WITH PRESERVED LEMONS AND HARISSA

2 pounds lean shoulder of lamb, cut into 1-inch cubes
Kosher salt and freshly ground black pepper
2 tablespoons olive oil
1 medium onion, chopped
2 cloves garlic, minced
2 tablespoons harissa sauce (recipe follows), plus more for serving
4 cups peeled, uncooked butternut squash in 1/2-inch cubes
1 28-ounce can whole peeled tomatoes, drained and chopped
1 15-ounce can cooked chickpeas, drained and rinsed
1 preserved lemon, rind and pulp finely diced, plus additional pulp from 1 preserved lemon
1/4 cup golden raisins
1/4 cup fresh chopped mint for garnish

Cooked couscous or bulghur for serving.

Season the lamb cubes with salt and pepper. Heat the olive oil in a large dutch oven set over medium-high heat and cook the lamb, stirring, until lightly browned, about 5 minutes. Add the onion and garlic and continue to cook until the onion is soft. Add the 2 tbsp of harissa sauce and cook another 5 minutes.

Add 2 cups water, bring to a boil, lower heat and simmer, covered, until the lamb is tender, about 45 minutes. Add the squash, tomatoes, chickpeas and additional water to almost cover the ingredients. Simmer, uncovered, until the squash is tender, about 20 minutes.

Stir in the preserved lemon and raisins and cook another 2 minutes. Remove from the heat, garnish with mint and serve with couscous or bulghur and more harissa on the side.

Serves 4-6.

HARISSA SAUCE

1/2 cup olive oil
3 tbsp tomato paste
2 tbsp fresh lime juice
1 tbsp Aleppo pepper
1 tsp cumin
1/2 tsp coriander
1/4 to 1/2 tsp cayenne pepper, depending on desired heat level
1/4 tsp kosher salt

In a small bowl, whisk together all the ingredients. Let sit at least an hour before serving with lamb stew.

Continue Reading "pumpkin for halloween. or squash, whatever."

Monday, September 27, 2010

butterscotch


Butterscotch. It sounds strange to say, but I didn't really like butterscotch until recently. It should be the other way around, but as a kid I just thought butterscotch was sweet and not much else. I imagine that might be due to many really bad butterscotch candies or instant butterscotch puddings. It's not until I started actively working with candy and sugar that I started to understand what real butterscotch was about. It's about butter. The amazingness of butter. THAT is something to appreciate.

When butterscotch is made properly - no corn syrup, no weird additives, no hydrogenated fats - it tastes so deeply of browned butter and molasses-y brown sugar, how could that be a bad thing? Though true butterscotch is a candy confection, the classic butterscotch flavor is used in a ton of alternative ways - in puddings, sauces for ice cream, cakes, and cookies. And here are some butterscotch cookies.

A touch of crisp on the outside, dense and slightly chewy on the inside, a sprinkling of flaky sea salt brings out the deep nutty flavor and balances the richness. Recipe after the jump:


SALTY BUTTERSCOTCH BUTTONS
Adapted from Simply Recipes

12 tablespoons unsalted butter, cut into tablespoon sized slices
1 3/4 cups dark brown sugar
1/2 teaspoon salt
1 egg
1 egg yolk
1 tablespoon vanilla extract
2 1/2 cups all-purpose flour
1/2 teaspoon baking soda
1/4 teaspoon baking powder

1/4 cup granulated sugar, for dredging
Fleur de sel, Maldon, sea salt, or Kosher salt for sprinkling

Preheat oven to 375°F and line two baking sheets with parchment paper. Whisk or sift together the flour, baking soda, and baking powder and set aside. Place the sugar for dredging in another bowl and set aside.

Place 10 tablespoons of butter into a thick-bottomed skillet over medium heat. The butter will foam a bit before subsiding. Once the butter takes on a tan color and begins to smell nutty take it off of the heat. Add the other two tablespoons of butter and mix it in until it melts.

Pour the brown butter into a mixing bowl fitted with a paddle attachment. Add the brown sugar and salt and mix well. Add the egg, egg yolk, and vanilla extract and mix together, scraping down the sides and bottom of the bowl at least once. Add the flour mixture in three increments being sure to scrape down the sides and bottom once or twice. Mix just until the flour is incorporated. The dough will be very thick.

Take 1/2 tablespoon sized pieces of dough (I used a 1-inch diameter scoop to insure that all cookies were about the same size) and gently roll them into ball shapes. Dredge them in the sugar until well-coated. Place on the baking sheet and sprinkle with a little bit of the sprinkling salt.

Bake for 10-11 minutes or until the edges have browned a bit. Be careful not to over-bake. Allow to cool on the sheet for one minute before transferring to a wire rack to cool completely.

Makes 4 dozen.

Continue Reading "butterscotch"

Wednesday, August 18, 2010

lemony creme fraiche ice cream


Sometimes I love an ice cream that you don't have to turn a stove on for. The tanginess of creme fraiche and buttermilk, the brightness of lemon juice and zest, and that's all it takes. This would be the perfect accompaniment to a subtle olive oil cake or a pear tart, but it's also good just on it's own, maybe with some chopped pecans for crunch. Twenty minutes to greatness. Recipe after the jump:


LEMON CREME FRAICHE ICE CREAM

2 cups creme fraiche
2 cups buttermilk
zest of 1/2 lemon
1/3 cup fresh lemon juice
1 1/4 cups sugar
pinch of salt

Blend all ingredients together in a blender or food processor, making sure to scrape down the sides of the bowl. Chill until very cold, at least 4 hours, then freeze in an ice cream maker according to manufacturer's direction. Makes about 1 1/4 quarts.


Continue Reading "lemony creme fraiche ice cream"

Monday, July 26, 2010

greek diner dinner


I remember once that a friend was visiting from a faraway state and was unfamiliar with the NY-style diner. It's really 24 hours? This huge thing is the menu? You can really get ANY of this stuff at ANY time? What's with all the Greek food? I don't know diners any other way. Everywhere else I've been in the states, a "diner" is not remotely a diner. I think the word "diner" in most of the country suggests simple comfort grub, like burgers and fries and eggs and pancakes. To me, the quintessential diner dinner is spinach pie with a Greek salad.

Spanakopita is probably more commonly known as an hors d'oeuvres at weddings, wrapped as little crispy triangles. Diner style spanakopita is pie-style, a huge square cut from a huge tray. It is certainly easier to make that way, though perhaps not easier to eat. And it's a very simple dish, just a little time-consuming and perhaps a little frustrating, depending on how you feel about phyllo. Phyllo is a pain in the ass, but at least for this dish you're putting on so many layers that no one will care if there's a tear or two. Serve this with a big salad piled with crumbled feta, kalamata olives, grape tomatoes, chopped cucumber, and thinly sliced red onion for the complete diner experience. Recipe after the jump:


SPANAKOPITA (SPINACH PIE)

2 lbs fresh spinach, washed well and spun dry
3 tbsps extra virgin olive oil
1 medium yellow onion
1/4 cup fresh dill
juice of 1/2 lemon
1/2 lb greek feta
1 egg, beaten
1 lb phyllo leaves
1/2 cup (1 stick) unsalted butter
salt and pepper to taste

In a large pot, heat 2 tbsps olive oil. Add the spinach and saute until wilted. You may need to do this in 2 batches. Remove the spinach to a large bowl and allow to cool. Add the remaining oil to the same pot and saute the onions until translucent. Set aside to cool. When the spinach is cool enough to handle, squeeze out the excess liquid, then chop well. Add the onions, dill, and lemon juice and season with salt and pepper to taste. Crumble the feta into the spinach mixture, then add the beaten egg and stir well to combine.

Preheat the oven to 350 degrees. Melt the butter in a small pan. Using a pastry brush, butter the sides and bottom of a 9/13 baking pan. Place 10 layers of phyllo dough in the bottom of the dish, buttering each layer (you may need to cut down the sheets to the correct size of the dish, but it is not a big deal if it is slightly large and the sides go up the sides of the pan slightly). Be sure to keep the phyllo damp by covering the unused sheets with a damp towel until you use them. After 10 layers of phyllo, spoon the spinach mixture evenly over the pie. Top with another 10 layers of phyllo, again buttering every layer. Bake in the preheated oven for 40 to 45 minutes, or until the top is golden brown and crispy. Allow to cool for 10 minutes before slicing into large squares.

Continue Reading "greek diner dinner"

Monday, June 14, 2010

ice cream garden


I don't know how it is that I had never made mint chocolate chip ice cream. It is easily my all-time favorite ice cream flavor. And now that I have made it and realize how much fresh mint blows away any store-bought mint extract-based green stuff, I may have to continually make this every few days.


Because J and I finished the whole quart in two days. QUART. In TWO DAYS. I'm not proud of that, but it was just so freaking good. Creamy and extra cool, with this added fresh grassy flavor that only real herbs could bring. I added the bittersweet chocolate in a straciatella style, by melting it, drizzling ribbons onto the softly frozen ice cream, and breaking up the chocolate by hand. This results in super crackly thin bits of chocolate, incredibly well distributed.


And look, it's actually green! Recipe after the jump:

MINT CHOCOLATE CHIP ICE CREAM
Adapted from the recipe by David Leibovitz

For the mint ice cream:

3 cups half and half, divided
3/4 cup sugar
pinch of salt
2 cups packed fresh mint leaves
5 large egg yolks

For the chocolate chips:

4 ounces bittersweet chocolate, chopped

1. In a medium saucepan, warm the sugar with 2 cups of the half and half, salt, and mint.

2. Once the mixture is hot and steaming, remove from heat, cover, and let stand for an hour to infuse the mint flavor.

3. Remove the mint with a strainer, then squeeze out as much liquid from the mint leaves as possible. Discard the mint.

4. Pour the remaining half and half into a large bowl and set the strainer over the top.

5. Rewarm the infused milk. In a separate bowl, whisk the egg yolks, then slowly add some of warmed milk to the eggs to temper, whisking constantly. Add the warmed egg mixture back into the pot of milk.

6. Cook the custard, stirring constantly with a heatproof spatula, until the mixture thickens and coats the spatula. If using an instant read thermometer, it should read around 170ºF.

7. Immediately strain the mixture into the cream, then stir the mixture over an ice bath until cool.

8. Refrigerate the mixture thoroughly, preferably overnight, then freeze it in your ice cream maker according to the manufacturer's instructions.

While the mixture is freezing, melt the chocolate in a small bowl over a pot of simmering water, or in a microwave oven on low power, stirring until smooth. Place a storage container in the freezer.

9. When the ice cream in the machine is ready, scribble some of the chocolate into the container, then add a layer of the just-churned ice cream to the container. Scribble melted chocolate over the top of the ice cream, then quickly stir it in, breaking up the chocolate into irregular pieces. Continue layering the ice cream, scribbling more chocolate and stirring as you go.

When finished, cover and freeze until firm.

Continue Reading "ice cream garden"

Monday, June 07, 2010

apparently, sade sang a song about cherry pie, too


It is confirmed, the teeniest touch of almond makes the flavor of cherries burst to the forefront. Of course, it does help to have beautifully sweet and plump cherries to work with. This cherry-almond pie was - if I can give myself a pat on the back - the BEST cherry pie I've ever had.


It is the essence of cherry flavor, the flavor that makes you understand what all of those artificial cherry flavors are trying to go for, but don't quite get right.


If you can manage to stop yourself from eating all of the cherries before they go into the pie (I think approximately the same amount of cherries went into the pie as went straight into my mouth), this is what you should do with lovely fresh cherries. It will ruin you forever for any store bought pie, or pie filling in a can, or those gut bomb pocket pies covered in glaze. THIS is what cherry pie should be, the only thing it should ever be. This pie is fantastic warm with vanilla ice cream, but was actually even better cold with nothing at all. Recipe after the jump:


FRESH CHERRY AND ALMOND PIE

1 recipe for a double crust 9-inch deep dish pie
2 pounds fresh cherries, pitted
4 tablespoons quick-cooking tapioca
1 cup granulated sugar
1/2 teaspoon pure vanilla extract
1/4 teaspoon almond extract
1 teaspoon kirsch
1/2 cup thinly sliced almonds
1 tablespoon butter, diced
3 tablespoons heavy cream, optional

Preheat oven to 400 degrees. In a large mixing bowl, toss the cherries, sugar, tapioca, extracts, and kirsch and let sit for 15-20 minutes.

Roll out the chilled pie dough for the bottom crust and line a deep dish pie plate, leaving 1/2 inch of overhang. Fill the pie with the cherry mixture, then sprinkle the almond slices over the fruit. Dot with the butter pieces. Cover with the top crust, crimp to seal, and cut slits to allow steam to escape. Brush the crust with the heavy cream. Bake in the preheated oven for 50-55 minutes until crust is golden brown and juices are bubbling. Allow to cool completely before slicing.

Continue Reading "apparently, sade sang a song about cherry pie, too"

Wednesday, January 27, 2010

carrrrrrnitas baby


Week 6 of our porkilicious CSA brought me a 3.7 lb boston butt with a glorious fat cap and marbling throughout. I took one look at that chunk of meat (the approximate current weight of Christine's baby bump, as we were discussing last night)and thought about how perfect it would be all chunked up with crisped, caramelized edges, doused in salsa and crema and wrapped in soft corn tortillas. The carnitas cooked for about 3 hours, exuding an intensely incredible porky aroma, apparently all through the 4th floor of our building. But the amazing thing about these carnitas is that you just leave them there to cook and DO NOTHING. They go from pink, to brown, to crispy brown, to heaven, and you barely even touch them. MAGICAL.


The roasted tomatillo salsa was pretty damn easy, too, and the perfect tangy, fresh accompaniment. Recipes after the jump:

HOUSTON-STYLE CARNITAS
Adapted from Homesick Texan

Ingredients:
3 pounds of pork butt
1 cup of orange juice
3 cups of water
2 teaspoons of salt

Method:
1. Cut pork into strips (three inches by one inch), add to a large pot with the liquids and salt. Bring to a boil and then simmer uncovered on low for 2 hours. Do not touch the meat.
2. After two hours, turn heat up to medium high, and continue to cook until all the liquid has evaporated and the pork fat has rendered (about 30 minutes). Stir a few times, to keep pork from sticking to bottom of pan.
3. When pork has browned on both sides, it’s ready (there will be liquid fat in the pan). Serve either cubed or shredded (pork will be tender enough that just touching it will cause it to fall apart). Serve as soft tacos with soft corn tortillas, green salsa (recipe to follow), crema, sliced radishes, chopped fresh cilantro, and a squeeze of fresh lime juice.
Serves 4-6

ROASTED TOMATILLO SALSA


1 1/2 lb tomatillos
1/2 cup chopped white onion
1/2 cup cilantro leaves
1 Tbsp fresh lime juice
1/4 teaspoon sugar
3 Jalapeño peppers
Salt to taste

Remove papery husks from tomatillos and rinse well to remove some of the stickiness.
Cut in half and place cut side down on a foil-lined baking sheet. Place under a broiler for about 7-10 minutes to lightly blacken the skin.

Place tomatillos, lime juice, onions, cilantro, jalapenos, and sugar in a food processor (or blender) and pulse until all ingredients are finely chopped and mixed. Season to taste with salt. Cool in refrigerator.

Makes 3 cups.

Continue Reading "carrrrrrnitas baby"

Monday, October 26, 2009

in season: hide the cauliflower


That's not a particularly attractive dish right there. But it's one of those special recipes with hidden surprises. It is perfect fall food in several ways. Cauliflower is at it's best right now, and nothing is more warming and yummy on a chilly autumn day than a bowl of steamy, creamy risotto. This is a cauliflower and leek risotto. You can't really see the cauliflower hiding amidst the rice, but you take a bite and it bites back, just a tiny bit. Surprise. Need I say more? Recipe after the jump:

CAULIFLOWER LEEK RISOTTO

3 tbsp butter, separated
1 medium leek, chopped into half-moons
1 small head cauliflower, about 1 to 2 lb, cut into small florets
1 cup arborio or carnaroli rice
1 cup dry white wine
4 cups chicken broth (vegetable broth if you prefer this dish vegetarian)
3/4 cup parmiggiano-reggiano, or more to taste
salt and pepper, to taste

Heat the chicken broth in a medium saucepan until boiling, then lower to a low simmer. Melt 2 tbsp butter in a heavy 4-quart pot over medium heat until foam subsides. Add the leeks and cauliflower and saute until just starting to loose the raw color, about 2 minutes. Add the rice and toast, stirring about 1 minute. Add the wine and stir, allowing a strong simmer until the liquid is completely absorbed. Add 1/2 cup broth and repeat the stirring and simmering process. Continue to add broth 1/2 cup at a time, stirring and simmering, until the rice is tender and creamy looking, about 25 minutes. You may not need all of the broth. Remove from the heat, add the cheese, and season with salt and pepper to taste. Serve immediately.

Continue Reading "in season: hide the cauliflower"

Thursday, June 18, 2009

french food i did not eat in france: cherry clafoutis


I have been terribly neglectful of this blog since I've been back, I know, but I have been busy busy busy shooting a show and cursing the rain and my brain has not been in a place of writing. I have also been somewhat neglectful of my kitchen, what with leftovers coming home with me at the end of many of my days on set. I have been able to do a little culinary dabbling on the weekends, and I find myself trying out recipes for dishes that I should have eaten in Paris but didn't have a chance to. There were only so many hours and so many foods that I could stuff into myself at a time. So here is one classic French dessert that I should have stuffed: clafoutis.


Clafoutis is a baked fresh fruit custard, traditionally featuring fresh sweet cherries. Apparently the original version included whole unpitted cherries, the pits lending a mild almondy flavor when baked. These days, however, most recipes call for pitted cherries, probably because one too many hosts neglected to mention the pits and had an unhappy guest with a chipped tooth. To make up for the missing almond flavor, this recipe includes slivered almonds and a touch of almond extract. Clafoutis is incredibly simple to make, and yet seems like a complicated dish. The result is like a cross between a tart and a custard. Though it all starts out as one batter, the baking process seems to create two distinct textures; an almost cakelike crust along the bottom and sides, with a layer of light custard and fruit floating above it. J-Cat usually doesn't like eggy custards, but he loved this dessert for the almond flavor and the fact that the custard was so delicate and not eggy at all. This is the time for fresh cherries, so I cannot recommend this recipe more. Just be careful pitting those cherries, I'm still cleaning the dark red juice off of my kitchen...

CHERRY ALMOND CLAFOUTIS
Adapted from Simply Recipes

1 pint fresh sweet cherries, pitted
1/4 cup sliced almonds
3 eggs
3/4 cup sugar
1 tbsp dark brown sugar
1/2 cup all purpose flour
pinch salt
1 cup whole milk
1 tsp almond extract
2 tsps vanilla extract
powdered sugar for dusting

Preheat oven to 350 degrees. Butter and flour a 9x13 baking dish. Layer the pitted cherries and almond slivers in the bottom of the dish. Whisk together the eggs, sugars, flour, and salt. Add the milk and extracts and whisk until well combined. Pour slowly into the baking dish. Bake for 40-50 minutes until lightly browned and a toothpick inserted in the center comes out clean. It may still wiggle a bit in the middle but that is fine. Remove and set to cool on a wire rack. This is especially delicious served a bit warm, dusted lightly with powdered sugar.

Continue Reading "french food i did not eat in france: cherry clafoutis"

Tuesday, April 07, 2009

easy weeknight dinner: asparagus, leek, and grueyere quiche


Eggs + Pie = Delicious. I'm officially protesting the recent popularity of the "crustless quiche". There are two major reasons that the idea offends me: 1. It's an oxymoron. If there is no crust, it is not a quiche. Perhaps it is a frittata. 2. The crust is the best part. No crust means that I am no longer half as interested.


I have tried to figure out why one would want to make a crustless quiche, and I'm guessing there are two major motivations: 1. People believe crust is a pain to make, or 2. Crust is not good for you. To that I say, get over it. Crust is pretty simple, but if you really don't want to bother, just buy a pre-made crust. It's still better than no crust. And as for it's relative unhealthiness, you can just pack your quiche full of healthy vegetables to counteract it. And as a wise friend just told me, if you drink tea after you eat, it doesn't count. Recipe after the jump:

ASPARAGUS, LEEK, AND GRUYERE QUICHE

1 tbsp butter
1 large leek, cut in quarters lengthwise, rinsed thoroughly, and thinly sliced
1 shallot, minced
1 bunch asparagus, chopped into 1/4-inch pieces
4 large eggs
1/2 cup milk
salt and pepper, to taste
1/2 cup shredded Gruyere cheese
1 pie crust for a 9"-inch single crust pie, or storebought crust

Preheat oven to 350 degrees. In a large skillet over medium heat, melt the butter. Saute the shallot and leeks in the butter until just softened. Add the asparagus and saute until bright green and tender, about 6-7 minutes. Season generously with salt and pepper. Set aside to cool.

In a large bowl, whisk together the eggs and milk. Season with salt and pepper.

Place pie crust on a baking sheet. Spread the vegetables on the bottom of the crust, then top with the cheese. Pour in the egg mixture evenly. Bake in the preheated oven for 50-60 minutes until the center is just set, rotating once during baking. Allow to sit for 10 minutes before serving.

Continue Reading "easy weeknight dinner: asparagus, leek, and grueyere quiche"

Wednesday, February 25, 2009

sunday supper: buttermilk fantail rolls


Buttery, tangy, yeasty, yummy. I should be ashamed at how many of these Buttermilk Fantail Rolls I inhaled over the last couple of days. They were so good that I barely ate the main course, I was so focused on stuffing rolls in my maw. Despite the fact that these rolls didn't quite look as I had hoped (certainly not as pretty as the photo in the February issue of Gourmet Magazine) they were just as delicious as I imagined they would be, and I found myself dreaming about them the whole next day, waiting to get home from work and reheat the leftovers and stuff myself yet again.


They were also quite simple to make, as long as you have the patience for several hours of rising, which I rarely do. Some simple rolling, slicing, and stacking of the dough turns what might otherwise be an easily overlooked bread dough into a fairly impressive looking bread basket to wow your guests with. J-Cat especially liked the pull-apart quality of these rolls, he described them as stuck together slices of bread, already buttered for you. Recipe after the jump:


BUTTERMILK FANTAIL ROLLS
From Gourmet Magazine, February 2009

1 stick plus 2 tablespoons unsalted butter, melted, divided
2 teaspoons active dry yeast (from a 1/4-oz package)
1/4 cup warm water (105–115°F)
1 tablespoon mild honey or sugar
3 cups all-purpose flour plus more for kneading and dusting
1 1/2 teaspoons salt
3/4 cup well-shaken buttermilk

Equipment: a muffin pan with 12 (1/3- to 1/2-cup) muffin cup

Butter muffin cups with 1 Tbsp melted butter.

Stir together yeast, warm water, and honey in a large bowl and let stand until foamy, about 5 minutes. (If mixture doesn't foam, start over with new yeast.)

Mix flour, salt, buttermilk, and 6 Tbsp melted butter into yeast mixture with a wooden spoon or rubber spatula until a soft dough forms. Turn out dough onto a well-floured surface and knead, dusting surface and your hands with just enough flour to keep dough from sticking, until dough is elastic and smooth, 6 to 8 minutes. Form dough into a ball.

Put dough in an oiled large bowl and turn to coat. Cover bowl with plastic wrap and a kitchen towel and let dough rise in a draft-free place at warm room temperature until doubled, 1 1/2 to 2 hours.

Punch down dough (do not knead), then halve. Roll out half of dough on a lightly floured surface with a floured rolling pin into a 12-inch square (about 1/8 inch thick; keep remaining half covered with plastic wrap). Brush dough with 1/2 Tbsp butter and cut into 6 equal strips. Stack strips, buttered sides up, and cut crosswise into 6 equal pieces. Turn each piece on a side and put into a muffin cup. Make more rolls with remaining dough in same manner. Separate outer layers of each roll to fan outward. Cover rolls with a kitchen towel (not terry cloth) and let rise in a draft-free place at warm room temperature until doubled and dough fills cups, 1 to 1 1/2 hours.

Preheat oven to 375°F with rack in middle. Bake rolls until golden brown, 20 to 25 minutes. Brush tops with remaining 2 Tbsp butter, then transfer rolls to a rack and cool at least 20 minutes.

Cooks’ note: Rolls are best the day they’re made but can be frozen (cool completely, then wrap well) 1 month. Thaw, then reheat on a baking sheet in a 350°F oven until warmed through, 5 to 10 minutes.

Continue Reading "sunday supper: buttermilk fantail rolls"

Friday, February 20, 2009

chicken pot pie


I thought it was a nice touch to make this pinnacle of comfort food in my mom's hand me down corning ware casserole dish. It's utterly appropriate. It was also a good thing that I chose to make a somewhat leaner version of the dish that I found in a recent issue of Real Simple Magazine, because not only was it completely tasty despite the lowered fat, but these last few days have been so ridiculously indulgent that the healthy-ish pot pie is the only bit of guilt-free dining I've had this week. Burgers, donuts, falafel, donuts, crepes, donuts. Sometimes my job just destroys my willpower.

J-Cat declared this dish one of his favorites, and ate a good 2/3 of it in one evening. When that skinny boy can stuff that much into himself, it is the ultimate sign that I made some good stuff. Recipe after the jump:


CHICKEN AND VEGETABLE POT PIE
Adapted from Real Simple Magazine

1 pound boneless, skinless chicken breasts
1 tablespoon olive oil
4 shallots, chopped
4 carrots, diced
2 stalks celery, diced
3 tablespoons all-purpose flour
1/2 cup dry white wine
2 cups 1 percent milk
1 10-ounce package frozen peas
1 tablespoon fresh thyme
Kosher salt and pepper
1 9-inch store-bought piecrust, thawed if frozen (the Pillsbury Just Unroll crust is perfect for this for a weeknight dinner)

Heat oven to 400° F. Cook the chicken in a pot of simmering water until cooked through, 10 to 12 minutes; let cool, then cut into small cubes.

Meanwhile, heat the oil in a saucepan over medium heat. Add the onions and carrots and cook, stirring, until they begin to soften, 6 to 8 minutes (do not let them darken). Sprinkle the flour over the vegetables and cook, stirring, for 1 minute.

Add the wine and cook until evaporated, about 5 minutes. Add the milk and simmer until the sauce thickens, 2 to 3 minutes. Stir in the chicken, peas, thyme, 3/4 teaspoon salt, and 1/4 teaspoon pepper. Transfer to a shallow 1 1/2- to 2-quart baking dish.

Lay the crust on top, pressing to seal. Cut several vents in the crust. Place the pot pie on a baking sheet and bake until bubbling and the crust is golden, 30 to 35 minutes.

Yield: Makes 6 servings

Continue Reading "chicken pot pie"

Wednesday, February 11, 2009

hocktacular


What. Is that? You might be asking. It does not look pretty. As always, slow cookers make everything look nasty but taste awesome. Then again, split pea soup is not really known for being attractive. What is attractive is the amazing smokey porky aroma that greets you when you get home after a long work day and your soup has been bubbling away for 10 hours. This is what it looked like in the morning:


Smoked ham hocks. Pure amazingness. I suspect they may have contributed to the brownish shade of the soup, when usually split pea soup is on the greener side. I don't really care what it looks like though, it was just tasty. It was also too easy, but you do have to be willing to chop onions first thing in the morning. Recipe after the jump:


SLOW COOKER SPLIT PEA SOUP

1 pound dry green split peas
2 smoked ham hocks
1 medium onion, diced
3 carrots, peeled and sliced into 1/4-inch coins
2 stalks celery, chopped
2 cloves garlic, minced
1 bouquet garni consisting of parsley, thyme, and 1 bay leaf
1 tsp freshly ground pepper
6 cups hot water

Layer ingredients in slow cooker in the order given; pour in water. Do not stir ingredients. Cover and cook on HIGH 4 to 5 hours or on low 8 to 10 hours until peas are very soft and ham falls off bone. Remove the bones, skin, and bouquet garni. Taste and adjust salt and pepper if necessary. I do not add salt until the end of the cooking because the ham hocks will add a lot of saltiness to the soup and extra salt may not be necessary. Serve garnished with croutons. Freezes well.
Serves 8.

Continue Reading "hocktacular"

Monday, January 12, 2009

sunday supper: not a pretty picture


I cannot blame my poor photography skills for this one. The fact of that matter is, if you put a chicken in a slow cooker for seven hours, it is generally not going to be attractive. It will, however, be extremely tasty. This is a slow cooker version of the Filipino classic Chicken Adobo. Adobo is a simple combination of soy sauce, vinegar, crushed garlic, peppercorns, and bay leaves and is traditionally made with pork or chicken or both. Some people like to brown the meat after cooking for a nice crisp edge, but because this version cooks for so long, I don't recommend attempting it, the chicken just falls completely off the bones. That, of course, is a good thing in itself. Seven hours in it's salty, tangy bath and the chicken was completely infused with flavor, lovely and tender, and perfect comfort food on a cold Sunday. I went off to spend a lovely day knitting at Leah's house and came home to the delicious aroma of a hot dinner. I love slow cookers. Recipe after the jump:

SLOW COOKER CHICKEN ADOBO

1 3-pound chicken, cut into parts (or parts of your choice)
1 large sweet onion, sliced
1 cup plus two tablespoons of soy sauce
1 teaspoon black peppercorns
10 cloves garlic, crushed
3/4 cup white vinegar
1 cup water
2 bay leaves

Place chicken pieces in a slow cooker. In a small bowl mix the onion, garlic, soy sauce, and vinegar, and pour over the chicken. Add the peppercorns and bay leaves. Cook on Low for 6 to 7 hours. Depending on the fattiness of the chicken, you may end up with quite a bit of fat on the surface of the liquid, I prefer to skim some of it off so that it is not so greasy, but this is to your taste. Serve over steamed white rice.

Continue Reading "sunday supper: not a pretty picture"

Wednesday, January 07, 2009

short rib showdown: beer vs. wine


Short ribs are pretty much my favorite thing to braise when it's cold out. They are perhaps the main reason that beef will always win out as my favorite meat, despite my deep appreciation for all things porky. I have two favorite recipes for braising short ribs - one with red wine, and one with beer. I tend to prefer the red wine recipe, J-Cat prefers the beer recipe. This is pretty much the opposite of our actual drinking tastes, where I prefer beer and he prefers wine. I find that strange. In any case, I do love both recipes and since I will likely braise short ribs at least a few times this winter, this time I went for the beer braising because, well, I had beer in the fridge.

The key to this recipe is the combination of tons and tons of onions and a dark beer. The bitterness of the beer, the sweetness of the onions, and the profound beefiness of the short ribs is a truly glorious combination.


I, of course, eat this over rice, as I do with pretty much everything. You do want something to soak up the beery, oniony, beefy sauce. Obviously, mashed potatoes or bread would work just as well. Recipe after the jump:

BEEF SHORT RIBS BRAISED IN BEER
from "Staff Meals from Chanterelle" by David Waltuck and Melicia Phillips

3/4 cup canola or other vegetable oil
5 to 6 pounds beef short ribs, trimmed of fat
4 large onions, halved lengthwise and cut crosswise into thin slices
2 tablespoons sugar
2 tablespoons all-purpose flour
4 bottles (12 ounces each) dark ale or beer
8 cups chicken stock
4 bay leaves
Coarse (kosher) salt and coarsely ground black pepper, to taste

Heat 1/2 cup of the oil in a very large, heavy, flameproof casserole or Dutch oven over medium-high heat. Add only enough of the short ribs to fit into the casserole without crowding and brown well on all sides, 4 to 5 minutes per side. As the ribs are browned, transfer them to a platter and continue browning the remaining ribs in batches.

When all the ribs are browned and removed from the casserole, discard the oil from the casserole, but do not wash it (you want to keep those flavorful brown bits). Return the casserole to the stove. Add the remaining 1/4 cup oil and the onions and cook slowly, covered, over low heat until the onions are very soft but not browned, about 20 minutes.

Uncover the casserole and sprinkle the sugar over the onions. Cook, uncovered, stirring occasionally, until the onions have caramelized slightly and are just light brown in color, about 5 minutes. Sprinkle the flour over the onions and continue cooking stirring frequently, until the flour turns light brown, 3 to 4 minutes. Add 1 bottle of the beer and increase the heat to medium high. Bring to a boil, scraping the bottom of the casserole with a wooden spoon to loosen any browned bits.

Return the ribs to the casserole along with the stock, remaining beer, and bay leaves. Bring to a boil, skimming the top occasionally, then reduce the heat to low and cook, tightly covered, until the meat is very tender, 1 1/2 to 2 hours; you should be able to pull the bones from the meat with ease. Using tongs, transfer the ribs to a platter and let cool.

While the ribs cool, check the liquid in the casserole. If it's thick enough to coat the back of a spoon, it's ready to use as a sauce. If not, increase the heat to medium and reduce the liquid until it reaches the proper thickness. This may take up to an additional 15 minutes. Taste; the sauce should be slightly bitter, with a subtle, balancing touch of sweetness from the caramelized onions. Season with salt and pepper; remove and discard the bay leaves.

When the ribs are cool enough to handle, remove the meat from the bones. Discard the bones and return the meat to the casserole. Simmer until heated through, about 5 minutes. If you'll be serving immediately, skim the fat from the surface of the sauce; otherwise, refrigerate overnight and remove the hardened fat before reheating.

Continue Reading "short rib showdown: beer vs. wine"

Tuesday, December 30, 2008

pizza!


Two of J-Cat's overly generous Christmas presents are represented in this post: the pizzas are made with my new brick walled pizza oven, and the pictures are taken with my new Canon digital SLR (but give me a break, I don't know how to use it yet). Methinks someone was feeling guilty about all the nursing I had to do last month. But it's not like he doesn't benefit at least from the pizza oven. I turned out a batch of 3 small pizzas last night, with gloriously crispy crusts and melty cheese and the aroma of an actual pizzeria.


The first pizza turned out to be our favorite by far, a sauceless combination of brussels sprouts and sweet Italian sausage with fior di latte mozzarella. Pizza perfection. See what I mean about brussels sprouts obsession?


The second was a simple classic of tomato sauce, mozzarella, and parmesan. I was pretty happy with my thrown together pizza sauce, it really showed through on this one.


The third was the same as the second with the addition of spicy Italian sausage, and was the one that felt most like a pizzeria pizza. Overall I was really pretty thrilled with the results and how easy it ended up being. The hardest part was waiting for the dough to rise, but really it was an exceedingly simple dough. Recipes for the sauce and the dough after the jump:

THE SIMPLEST PIZZA DOUGH
Makes 4 8" pizzas or 3 10" pizzas, depending on the thickness of your crust.

3 cups all-purpose flour (up to 1/3 can be replaced with whole wheat flour)
1 packet active dry yeast
2 tsp salt
1 cup lukewarm water
2 tbsp olive oil

In a large mixing bowl, combine the dry ingredients and mix well. Add the water and oil and stir just until the dough comes together. Turn the dough out onto a lightly floured surface and knead for 2 minutes until smooth. Lightly oil the mixing bowl. Shape the dough into a ball and return to the mix bowl, turning to coat all sides with a bit of oil. Cover the bowl with plastic wrap and allow to rise for 1 to 2 hours until about doubled in size.

After rising, return the dough to the floured surface and press out the air. Divide into either 3 or 4 balls, depending on what size you want your pizzas. Cover the dough with the plastic wrap and allow to rest for another 20 minutes. In the meantime, preheat your oven as hot as it will get. Shape the dough by stretching or rolling to desired thinness. Top and bake for about 10 minutes on a pizza stone or perforated pizza pan until the crust is browned and crispy. Best served immediately.


THE SIMPLEST PIZZA SAUCE

1 15-oz can plum tomatoes, pureed (I just use an immersion mixer, but this can easily be done in a food processor)
1 tsp olive oil
1 tsp tomato paste
2 tsp salt
1 tsp freshly ground pepper
2 tsp dried oregano
1 tsp garlic powder

Heat olive oil over medium heat in a medium skillet. Add the tomato paste and allow to sizzle for a minute or two. Add the tomato puree and the seasonings. Bring to a strong simmer then lower to a light simmer until it reduces by about a half, approximately 20 minutes.

Continue Reading "pizza!"

Thursday, December 11, 2008

sunday supper: bolognese of my dreams


Marcella Hazan's magical bolognese. As far as I'm concerned, there is no reason to go looking for another recipe. This is exactly what you want bolognese to taste like, smell like, look like, sound like. This is the sauce you turn to when you're simply craving pasta in it's classic and true form. And the only thing difficult about this recipe is having the patience to cook it as long as you should - no shortcuts allowed. If I had one complaint - one teeny, tiny, probably sacrilegious complaint - it's maybe that this can be quite greasy. I know fat is a good thing and I use the fattier chuck meat, but I couldn't stop myself from skimming off a little bit of the fat as it cooked. I don't know, I have a problem. Recipe after the jump:


MARCELLA HAZAN'S PERFECT BOLOGNESE
From Essentials of Classic Italian Cooking

NOTE: I took a few liberties with ingredient amounts, which I've noted below. Still awesome.
1 Tbs vegetable oil
3 Tbs butter plus 1 Tbs for tossing the pasta
1/2 cup chopped onion
2/3 cup chopped celery
2/3 cup chopped carrot
3/4 pound ground beef chuck (I used a whole pound)
Salt
Black pepper, fresh from the mill
1 cup whole milk
Whole nutmeg
1 cup dry white wine
1 1/2 cups canned imported Italian plum tomatoes, cut up, with their juice (I used a whole 28 oz can)
1 1/4 to 1 1/2 pounds pasta (I used 1 pound of dried rigatoni)
Freshly grated parmigiano-reggiano cheese

Put the oil, butter, and chopped onion in the pot and turn the heat to medium. Cook until the onion's translucent, then add the celery and carrot and cook for 2 minutes more until coated well.

Add the ground beef, a large pinch of salt, and a few grindings of pepper; crumble the meat with a fork and stir until the beef has lost its raw, red color.

Now the cool part: add the milk and let it simmer gently, stirring frequently, until it has bubbled away completely. Add a tiny grating--about 1/8 teaspoon--of nutmeg and stir.

Add the wine, let it simmer until it's evaporated, then add the tomatoes and stir thoroughly to coat all the ingredients.

When the tomatoes begin to bubble, turn the heat down so the sauce cooks at the laziest of simmers (just an intermittent bubble here and there). Cook, uncovered, for 3 hours or more, stirring from time to time. While the sauce is cooking, you are likely to find that it begins to dry out and the fat separates from the meat. To keep it from sticking, continue the cooking, adding 1/2 cup of water whenever necessary. At the end, however, no water at all must be left and the fat must separate from the sauce. Taste and correct for salt.

Cook pasta, drain, then add the pasta to the sauce with the remaining tablespoon of butter. Toss to coat evenly and serve with grated parmiggiano-reggiano.

Continue Reading "sunday supper: bolognese of my dreams"

Wednesday, December 03, 2008

the upside of a thanksgiving chicken


Matzo ball soup, made from scratch. The carcass of our Thanksgiving chicken made a delicious soup that I believe has bone-healing properties. At least for my poor Jewish boy. He took one look at the soup and said "It looks just like my mom's!". I guess that's about as good a compliment as I could ask for from him. Recipe after the jump:

HOMEMADE CHICKEN MATZO BALL SOUP

For the stock:
1 chicken carcass
4 quarts water, or enough to completely cover the carcass
1 onion, halved
2 carrots, halved
2 ribs celery, halved
various fresh herbs, tied in a bouquet garni (I used thyme, sage, and rosemary. Use whatever you have on hand.)
salt and pepper, to taste

For the matzo balls:
1 cup matzo meal
3 eggs
2 tbsp oil
2 tbsp seltzer, optional
salt and pepper

For the soup:
1 recipe chicken stock
2 carrots, cut into coins
1 onion, diced
3 tablespoons fresh dill
1 recipe matzo balls

To make the stock: In a large stockpot, cover the chicken carcass with water. Add the onion, carrots, celery, and bouquet garni. Bring to a boil, then lower to a rolling simmer. Simmer for at least 3 hours. Season with salt and pepper to taste. Remove the carcass and set aside to cool. Remove the aromatics and discard. Strain if desired.

For the soup: after straining the stock, pick the chicken meat off of the carcass and add back to the stock with the carrots, onion and dill. Bring to a boil and add the matzo balls.

For the matzo balls: Beat the eggs and oil together, then add the matzo meal, salt, pepper, and seltzer and stir just until it comes together. Shape into small balls about 1-inch in diameter and drop into the boiling stock. Cook for 30 minutes. Season with salt and pepper to taste.

Continue Reading "the upside of a thanksgiving chicken"