Wednesday, June 30, 2010

in season: blueberry buttermilk scones


It's summer now, and summer is blueberry season. There's not much more that I can say than that I am obsessed with blueberries and eat them everyday when they're good. I eat them straight, I bake them into everything, I even toss them on salads. This is just a humble blueberry buttermilk scone. It doesn't get much better than this. And these are good for you. In the sense that they aren't BAD for you. Antioxidants and fiber and all that good stuff. Mostly, they're just good. Recipe after the jump:


BLUEBERRY BUTTERMILK SCONES

1 1/4 cup all-purpose flour
3/4 cup whole wheat pastry flour
1 1/2 tablespoon granulated sugar
2 1/2 tsp baking powder
3/4 tsp salt
4 ounces (1 stick) cold unsalted butter, diced
1 heaping cup fresh blueberries
zest of one small lemon
1/2 cup buttermilk
1 large egg, plus 1 large egg lightly beaten for egg wash
1/2 teaspoon pure vanilla extract
coarse sugar (like demerara) for sprinkling.

Preheat oven to 375 degrees. Line a baking sheet with parchment paper or a silicone mat.

Whisk together flours, granulated sugar, baking powder and salt in a large bowl. Add butter and rub with your fingers until mixture has the texture of course meal. Gently stir in blueberries.

In another bowl whisk together buttermilk, 1 egg , lemon zest and vanilla. Drizzle over flour mixture and stir lightly with a fork until the dough just comes together. Do not overwork the dough.

Turn out dough onto work surface and gently knead dough once or twice just to incorporate the flour. Pat the dough into a 1-inch thick round. Cut the round into approximately 10-12 wedges. Transfer to baking sheet.

Brush the top of each scone with egg wash and sprinkle generously with coarse sugar. Bake until golden brown and cooked through, roughly 25 minutes. Transfer scones to a wire rack to cool.

Continue Reading "in season: blueberry buttermilk scones"

Monday, June 21, 2010

in season: summer (spring) berry pudding


It is really freaking hot out today. We didn't have much of a spring, it's been so hot for so long already. Even though it was not technically summer until today, this berry pudding made a special spring appearance to help combat the weather and take advantage of the super sweet berries gracing the greenmarket.


Since it was still spring when I actually made this, my choice of berries leans toward the early season favorites - strawberries, blueberries, and sweet cherries. This super easy British classic takes modest ingredients and transforms them into an almost fancy dessert with just a little patience and pressure. It's almost as if the bread, soaking up those sweet juices, turns into cake and waits for you cold and refreshing in the fridge to delight you with a dollop of cream. And you don't even need to turn on an oven. Keep one of these in the fridge at all times this summer, choose the best variety of berries that you can find in the market, you won't regret it. Recipe after the jump:


SUMMER BERRY PUDDING

6 cups assorted seasonal berries (strawberries, blueberries, cherries, blackberries, raspberries, currants, etc)
3/4 cup sugar
1 tbsp kirsch
1 small bundle of mint
1 loaf of soft, dense sliced white bread, crusts removed (brioche also works great)

Prep any berries that need stemming or pitting, slicing any larger berries. In a medium saucepan, combine the berries with the sugar, kirsch, and mint bundle. Bring to a simmer over medium heat and cook until the juices release and the berries soften, about 8-10 minutes. Remove the mint bundle and discard, then set the berries aside to cool slightly.

Line a 6-cup pudding bowl with plastic wrap, leaving enough overhang to cover the opening once it is full. Line the bowl along the bottom and all the way up the sides with slices of bread, dipping the outer side of the bread into the berry syrup before placing. Be sure the bowl is completely lined, you will probably need to cut slices to size to fill gaps. Using a slotted spoon, fill the bowl with about 1/3 of the berries. Top with a layer of bread. Repeat the layering twice, finish with a cover of bread dipped in the syrup. Pour the remaining syrup over the top layer. Fold over the plastic wrap overhang. Cover with a plate, pressing down on the pudding. Top the plate with a heavy can to weight it down. Store in the fridge for at least 12 hours, but the longer you let it chill the better.

To serve, unmold the pudding and remove the plastic wrap. Slice into wedges and serve topped with fresh berries, a dollop of whipped cream, and a garnish of mint.

Continue Reading "in season: summer (spring) berry pudding"

Monday, June 14, 2010

ice cream garden


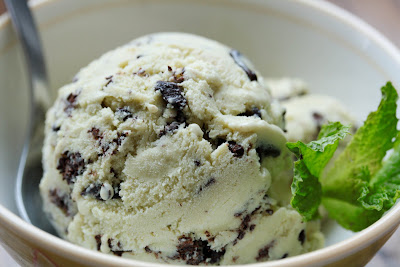
I don't know how it is that I had never made mint chocolate chip ice cream. It is easily my all-time favorite ice cream flavor. And now that I have made it and realize how much fresh mint blows away any store-bought mint extract-based green stuff, I may have to continually make this every few days.


Because J and I finished the whole quart in two days. QUART. In TWO DAYS. I'm not proud of that, but it was just so freaking good. Creamy and extra cool, with this added fresh grassy flavor that only real herbs could bring. I added the bittersweet chocolate in a straciatella style, by melting it, drizzling ribbons onto the softly frozen ice cream, and breaking up the chocolate by hand. This results in super crackly thin bits of chocolate, incredibly well distributed.


And look, it's actually green! Recipe after the jump:

MINT CHOCOLATE CHIP ICE CREAM
Adapted from the recipe by David Leibovitz

For the mint ice cream:

3 cups half and half, divided
3/4 cup sugar
pinch of salt
2 cups packed fresh mint leaves
5 large egg yolks

For the chocolate chips:

4 ounces bittersweet chocolate, chopped

1. In a medium saucepan, warm the sugar with 2 cups of the half and half, salt, and mint.

2. Once the mixture is hot and steaming, remove from heat, cover, and let stand for an hour to infuse the mint flavor.

3. Remove the mint with a strainer, then squeeze out as much liquid from the mint leaves as possible. Discard the mint.

4. Pour the remaining half and half into a large bowl and set the strainer over the top.

5. Rewarm the infused milk. In a separate bowl, whisk the egg yolks, then slowly add some of warmed milk to the eggs to temper, whisking constantly. Add the warmed egg mixture back into the pot of milk.

6. Cook the custard, stirring constantly with a heatproof spatula, until the mixture thickens and coats the spatula. If using an instant read thermometer, it should read around 170ºF.

7. Immediately strain the mixture into the cream, then stir the mixture over an ice bath until cool.

8. Refrigerate the mixture thoroughly, preferably overnight, then freeze it in your ice cream maker according to the manufacturer's instructions.

While the mixture is freezing, melt the chocolate in a small bowl over a pot of simmering water, or in a microwave oven on low power, stirring until smooth. Place a storage container in the freezer.

9. When the ice cream in the machine is ready, scribble some of the chocolate into the container, then add a layer of the just-churned ice cream to the container. Scribble melted chocolate over the top of the ice cream, then quickly stir it in, breaking up the chocolate into irregular pieces. Continue layering the ice cream, scribbling more chocolate and stirring as you go.

When finished, cover and freeze until firm.

Continue Reading "ice cream garden"

Monday, June 07, 2010

apparently, sade sang a song about cherry pie, too


It is confirmed, the teeniest touch of almond makes the flavor of cherries burst to the forefront. Of course, it does help to have beautifully sweet and plump cherries to work with. This cherry-almond pie was - if I can give myself a pat on the back - the BEST cherry pie I've ever had.


It is the essence of cherry flavor, the flavor that makes you understand what all of those artificial cherry flavors are trying to go for, but don't quite get right.


If you can manage to stop yourself from eating all of the cherries before they go into the pie (I think approximately the same amount of cherries went into the pie as went straight into my mouth), this is what you should do with lovely fresh cherries. It will ruin you forever for any store bought pie, or pie filling in a can, or those gut bomb pocket pies covered in glaze. THIS is what cherry pie should be, the only thing it should ever be. This pie is fantastic warm with vanilla ice cream, but was actually even better cold with nothing at all. Recipe after the jump:


FRESH CHERRY AND ALMOND PIE

1 recipe for a double crust 9-inch deep dish pie
2 pounds fresh cherries, pitted
4 tablespoons quick-cooking tapioca
1 cup granulated sugar
1/2 teaspoon pure vanilla extract
1/4 teaspoon almond extract
1 teaspoon kirsch
1/2 cup thinly sliced almonds
1 tablespoon butter, diced
3 tablespoons heavy cream, optional

Preheat oven to 400 degrees. In a large mixing bowl, toss the cherries, sugar, tapioca, extracts, and kirsch and let sit for 15-20 minutes.

Roll out the chilled pie dough for the bottom crust and line a deep dish pie plate, leaving 1/2 inch of overhang. Fill the pie with the cherry mixture, then sprinkle the almond slices over the fruit. Dot with the butter pieces. Cover with the top crust, crimp to seal, and cut slits to allow steam to escape. Brush the crust with the heavy cream. Bake in the preheated oven for 50-55 minutes until crust is golden brown and juices are bubbling. Allow to cool completely before slicing.

Continue Reading "apparently, sade sang a song about cherry pie, too"