Friday, September 09, 2011

hurricane muffins


I bought some water. I filled up the bathtub. I made sure the flashlights had batteries. And I baked some muffins.

I figured that Hurricane Irene would, at the least, bring some power outages or knock out cable and internet. To my surprise, none of that happened. I didn't imagine any dire circumstances, but I did imagine that we could be caught in a situation where we were stuck at home for a couple days with nothing to do but watch the cats sleep. So, foremost in my mind was making sure that we had plenty of junk food to tide us over.

It does seem that the prevailing food theme of Hurricane Weekend was comfort food. As the rain started rolling in and we were hit with a massive craving for Doritos, J-Cat volunteered to head out in the rain to get a bag, but did not anticipate that he would have to hit 4 different bodegas to find them, and then only in snack size bags. Whoever wanted Doritos next would find none within a 5 block radius of our place. (And I actually have confirmation that a friend in the neighborhood was forced to settle for Bravos, the horror! Sorry, Tom.)

Having secured our crunchy snacks, we were now fully equipped for the weekend - a massive pot of pasta and bolognese, a rice cooker full of rice, a bunch of hard boiled eggs, and these Chocolate Chip Muffins. Recipe after the jump:


CHOCOLATE CHIP MUFFINS

1/2 cup unsalted butter, melted and cooled
2 large eggs
1 cup half and half (or whole milk)
1 1/2 teaspoons pure vanilla extract
2 cups all-purpose flour
2/3 cups granulated white sugar
1 tablespoon baking powder
1/2 teaspoon salt
1 cup semisweet chocolate chips

Preheat oven to 375 degrees. Line a standard 12-cup muffin pan with paper liners, or grease the cups.

In a large mixing bowl, whisk together the eggs, half and half, and vanilla extract. In a another large bowl, whisk together the dry ingredients, then stir in the chocolate chips. Fold the wet ingredients and the butter into the dry ingredients, mixing just enough to combine. Do not overmix or you will have tough muffins.

Use an ice cream scoop to fill the muffins cups evenly. Bake in the preheated oven for 18-20 minutes, until a toothpick inserted in the center of a muffin comes out clean. Remove the pan to a wire rack to cool for 5 minutes, then remove the muffins from the tin and allow to cool further on the rack.

Continue Reading "hurricane muffins"

Friday, August 26, 2011

bibimbap


There is only one Korean restaurant in our neighborhood. It's okay, not great, and they charge $13 for bibimbap. $13! For a bowl of rice and veggies and a fried egg. Some of my Korean friends have told me that ordering bibimbap at a restaurant is silly anyway, because it's such a homestyle dish. I guess it's like going to a restaurant known for great seafood and ordering a boring roast chicken.

So I figured now is as good a time as any to make some homemade bibimbap, when there are lots of good veggies to choose from. Of course, the types of veggies in this dish vary from place to place and home to home, but I went fairly traditional and stuck to carrots, zucchini, spinach, napa cabbage, mung bean sprouts, and shiitake mushrooms. I went through the trouble of prepping each ingredient separately so as to get that classic picture of every vegetable in its own little quadrant, but being as how you just mix it all up before you eat, it seems fairly unnecessary if you have no one to impress. Recipe after the jump:


VEGETABLE BIBIMBAP
Serves 4

4 cups cooked short grain Asian rice
1 medium zucchini, julienned
2 medium carrots, julienned
1 cup mung bean sprouts
1 lb baby spinach
2 cups napa cabbage, chopped into thin strips
4 large shiitake mushroom, sliced thinly (if dried, rehydrate with hot water. If fresh saute for a couple minutes with a touch of sesame oil)
4 teaspoons dark toasted sesame oil, divided
1 tbsp white sesame seeds
4 eggs, fried sunny side up
salt, to taste
1/4 cup gochujang (Korean hot pepper paste), or to taste, served on the side

Bring a small pot of water to boil. Blanch the carrots for one minute and remove with a strainer. Do the same with the zucchini, then the mung bean sprouts. Set all aside while you prep the rest of the vegetables.

In a medium skillet, heat 2 tsps of the sesame oil over medium heat. Be careful not to overheat or it will smoke. Add the spinach leaves, a pinch of salt, and saute until wilted. Sprinkle with sesame seeds and set aside. Do the same with the napa cabbage, which will probably take a minute or two longer than the spinach. If you are working with fresh shiitakes, also saute them for a minute or two in the oil.

In a large bowl, fill the bottom with rice, then top with the vegetables, keeping each in their own section if you desire. Top with a fried egg and serve with gochujang on the side and a big spoon.

Continue Reading "bibimbap"

Thursday, August 18, 2011

great grains


I love big filling salads on a summer night, based around some good old starch. Pasta or grains, please. And with grains, there are endless choices. I do lots of salads with quinoa, wheat berries, different rices, freekeh, farro, bulgur, spelt; the list goes on and on. This week, it was barley, a grain I usually only use in soups, but has a wonderfully nutty flavor and satisfying bite when cooked and cooled.

The great thing about having a variety of grains in your pantry is how easy it makes improvising a meal after you've raided the farmer's market for the freshest veg you can find. There's always a base to work off of, they keep for ages, and they keep things interesting. Recipe for my barley, heirloom tomato, arugula, zucchini, mozzarella salad after the jump:


SUMMER BARLEY SALAD

1 cup whole grain barley
1 lb heirloom cherry tomatoes, quartered
1 medium zuchinni, quartered lengthwise and sliced thinly
3 or 4 big handfuls of baby arugula
1/4 cup flat-leaf parsley, chopped
1/2 lb fresh salted mozzarella cheese, cut into small cubes
salt and pepper, to taste

For the dressing:
juice of 1 lemon
1/4 cup extra virgin olive oil
salt and pepper, to taste

Bring 2 cups of water to a boil in a medium saucepot. Add the barley, bring down heat to a simmer, cover, and cook for 35-40 minutes until tender. (You can also soak your barley overnight, which cuts the cooking time down to about 15 minutes. You need less water to cook if you soaked it). Fluff the barley with a fork and set aside to cool well. You can cook the barley well ahead of time and cool it in the fridge so that it's ready for the salad any time.

In a large bowl, toss the cooled barley with all of the vegetables. Whisk together the dressing ingredients and dress to taste, adding more salt and pepper if needed. Top with the cubed mozzarella.

Continue Reading "great grains"

Wednesday, August 10, 2011

variations on a theme: apricot and almond crostata


It takes about an hour to bake a full-on pie, and with the summer we've been battling in the northeast, keeping the oven on for an hour is not advisable. But I really can't go very long without pie. Especially when it's high season for so many delectable fruits. The answer? A crostata. A rustic, free-form tart that bakes in half the time and totally satisfies the pie craving. A simple pate brisee crust, fresh fruit, a touch of sugar, and whatever complementary flavor you're in the mood for.


This time, the apricots at the farmer's market were both adorable and ripe, and I had a bag of sliced almonds that I wanted to use. I always end up pairing fruit with nuts nowadays, because I pretty much want some kind of crunch in everything I eat. Or, as Beth might tell you, because I love nuts. Recipe after the jump:

APRICOT AND ALMOND CROSTATA

For the pate brisee:
1 1/4 cups all purpose flour
1/2 teaspoon salt
1 tablespoon granulated sugar
1/2 cup (1 stick) (unsalted butter, chilled, and cut into 1 inch pieces
3-5 tablespoons ice water

For the filling
1 1/4 pounds fresh apricots
1/3 cup white sugar
1 teaspoon almond extract
pinch salt

Make the crust: Combine the flour, salt, and sugar in a food processor and pulse a few times to mix well. Add the cold cubed butter and pulse until mixture resembles a coarse meal. Add the ice water one tablespoon at a time, pulsing between spoons, only using as much as it takes to get the dough to come together. Turn the dough out onto plastic wrap, flatten into a disk, and refrigerate for at least 1 hour. When it is fully chilled, preheat your oven to 400 degrees.

Make the filling: Split the apricots along the seam and remove the pits. Slice each half into 2 or 4 pieces, depending on how large your apricots are. Combine in a bowl the the sugar, salt, and almond extract and toss to coat. Set aside while you roll out your dough.

Roll your dough into a 13-inch circle and transfer onto a sheet pan. Place the apricot slices in a decorative circular pattern from the center radiating to the edges, leaving at least 1 inch of uncovered crust. Sprinkle with the almond slices. Fold the edges of the crust over the fruit. Bake in the preheated oven for 35-40 minutes until the crust is golden brown and the fruit juices are bubbling. Serve warm with whipped cream or vanilla ice cream.

Continue Reading "variations on a theme: apricot and almond crostata"

Friday, June 24, 2011

not that i don't love pie: strawberry rhubarb cobbler


Sometimes I just don't have the time to make a pie crust. I'm a busy lady, and sometimes the craving for strawberry-rhubarb something or other hits at 6PM. I think that's why cobblers and crisps were invented.


I also like any excuse to eat a biscuit. This cobbler really does look like cobblestones, just like the cobblestones paving the streets of Rome. Where we'll be (finally) honeymooning this September! Woohoo!


Oh, and sorry this is essentially out of season already. To tell you the truth, I baked this back in May and uh...I've been busy. Recipe after the jump:

STRAWBERRY RHUBARB COBBLER

Fruit layer
4 1/2 cups rhubarb stalks trimmed of stringy layer and cut into 1-inch pieces
1 1/2 cups strawberries, stemmed and sliced
1/2 cup white sugar
2 Tablespoons of quick cooking tapioca
1 teaspoon of grated orange peel

Cobbler crust
2 Tbsp white sugar
1 cup all purpose flour
1 1/2 teaspoon baking powder
1/4 teaspoon salt
1/4 cup unsalted butter, cut into small cubes
1/4 cup milk
1 egg

Preheat oven to 350 degrees. In a medium bowl, mix together all of the fruit filling ingredients and let sit while you prepare the cobbler batter.

In another bowl, combine the sugar, flour, baking powder and salt. Cut the butter in with a fork or pastry cutter. Whisk together the milk and egg and slowly add to the batter, mixing just until moistened.

Pour the fruit mixture into a 2-quart casserole dish. Use a large spoon to drop the cobbler batter on top, you can make 4 large cobbles or 6 smaller cobbles, depending on the shape of your dish. Bake in the preheated oven for 35 minute or until the cobbles are golden brown and the fruit is bubbly.

Continue Reading "not that i don't love pie: strawberry rhubarb cobbler"

Monday, May 09, 2011

r is for ramps


Ramps have become code for "foodie". Perhaps not in the most flattering way. If someone asks me what I'm making for dinner and it happens to contain ramps, I get one of two reactions:

1. What the hell is a ramp?
2. You're such a f*&%ing foodie.

Why?


It's still not so easy to find ramps, you generally have to trek to a farmer's market or specialty produce store, but seriously I saw some in the Key Foods recently and that place is full-on ghetto. They are only in season for a couple of weeks, but I don't know if that's reason enough to find them snobbish.


Because, after all, what's not to like? Slightly oniony and a bit garlicky, those are two of the bestest flavors on the planet. To me, ramps are a sign that spring has really arrived, along with fresh peas, good strawberries and rhubarb. So last night's dinner was a simple pesto of peas, ramps, and lemon, followed by a strawberry-rhubarb cobbler. Call me a foodie, I don't care, at least my life is always delicious.

PASTA WITH RAMP AND PEA PESTO

1 1/2 cups fresh shelled English peas
1/2 pound wild ramps (about 6-7 medium-sized ramps), trimmed at the root end
zest of 1 lemon
1 large garlic clove, peeled and smashed
1/4 cup pine nuts
1/2 cup extra virgin olive oil
3/4 cup grated parmiggiano-reggiano cheese
1 tsp kosher salt, to taste
1 lb fettucine or other long flat pasta

Bring a large pot of water to boil. Blanch the peas for 3 minutes, then remove from the water with a skimmer to a bowl of cold water. Add the ramps to the boiling water and blanch for two minutes, also removing with a skimmer and setting aside. Add a handful of kosher salt to the water and bring back to a full rolling boil before adding the pasta, cooking as directed on the package or until al dente.

While the pasta is cooking, drain the peas and add 1 cup to the bowl of a food processor, reserving the remainder. Coarsely chop the blanched ramps and add to the food processor with the pine nuts, garlic, and lemon zest. Turn on the processor and begin to slowly drizzle half of the olive oil through the lid opening until a paste forms. Scrape down the sides of the bowl, add the salt and cheese and begin to process again. Continue drizzling the remaining oil until a shiny paste forms, you may not need all of the oil to reach your desired consistency.

When the pasta is done cooking, drain well, reserving about 1 cup of the pasta cooking water. In a large bowl, toss the hot pasta with the pesto, adding enough cooking water to loosen the paste. You want the pesto to coat the pasta well without being too thick and clumpy. Add in the reserved peas and toss. Serve with additional grated cheese and a drizzle of olive oil.

NOTE: This recipe makes more than enough for a pound of pasta, so store leftovers in an airtight container in the fridge, with a layer of olive oil on the surface to preserve the green color. It is excellent spread on crostini with some fresh ricotta cheese.

Continue Reading "r is for ramps"

Wednesday, April 20, 2011

j-cat's balls


Wow, you have a dirty mind, I was just talking about matzo balls. I made the soup, J-Cat made the balls, we ended up eating it on Sunday instead of waiting until Passover actually began because I wound up sick. Good timing.

The key to great chicken soup is a great chicken stock, and there's really nothing to it. I had roasted a chicken earlier in the week, so the carcass made the stock, and stock made from a previously roasted chicken just always seems to have a deeper flavor than one made of a boiled whole chicken. If you plan ahead, I also recommend making the stock a day ahead, straining and refrigerating, then skimming off the fat that rises to the top the next morning. Use this fat to make the matzo balls and you will discover a whole new world of amazing balls. Recipe after the jump:


CHICKEN AND MATZO BALL SOUP

For the chicken stock:
1 small whole chicken, 3-3.5 pounds, or the leftover carcass and meat of a larger roasted chicken (I had the carcass and about half the meat of a 4.5 lb chicken)
2 medium carrots, cut in large chunks
2 celery stalks, cut in large chunks
1 medium onion, peeled and halved
10 black pepper corns

Place the chicken in a large stockpot and cover with cold water. If using a previously roasted chicken, remove majority of the cooked meat and set aside to add to the completed soup, adding just the carcass to the pot. Set heat on high and bring to a boil. Lower to a simmer, add the remaining ingredients, and cover. If using a raw chicken, cook 45 minutes until the meat is cooked and easily comes off the bone. Remove the chicken, pull off majority of the meat and set aside to add to the completed soup. Return the carcass to the pot and continue to simmer for another hour. Strain the stock and discard the solids. At this stage you can let the stock cool completely, then refrigerate for later use. When the stock is fully cold, skim off the fat and use in the matzo balls.

For the matzo balls:
3 eggs
2 tbsp chicken fat
1/2 cup water
1 cup matzo meal
1/2 tsp baking powder
salt and pepper to taste

Bring the chicken stock to a boil in a large stockpot. Mix the eggs, fat, and water together. Add the matzo meal, baking powder, salt and pepper, and mix well. Let stand for 10 minutes. Form small balls with your hands (easiest if they're wet) and drop into the boiling stock. Reduce heat to a simmer, cover pot, and cook for 30 minutes.

For the soup:
2 medium carrots, cut into rounds
2 stalks celery, sliced
1 medium onion, diced
1/4 cup fresh dill, chopped
leftover cooked chicken, shredded into bite-sized pieces
salt and freshly ground pepper, to taste

About 10 minutes into cooking the matzo balls, add the carrots, celery, and onion and continue cooking. About 5 minutes before the matzo balls are ready, add the chicken, fresh dill, and salt and pepper.

Continue Reading "j-cat's balls"

Thursday, April 07, 2011

insisting on spring


Weather, what a tease. We had the briefest glimpse of warmth and sun, followed by a plunge back into the depths of a winter than just won't end. Did you know that one year ago today it broke 90 degrees in NYC? Yeah.

Anyway, enough with the winter, I refuse to acknowledge its death grip on the city. I will eat spring foods and I will not wear my winter coat or boots. I will make risotto with fresh peas and leeks and bright happy lemon, and that's that. Recipe after the jump:


RISOTTO WITH PEAS AND LEEKS

1 tbsp unsalted butter
1 tbsp olive oil
1 medium leek, white and light green parts only, thoroughly washed and sliced into half-rings
1 1/2 cups arborio rice
1 cup dry white wine
6 cups vegetable or chicken stock
2 cups fresh shelled peas
zest of one lemon
1 cup freshly grated parmiggiano-reggiano
salt and pepper, to taste
chopped fresh mint, optional

Heat the stock in a small saucepot and keep at a low simmer at a burner adjacent to where you will cook the risotto.

Heat the butter and olive oil in a large heavy skillet or saucepan over medium heat. Add the leek and saute until softened, about 2-3 minutes. Add the dry rice and saute to coat the grains with the fat. Add the wine and stir until fully absorbed. Add 1 cup of the hot stock and stir until absorbed. Continue adding the stock 1 ladleful at a time, stirring continuously until absorbed before adding the next ladle.

When the rice is almost al dente, about 30 minutes, add the peas. Continue to cook until peas are tender, about 5 minutes. Take off the heat, add the lemon zest and cheese and stir to incorporate. Test for seasoning and add salt and pepper to taste. Serve warm topped with chopped mint.

Continue Reading "insisting on spring"

Friday, April 01, 2011

it's not burned


It's balsamic. Four ingredients, 20 minutes, really tasty. I use chicken thighs because they are better. Really, they are tastier. Chicken breasts are boring. If you MUST use breasts, at least get bone-in skin on. And yes, in this case, eat the skin, otherwise it will not taste like the sauce. Skin is delicious, and after a couple minutes under the broiler this skin gets delightfully crispy and sticky from the balsamic. This cannot be easier nor tastier. One tip: when the balsamic is on the stove simmering away and reducing down, don't stick your face right over the pot. Recipe after the jump:


BALSAMIC GLAZED CHICKEN THIGHS

1 cup balsamic vinegar
3 cloves garlic, peeled and lightly smashed
1 tbsp chopped fresh rosemary
4 skin-on, bone-in chicken thighs (about 1 1/4 pound)
salt and pepper to taste

Preheat oven to 450. Combine the vinegar and garlic in a small saucepot and set over medium high heat. Bring to a light boil and allow to bubble until reduced to about 1/3 cup, about 10 minutes. Stir in the rosemary and set aside.

While the balsamic is reducing, set a heavy, oven-proof skillet over medium high heat. Season the chicken with salt and pepper. Place the chicken in the hot skillet skin side down and sear until browned, 3-5 minutes. Remove the chicken, pour off excess fat, then return the chicken skin side up. Place the skillet in the preheated oven for 10-15 minutes until cooked through.

Remove skillet from oven. Turn the oven to broil. Brush the chicken thighs with the balsamic, then set under the broiler until bubbly, about 2-3 minutes.

Continue Reading "it's not burned"

Thursday, March 24, 2011

purim for the aged


I only made one kind of hamantaschen this year - prune. It's not because prune is my favorite filling, although I do really love it. The sad truth is that I thought it might be a wise choice to counteract the "bagel jam", as J-Cat calls it. Bagel Jam is the digestive situation that arises when you buy a dozen bagels and only two people live in your house, so rather than actually cooking a meal you just keep eating bagels all weekend. I don't think I need to elaborate.


I'm happy to report that it seems my prune theory may have legs. I made the hamantaschen on Sunday evening - after about 18 hours of bagels - and by Monday morning I no longer felt like I was going to splode. You know you have entered middle age when you start planning your desserts around your digestive system. All foods must serve a double duty. It's a sad state of affairs. Recipe after the jump:

PRUNE (LEKVAR) HAMANTASCHEN

For the dough:
(From the recipe by Shmil Holland, NY Times, March 15, 2011)
1 cup confectioners’ sugar
2 large egg yolks
8 ounces unsalted butter at room temperature, in small pieces
Grated zest of 1 lemon
2 1/4 cups all-purpose unbleached flour
Dash of salt
1 large egg, beaten, for the glaze

Put the confectioners’ sugar and the egg yolks in a food processor and blend. Add butter and lemon zest and process to blend. Gradually add the flour and the salt, pulsing until it forms a ball. Cover with plastic wrap and refrigerate for at least an hour, or overnight. Meanwhile, prepare the filling.

For the prune filling:
(From no particular recipe)
2 cups pitted prunes
1/2 cup orange juice
juice and zest of 1 lemon
1/2 cup sugar
1 tsp vanilla extract
1/2 teaspoon cinnamon
1/4 tsp ground cloves

Combine all filling ingredients in a small pot over medium heat. Bring to a low boil then lower heat to a simmer. Cover and allow to simmer until the prunes are very soft, about 30 minutes. Remove it from the heat and allow to cool to room temperature. Use an immersion blender or food processor to blend the ingredients into a smooth paste.

Assemble the cookies:
Preheat the oven to 350 degrees. Line two cookie sheets with parchment. Roll out the dough to 1/4-inch thickness and use a biscuit cutter or glass to cut 3-inch circles. Put a heaping teaspoon of the filling in the center of each, and press up the sides to form triangles. Brush the tops with beaten egg.

Bake until golden and dough is delicately firm all the way through, about 15 minutes. If trays are on different racks, switch them after about 10 minutes.

Continue Reading "purim for the aged"

Sunday, March 13, 2011

keeeesh


Where have I been?! It's been a crazy month. Exciting and stressful and rather tiring. And I haven't been doing much cooking. But it was definitely time to get back in the kitchen, and what better way than cooking some Sunday brunch for mom and brother #2 and sissy and my new baby niece who can't actually eat food yet but should be very familiar with the smells of sauteed leeks by the time she can.

Brunch is a meal that I admit I have not made much of in my life. This is because I am not generally the type of person who wants to wake up in the morning and...do anything. Especially on the weekend. From Monday through Friday my alarm goes off and I roll over and hit snooze and groan and snuggle my Opaw closer and scratch behind her ears while she purrs. I curse the moment the alarm goes off again and I actually have to get up. And I promise my kitty that come Saturday I will stay in bed and scratch her ears for much much longer.

But this morning I had thoughts of leeks and goat cheese in a rich, smooth quiche. And despite the fact that we lost an hour on this damned Sunday morning, I dragged my ass up and made some pie crust, and got everything else prepped while it chilled. It was extremely worth it. WORTH IT. Best. Quiche. Ever. Recipe after the jump:


LEEK & GOAT CHEESE QUICHE

2 medium leeks, white part only, washed thoroughly and thinly sliced
2 tablespoons unsalted butter
2 large eggs
2 large egg yolks
1 1/2 cups half & half
1 teaspoon kosher salt
1/2 teaspoon freshly ground pepper
1 pinch freshly grated nutmeg
4 ounces goat cheese, crumbled
2 tablespoons chives, snipped
1 par-baked pie crust (recipe follows)

Preheat oven to 375 degrees. In a medium saute pan, melt butter and saute leeks over medium heat until softened, about 10 minutes. While the leeks are cooking, combine the remaining filling ingredients, minus the goat cheese. When the pie crust is par-baked until light golden brown, remove from the oven and spread the leeks in the bottom of the crust. Crumble the goat cheese over the leeks. Sprinkle the chives over the cheese. Place the crust on the center rack of the heated oven. Carefully pour the egg mixture into the shell. Bake the quiche for 30-35 minutes until the top is light brown and a knife inserted one inch from the edge comes out clean. The center should be just set but still slightly jiggly.

PERFECT PIE CRUST
Makes crust for 9-inch single crust pie.

1 1/4 all purpose flour
1/2 teaspoon kosher salt
6 tablespoons cold unsalted butter, cut into small dice
4 tablespoons cold leaf lard, cut into small pieces
2-5 tablespoons ice water

In a food processor, briefly pulse together the flour and salt. Add butter and pulse until mixture forms chickpea-size pieces (3 to 5 one-second pulses). Add ice water 1 tablespoon at a time, and pulse until mixture is just moist enough to hold together.

Form dough into a ball, wrap with plastic and flatten into a disk. Refrigerate at least 1 hour before rolling out and baking.

To par-bake, lightly spray one side of foil with cooking spray and line the crust with the foil. Fill with pie weights, dry beans or rice to weigh it down. Bake in a 375 degree oven for 10 minutes until lightly brown on the edges.

Continue Reading "keeeesh"

Monday, January 31, 2011

it's bananas. b.a.n.a.n.a.s


The last few times we've bought bananas they have ripened so quickly we couldn't keep up with them. At one point we actually talked about buying one of those super dorky banana hangers. I don't know if I could do it, it seems so lame.

Worse things can happen than ending up with a bunch of overripe bananas and being forced to throw together an impromptu banana nut bread. With this bread, which I baked late last night after a day of more meals than were truly necessary, I felt the need to be a little healthier. I decided to try out that applesauce trick to cut down on the butter in the recipe. After all, I have a ton of homemade applesauce that I keep making whenever we have a big snowstorm and I'm bored at home, which lately has been every 4 days or something. I also used only egg whites, and a mixture of whole wheat and white flours. Now I've never done this "low-fat" baking thing and I was expecting a result like those weird chewy almost plastic feeling fat free bran muffins I've had in the past, but to my surprise, I couldn't tell at all. AT ALL! It tasted exactly the same as any other banana bread I've ever made. Of course, I did still use some butter, I'm not insane, so this is by no means fat free (there's also those walnuts), but I figure a couple of small concessions is good in the long run and even better is not even noticing those concessions at all. Recipe after the jump:


LOWISH-FAT BANANA NUT BREAD

6 ripe medium bananas, mashed
1/2 cup unsweetened apple sauce
1 1/2 cups whole wheat flour
1 cup unbleached all purpose flour
1 1/2 tsp baking soda
1/2 tsp salt
4 tbsp unsalted butter, softened
3/4 cup raw cane sugar, or light brown sugar
4 large egg whites
1 tsp vanilla extract
1 cup chopped walnuts
baking spray

Preheat oven to 325°. Grease 9x5 inch loaf pans with baking spray.

In a medium bowl, whisk together flour, baking soda and salt. Set aside.

In a large bowl cream butter and sugar with an electric mixer. Add egg whites, bananas, apple sauce and vanilla, and beat at medium speed until thick. Scrape down sides of the bowl.

Add flour mixture and then blend at low speed until combined. Do not over mix. Gently fold in the chopped walnuts.

Pour batter into loaf pan and bake on the center rack for 60-70 minutes, or until a toothpick inserted in the center comes out clean.

Let bread cool in the pan for 5 minutes, then invert and remove bread to finish cooling on a wire rack. Allow the bread to cool at least 20 minutes before slicing.

Continue Reading "it's bananas. b.a.n.a.n.a.s"

Tuesday, January 25, 2011

this is not a recipe


The nerve of me, going weeks without posting, then finally returning with this non-recipe of a recipe, this epitome of culinary laziness. And one that seems dreadfully off season considering the frigid weather we have been doomed with of late.


But, you see, I am so seduced by these types of recipes, these classics of American kitchen convenience. Growing up with two immigrant parents who raised us on a predominantly Chinese diet, these foods are the exotic, the unknown, and are the joy to discover as I've grown up and moved away from that home. It was not until just a couple of years ago that I had ever even heard of monkey bread, or tater tot casserole, or chess pie. I remember the revelation of rhubarb when I first tasted a pie sent to my friend by his mother while we were at camp in Michigan. Even those American classics that my parents attempted to adopt into our menu - meatloaf, spaghetti, burgers - were always tweaked with Asian flavors. Not to say the tweaks weren't great, they invariably were. I grew up loving my mother's meatloaf, and have always been deeply disappointed with any truly American meatloaf I've come across. The first time I tasted broccoli cooked by a friend's mother, I understood why most children hated what had always been my favorite vegetable. But these American classics have always appealed to me, and especially those that came into being during the push towards convenience food.


The ice box cake is a double whammy of an American classic. Just the name alone, "ice box cake", has the quaintness of the past. How far back into our history do you have to go to find people who called it an ice box? Though the real origin of ice box cake dates back at least to the 1930's, the cake that most Americans know and love is a 1950's revival of the classic. My first introduction to the ice box cake was as recently as a year or two ago and was the version popularized by Nabisco, on their packages of chocolate wafers. I've never even tasted a Nabisco chocolate wafer, apparently they are not so easy to find in stores these days, but I understand they taste like a thin oreo without the cream. The cake is no-bake, perfect for hot summer weather, and I was stunned when I learned how simple it was to make. Make up a bunch of whipped cream, maybe sweeten it a touch and a dash of vanilla. Make layers of chocolate wafers and alternate with whipped cream. Stick it in the fridge for a few hours. Voila. Cake.


If you think about it for a moment, you realize that it is silly and lazy, but genius all the same. How could it not be good? My favorite cakes are iced with whipped cream anyway. The cream softens the wafers until they are basically the texture of cake. And the best part, what I consider the ultimate 1950's coup of convenience recipes, is when you slice the cake and reveal fantastic zebra stripes, that look so much fancier than it has any right to look.

And the bittersweet side of the story this time is that I never did find Nabisco wafers, and instead used the Swedish Anna cookies, which come in such a great variety of flavors that I look forward to making plenty of ice box cakes come summer. Why is not finding Nabisco wafers bittersweet? Well, because for the past four years, I've worked at the Chelsea Market, the building that once housed the original National Biscuit Company factory, Nabisco. And as I walked out of the factory for the last time on Friday, bidding farewell to a hugely significant chapter of my life and anxious about a new adventure, a new step, and new world at my doorstep, I wondered how many of those blasted wafers were made within those walls back in the day and how ridiculous it is that I can't find them in any store in NYC.

Non-recipe after the jump:

CHOCOLATE ICE BOX CAKE

4 cups heavy whipping cream
4 tbsp confectioners sugar
1 tsp pure vanilla extract
2 9-ounce boxes of Nabisco chocolate wafers, or 3 5.25-ounce boxes of Anna chocolate wafer cookies

Whip the whipped cream, sugar and vanilla extract to soft peaks. On a large serving plate, lay down 7 wafer cookies in a circle, placing an 8th in the middle. Spread the cookies with 3/4 cup of the whipped cream. Repeat the layers of cookies and whipped cream until the cake is as tall as you like. Finish with a layer of whipped cream. Refrigerate for at least 6 hours, or overnight. I crushed up all of the broken cookie pieces and sprinkled them on top for decoration, shaved chocolate is also a nice garnish. Any garnish should be added just before serving.

Continue Reading "this is not a recipe"

Wednesday, December 29, 2010

this one's for beth: nut balls


Buttery, nutty, shaped like a ball. A little snowball, appropriate for the blizzard apocalypse we are still trying to dig ourselves out of here in NYC. It's one of the most basic, classic holiday cookies and one of my all time favorites. It also comes together really quickly, and with ingredients that most of us always have in our pantry.

Be careful not to overbake these so they don't dry out. They are fragile while hot and may seem overly crumbly, but given some time to chill out, they almost melt back into a comfortable little morsel of butter and nuts and that faint dusting of powdered sugar. Don't inhale when you take a bite. Don't wear black. Recipe after the jump:


OLD-FASHIONED WALNUT BALLS

1 cup butter
1/3 cup brown sugar
1 teaspoon vanilla
2 cups flour, sifted
1/2 teaspoon salt
2 cups finely chopped walnuts
powdered sugar

Preheat oven to 375 degrees. Cream butter, sugar, and vanilla until fluffy. Sift flour and salt together, and mix into creamed mixture. Stir in walnuts. Shape dough into smalls balls, about the size of a walnut (maybe 1 to 1 1/2 inches in diameter. I used a small scoop). If you have the time, you can freeze the balls for 20 minutes or so, this helps them hold their ball shape a little better when baked. Bake on an ungreased cookie sheet at 375 degrees for 11-13 minutes. Let rest on cookie sheet for 5 minutes, then use a spatula to transfer to a wire cooling rack. When still warm but cool enough to handle, roll in powdered sugar.
Makes about 4 dozen.

Continue Reading "this one's for beth: nut balls"

Wednesday, December 22, 2010

10 minute dinner: garganelli with zucchini and ricotta salata


It's the week when you scramble to make and/or buy presents for everyone on your list, plan the necessary baking, realize at the last minute that you have all the presents but nothing to package them in, attempt to keep the cats out of the strange big tree in the living room. The last thing I think about is what to make for dinner. So it's a good week for a 10-minute dinner. It's not exactly zucchini season, but I occasionally break with seasonality to bring a bit of brightness to the beginning of winter. Recipe after the jump:

GARGANELLI WITH ZUCCHINI, LEMON, AND RICOTTA SALATA

1 lb garganelli or similar short pasta (penne or cavatini is great for this)
2 tbsp extra virgin olive oil
1 medium onion, diced
3 cloves garlic, minced
2 medium zucchini, quartered lengthwise then sliced into 1/4-inch pieces
juice of 1 small lemon
1/4 cup flat-leaf parsley, minced
salt and pepper, to taste
1/4 cup grated ricotta salata

Boil a large pot of salted water for the pasta. When the pasta goes in, heat the olive oil over medium high heat in a heavy bottomed saute pan or large skillet. Saute the onions until beginning to soften, about 5 minutes. Add the garlic and saute another minute. Add the zucchini and saute until tender crisp, about 5 minutes. Add the lemon juice and season to taste with salt and pepper. When the pasta is al dente, drain and add to the pan with the zucchini. Toss to mix well, then add the parsley. Serve top with the grated ricotta salata.

Continue Reading "10 minute dinner: garganelli with zucchini and ricotta salata"

Wednesday, December 08, 2010

smokey beans


At what point do I just rename this blog "Beans and Baking"? More beans! It's cold outside. It's the season for stewing and braising and having pots bubbling away on the stove for hours, perfuming your home with the aroma of cozy. These beans are extra warm from the added smokiness of chipotle. A bit of kick and heat, tons of flavor, it transforms the humble black bean into the ultimate comfort food. Mound some on top of some rice, top with fresh cilantro and a dollop of sour cream, maybe a squeeze of lime or even some raw minced red onion.

And as with every giant pot of beans, leftovers go very far. Wrap these beans up in a tortilla with leftover rice, some raw sliced red cabbage, sour cream, shredded cheese, maybe some guac and salsa. Recipe after the jump:

SMOKEY CHIPOTLE BLACK BEANS

1 lb dried black beans
1 tablespoon canola oil
1 medium onion, chopped
4 cloves of garlic, chopped
1 carrot, chopped
4 chipotles in adobo, chopped
1/2 teaspoon of cumin
1/2 cup cilantro plus additional for garnish, chopped
1 tablespoon tomato paste
1/4 cup fresh lime juice
Six cups of water
Two cups of vegetable broth
Salt to taste

Soak the beans covered by two inches in cold water for at least 6 hours or overnight. Drain the soaked beans.

Combine the onions, carrots and garlic in a food processor and pulse until finely minced. In a large heavy dutch oven over medium heat, sauté the "sofrito" in oil for a few minutes until fragrant. Add the beans, chipotles, and 1/2 cup cilantro.

Cover beans with water and broth, bring to a boil, and then reduce heat to low. Stir occasionally.

After 1 1/2 hours, add the cumin, tomato paste, lime juice, salt and remaining cilantro and cook for 30 more minutes or until beans are tender. Serve over rice garnished with chopped cilantro and a dollop of sour cream or crema.

Continue Reading "smokey beans"

Friday, December 03, 2010

autumn in a jar


I'm almost ashamed that I made something already ridiculously simple to make even simpler. How lazy can I be? I can try to justify this by claiming that there's an additional upside to making applesauce in a slow cooker than just convenience; it's the way that it perfumes your house with the aroma of coziness for 5 hours.

Peel some apples, chop them up, throw them in a crockpot with a touch of cider, some spices, some sugar, and then do nothing. Make sure to eat this while it is still warm, that's the most important bonus of making your own applesauce. Recipe after the jump:


SLOW COOKER APPLESAUCE

8 apples, peeled, cored, and sliced*
1/3 cup apple cider or water
juice of one lemon
1/4-1/3 cup cane sugar, to taste (amount will vary depending on your apples)
1/2 tsp ground cinnamon
1/4 tsp ground nutmeg
pinch ground clove

Place the sliced apples in the slow cooker with the apple cider and lemon juice and set on low for 4-5 hours. About 30 minutes before cooking is complete, taste the sauce and add sugar to taste. Add the remaining ingredients and let cook for the remaining 30 minutes. If desired, blend with an immersion mixer to make smooth. Store in the refrigerator in airtight containers, or jar for long term storage.

*Note: I always use a combination of apples for depth of flavor, like macoun, empire, cortland, fuji, honeycrisp, golden delicious. Whatever you love, or whatever you have that is past its raw eating prime.

Continue Reading "autumn in a jar"

Monday, November 08, 2010

presenting perfect pear pie


When you've made a few too many apple pies and need a change - but not a huge one - make a pear pie instead. Maybe don't even mention that this is a pear pie when you serve it and see the thoughtful and slightly confused looks on people's faces when they taste it.


Use fairly firm anjou pears for a stunning texture and sweet, mild flavor. Grate a pile of fresh nutmeg. Make a thick, rustic pie crust, preferably with lard and butter. Serve warm or cold, with ice cream or whipped cream, or with nothing because it's that tasty. And that's it. Pears and nutmeg, whoulda thunk? Recipe after the jump:


ANJOU PEAR AND NUTMEG PIE

2 1/2 lb firm-ripe Anjou pears, peeled, cored and sliced into 1/4-inch slices
3 tablespoons all-purpose flour
1/2 teaspoon freshly grated nutmeg
1/8 teaspoon salt
2/3 cup plus 1 tablespoon sugar
1 tablespoon fresh lemon juice
1 recipe pie crust for a double crust 9" pie
1 egg

Prepare the dough for the crust and set to rest in the refrigerator for at least one hour. In the meantime, prepare the pears and toss in a large bowl with the flour, nutmeg, salt, lemon juice, and 2/3 cup sugar. Set aside to prep you crusts.

Preheat oven to 425F. Roll out the bottom crust and line a 9" deep-dish pie plate, trimming the overhang to about 1/2 inch. Fill the crust with the pear mixture. Top with the second crust, trim, and crimp the edges. Cut a cross in the middle of the top crust and fold back the corners to expose a square. Brush the crust (but not the edges) with a beaten egg, then sprinkle the remaining tablespoon sugar over top.

Bake pie on a baking sheet at 425F for20 minutes, then lower the temperature to 375 and bake for an additional 45-55 minutes, until filling is bubbling and crust is golden brown. Cool the pie on a rack for at least 2 hours before serving.

Continue Reading "presenting perfect pear pie"

Monday, November 01, 2010

pumpkin for halloween. or squash, whatever.


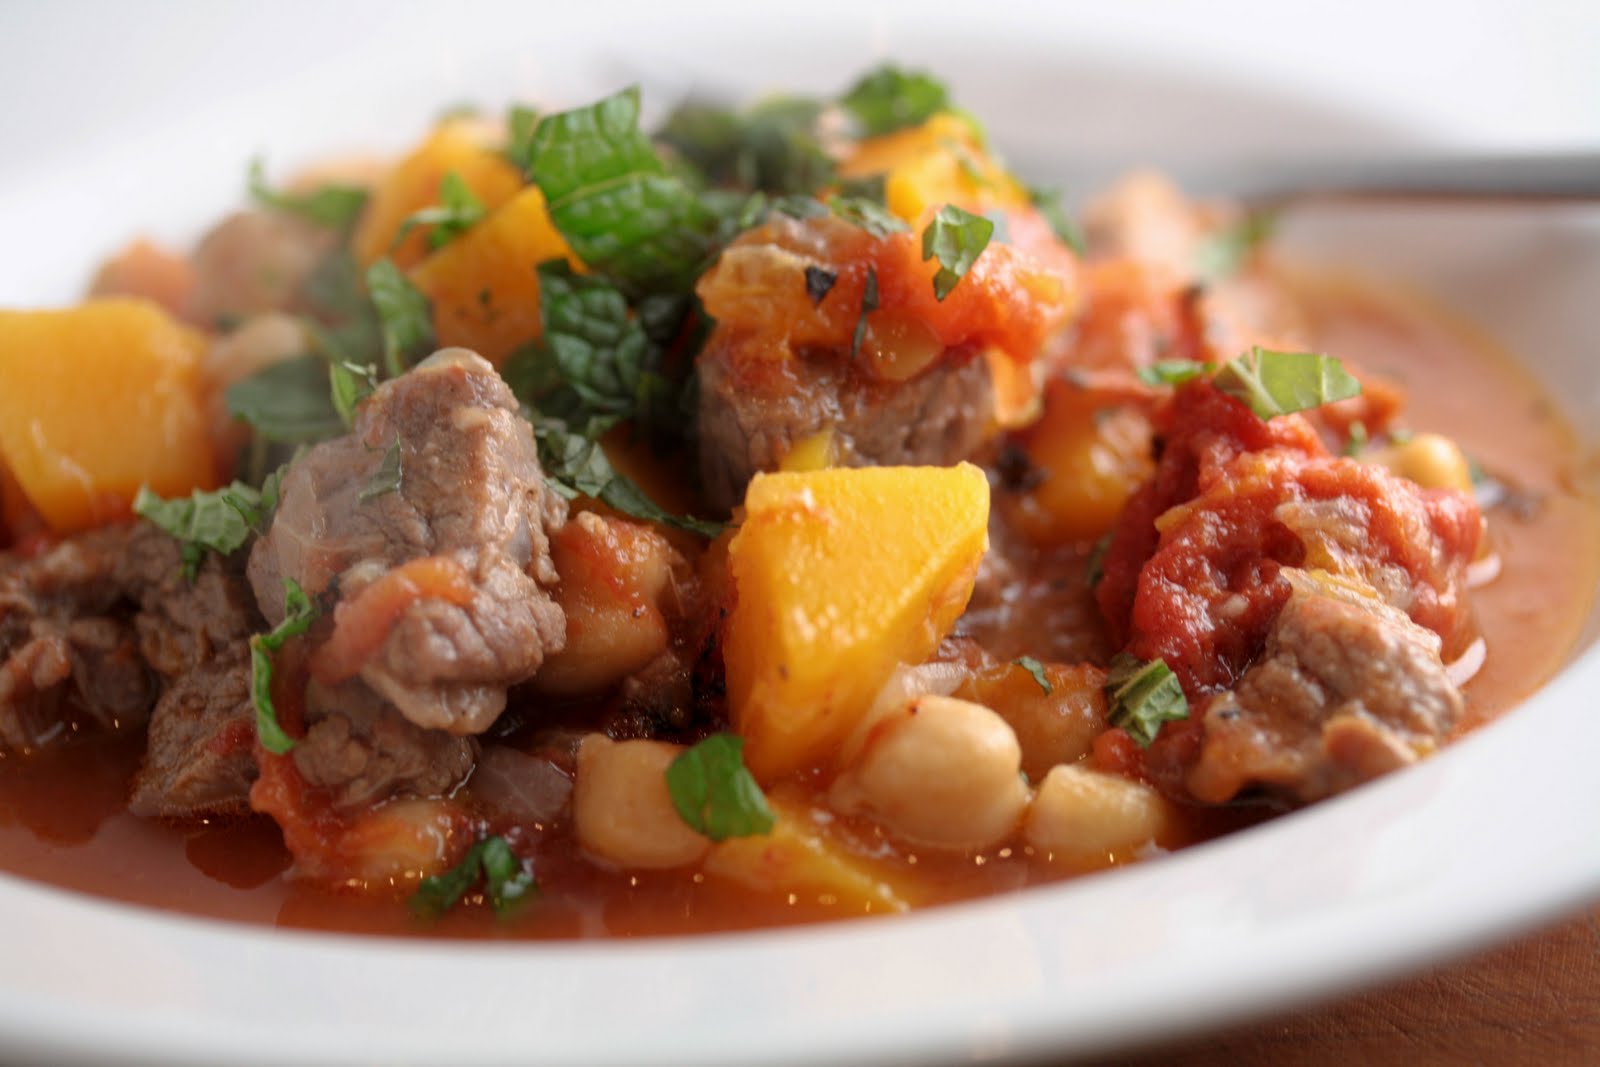
Other than the bag of mini-Kit Kats and a showing of Psycho at Film Forum on Friday night, Halloween passed in our household without much notice. We are fairly party pooper-ish about Halloween, due mostly to laziness about putting together costumes. When most of the world was out partying on Saturday night, we were out seeing that movie about Stephin Merritt and The Magnetic Fields. Stephin Merritt is kinda spooky. Then for Halloween proper, the extent of celebrating was including pumpkin in my Moroccan Lamb Stew. Technically it was butternut squash, but that's close enough. And Opaw hissed at least once. Happy Halloween!


My main catalyst for the lamb stew was a jar of preserved lemons that has been criminally neglected. I guess I go through stages and have a tendency to forget how magical they are. I want to dab preserved lemon behind my ears, the scent of them is so intoxicating.


I also really wanted to make some homemade harissa, because I always buy that stuff prepared and it's so silly to do so. I already have every ingredient in my house, and it takes all of 2 minutes to throw it together. Plus, I had the perfect little jar to pour it into, which brings me more satisfaction than one might think.


Tender lamb, chickpeas, squash, warm aleppo pepper, tomatoes for balance, golden raisins for a hint of sweetness, preserved lemons for tang, and a sprinkle of fresh mint to wake up the whole combination. The weather is finally cooling down, and this is the dish to warm you up. Recipe after the jump:


MOROCCAN LAMB STEW WITH PRESERVED LEMONS AND HARISSA

2 pounds lean shoulder of lamb, cut into 1-inch cubes
Kosher salt and freshly ground black pepper
2 tablespoons olive oil
1 medium onion, chopped
2 cloves garlic, minced
2 tablespoons harissa sauce (recipe follows), plus more for serving
4 cups peeled, uncooked butternut squash in 1/2-inch cubes
1 28-ounce can whole peeled tomatoes, drained and chopped
1 15-ounce can cooked chickpeas, drained and rinsed
1 preserved lemon, rind and pulp finely diced, plus additional pulp from 1 preserved lemon
1/4 cup golden raisins
1/4 cup fresh chopped mint for garnish

Cooked couscous or bulghur for serving.

Season the lamb cubes with salt and pepper. Heat the olive oil in a large dutch oven set over medium-high heat and cook the lamb, stirring, until lightly browned, about 5 minutes. Add the onion and garlic and continue to cook until the onion is soft. Add the 2 tbsp of harissa sauce and cook another 5 minutes.

Add 2 cups water, bring to a boil, lower heat and simmer, covered, until the lamb is tender, about 45 minutes. Add the squash, tomatoes, chickpeas and additional water to almost cover the ingredients. Simmer, uncovered, until the squash is tender, about 20 minutes.

Stir in the preserved lemon and raisins and cook another 2 minutes. Remove from the heat, garnish with mint and serve with couscous or bulghur and more harissa on the side.

Serves 4-6.

HARISSA SAUCE

1/2 cup olive oil
3 tbsp tomato paste
2 tbsp fresh lime juice
1 tbsp Aleppo pepper
1 tsp cumin
1/2 tsp coriander
1/4 to 1/2 tsp cayenne pepper, depending on desired heat level
1/4 tsp kosher salt

In a small bowl, whisk together all the ingredients. Let sit at least an hour before serving with lamb stew.

Continue Reading "pumpkin for halloween. or squash, whatever."

Monday, October 25, 2010

life events and lemon loaf


Straddling the line between savory and sweet, it's where I often love to be. It's a bit cake, a bit bread, bright lemon, woodsy rosemary, fruity olive oil, a touch of salt. It's unexpected.

Foods that surprise me are often the ones I find most memorable. Unusual flavor combinations, strange ingredients, or foods that don't sound like they would work, but they just do. Lemon, rosemary, and olive oil is not a particularly unusual combination, but perhaps in the context of a cake it's a little surprising.


It's corny to say, but surprising combinations are a lot like J-Cat and me. Who woulda thunk, 13 years after first meeting, after all that time that I thought we were a combination that didn't work, we did. So we did a little surprising of our own a couple of weeks ago when we went here:


The rest is history, and the recipe is after the jump:

LEMON ROSEMARY OLIVE OIL LOAF

4 eggs
3/4 cup granulated sugar
zest and juice of 1 lemon
1/2 cup extra virgin olive oil
1 1/2 cups all-purpose flour
2 tsp baking powder
1/2 tsp salt
2 sprigs rosemary leaves, finely chopped

Preheat the oven to 350 degrees. Grease a loaf pan or line with parchment paper. Using a hand mixer, beat eggs in a large bowl until frothy, about 1 minute. Add the sugar and beat another couple of minutes until thick and pale. Add the lemon juice, zest, and olive oil and mix until well incorporated.

In a separate bowl, whisk together the flour, baking powder, salt, and chopped rosemary. Add the dry ingredients into the wet, stirring with a wooden spoon just until incorporated. Pour into prepared loaf ban. Bake in center of oven for 35-40 minutes until golden brown.

Continue Reading "life events and lemon loaf"