Wednesday, January 30, 2008

sub obsession

J-Cat and I have been on the quest for a great Italian Sub sandwich for a while now. Despite living in a very Italian neighborhood, we just weren't happy with any of the ones we've tried. There are so many different interpretations of an Italian Sub, nobody seems able to agree on a name much less a standard ingredient list. I say "sub", many say "hero", some even say "combo". In other parts of the country they freakishly call these things "hoagies" or "grinders". But J-Cat and I grew up in the same place, and we grew up with a pretty specific idea of what an Italian Sub should be. Now, you will rarely catch one of us saying that we miss anything about Rockland County, but we came to the realization that they did make awesome Italian Subs up there, and we're positively despondent that we can't seem to find the exact same style of sandwich around here. How is this possible?

It's not that the subs we've tried around here are bad exactly, there's just always some element that isn't quite right. The bread, the combination of meats, the dressing, the fixings. It's so frustrating that after eating dozens of subpar subs, we've decided to take matters into our own hands.

So this weekend, we assembled the ingredients for what we consider the ultimate Italian Sub and did it our way. We were so happy with the results that we ate an obscene amount of sandwich, and decided that our home version is about 90% right. Our Italian Sub Philosophy:

1. The Foundation: The bread is perhaps the one element that was not as perfect as we wanted. It's the trickiest element. I think it needs to have a bit of a crunch to the crust, but too much and you're ripping up your upper palate. But too soft a bread and it gets all soggy from the dressing. There's a happy medium in there and we're determined to find it. In any case, it needs to have a soft inside to soak up the flavors.

2. The Meats: There are certain meats that are a hard and fast rule in Italian Subs. You must have Genoa Salami, you must have Hot Capicolla. The third meat (and generally there are three) should be some type of ham, but I'll allow that a couple of different styles could be acceptable. A simple ham works fine, a prosciutto might be too salty, a more bistro-style ham that falls somewhere in between is perfect. Some believe that Mortadella has a place in the Italian Sub. I'm not opposed to that, but I don't think it's necessary, and I definitely don't think you can substitute regular bologna in its place. There should be no pepperoni. Sorry, it just doesn't belong on this sandwich in my opinion. Between the salami and the capicolla, the pepperoni would just be over the top. In any case, the meats have to be sliced as thinly as possible.

3. The Cheese: Provolone. End of story.

4. The Fixings: Lettuce and onion are necessities, tomatoes are optional for me. I just don't like tomato on sandwiches. The big thing with the lettuce and onion is that they have to be shredded - truly shredded - so that the next ingredient can mingle properly. And I hate to say it because I know many would disagree, but peppers have no place on an Italian Sub.

5. The Dressing: Red wine vinegar! You cannot make an Italian Sub without it. No Balsamic, no white vinegar, no mustard. No! It must be red wine vinegar! And lots of it, on the bread, and on the lettuce. Olive oil, too, of course, plus a sprinkling of dry oregano, salt and pepper. The perfect finishing touches.

Continue Reading "sub obsession"

sunday supper: tried and true

Sunday supper was a big production this week, but alas, no pictures because I had company. At least, no pictures of anything cooked. Gene and Olivia brought Mom over and I cooked a three course meal. As is my way with entertaining, all of the dishes I made were tried and true. I just don't take chances with new recipes when feeding people other than myself and J-Cat. The meal started off with a Butternut Squash and Carmelized Onion Galette, which I blogged about a few months ago. That thing is so good we would have been happy eating it as the main course, if I had made three times as much.

Course two was Short Ribs Braised in Red Wine, served over rice, with a side of Oven-Roasted Brussels Sprouts. This is a favorite recipe of mine, and I chose it because it's simple and cooks long and slow, leaving me free to work on the other courses while it braises. Also, everyone loves short ribs, how could you not?


Dessert was an Olive Oil Cake, served with vanilla ice cream and fresh blueberries. Gene also sniffed out some leftover Semifreddo when going back for more ice cream, so he got the double dessert treatment. The olive oil cake is a favorite of mine for its simplicity and unique flavor. The flavor of the olive oil is unexpected and rich without being overwhelming. It's my kind of dessert. The recipe can be found in my favoritest of of favorite cookbooks - Essentials of Classic Italian Cooking by Marcella Hazan.

Recipe for the short ribs after the jump:

SHORT RIBS BRAISED IN RED WINE

Ingredients
4-5 pounds beef short ribs
2 tbsp olive oil
1 bottle (750mL) dry red wine
3-4 cups beef stock
1/4 cup balsamic vinegar
1 tbsp chopped fresh rosemary
1 tbsp chopped fresh thyme
1 tbsp chopped fresh tarragon
1 tbsp cornstarch
salt and pepper

Preparation
Heat olive oil in a large stockpot or dutch oven over high heat. Generously salt and pepper the meat. Sear the short ribs on all sides in batches, taking care to not crowd them in the pot. Set ribs aside. Deglaze the pot with some of the red wine, scraping the browned bits of meat from the bottom of the pan. Return the ribs to the pot, add the rest of the red wine and the beef stock, enough to barely cover the ribs. Add the vinegar and herbs, bring to a boil, then lower to a strong simmer and cover. Simmer for 2 hours or until meat is very tender and falling off the bone.

Remove the meat from the pot and set aside. Remove about 1/2 cup of the simmering liquid and mix well with the cornstarch to make a slurry. Pour slurry back into the pot and mix well. Raise the heat and bring to boil, allowing the liquid to thicken and reduce. Adjust seasonings to taste. If desired, you can remove the bones and any of the tough connective tissue from the short ribs before returning them to the pot. Add ribs back to the pot when the sauce is beginning to thicken and continue to simmer until heated through and the sauce has reached desired consistency. This is a matter of taste, you might want to thicken a lot to approach a gravy, or you might be happy with a thinner sauce. Serve the ribs over rice, mashed potatoes or polenta.

Continue Reading "sunday supper: tried and true"

Friday, January 25, 2008

it's semi-freezing outside


I do have an ice cream maker, but this is different. The last two times we had dinner at nice Italian restaurants, we were served a pre-dessert dessert of Semifreddo with Strawberry Soup. Two different restaurants, two extremely similar dishes, both delicious. It's a texture thing, Semifreddo is certainly denser than ice cream because it's not churned, yet there was a lightness to the flavor that has been haunting my dreams ever since. The whole point of Semifreddo is that it's easy to make, and indeed, that's very true.


I made a custard-style Mascarpone Semifreddo with a lemony background, served with raspberry "soup". The prep took all of 15 minutes; it's the 8+ hours of freezing time that will really kill you. Or maybe the fact that there are whole eggs that never actually get cooked could be what kills you, but I takes risks for deliciousness. It's worth it. Recipe after the jump:


MASCARPONE SEMIFREDDO WITH RASPBERRY SOUP

Ingredients
For the Semifreddo:
1/2 pound (about 1 cup) mascarpone
3 large eggs, separated (room temperature)
1 1/2 tsp pure vanilla, or vanilla bean
1 tsp finely grated lemon zest
1/4 cup sugar

For the Raspberry Soup:
1 10-oz package frozen raspberries, or the equivalent fresh
1 cup water
1/4 cup sugar
1/2 tsp fresh lemon juice

Preparation
Line a metal loaf pan with plastic wrap, allowing about 2 inches of overhang on the edges. Place in freezer while prepping the Semifreddo. In a large mixing bowl, combine mascarpone, egg yolks, sugar, vanilla and lemon zest and beat with an electric mixer until well combined. In a separate bowl, whip egg whites until stiff peaks form. Fold egg whites into mascarpone mixture. Pour into the plastic-lined loaf pan and cover the surface with the plastic overhang. Freeze for 8 hours or overnight.

In a small saucepan, combine raspberries, water, sugar, and lemon juice and bring to a simmer to dissolve sugar. Strain seeds out with a fine mesh strainer. Allow to cool. Slice Semifreddo into bars and serve with the chilled raspberry soup.

Continue Reading "it's semi-freezing outside"

Tuesday, January 22, 2008

sunday supper: kare-kare


Ah, food. It's so nice to be able to eat it. Last week I was taken down by a neverending stomach flu that robbed from me the most comforting of comforts - eating. Three days of laying around at home and I couldn't eat a damn thing. Once I did start to be able to eat, for some reason I only craved junk food. First food back: Kraft Mac N Cheese. I must have been sick, because I never eat that otherwise.

Anyway, I'm finally returning to the land of the living, and because I'm an idiot I decided that my first real meal should be rich and beefy. The words 'rich' and 'beefy' specifically brings one cuisine to mind: Filipino food. My mom hardly ever made Filipino food when we were young, perhaps the occasional pot of benignet or halo-halo (aka loco-loco), probably because my dad was the cook in the family. Or more likely because most Filipino food is pretty bad for you. The kare-kare that I made on Sunday is no exception, but it is warming and comforting, and pretty easy to make.

Kare-kare is an oxtail stew with a peanut butter sauce. I think it is one of those dishes that might vary a bit from region to region, some recipes calling for tripe in addition to oxtail, some requiring banana heart or cabbage. (I skipped the tripe. I have nothing against tripe - I've eaten my fair share - but I've never cooked it and I don't have much desire to. It's unappetizing enough when cooked, I don't want to deal with it raw.) It seems like the primary ingredients regardless of region are oxtail, eggplant, string beans, achuete, and a peanut butter based sauce. Achuete, more commonly known as "annatto", is some kind of seed from a tropical plant often used as a red dye. I've never used annatto in its whole form before, I've only used it when part of a spice mix, like Goya Sazon. I think its primary function is for coloring, but it has a subtle odor and I do think it imparts a subtle peppery flavor. There was a difference between my kare-kare and my mom's, and she definitely doesn't bother with the achuete.


You can simply soak the achuete in water, then discard the seeds and use the water as part of the stew stock, but I chose to make achuete oil. I simply sauteed the seeds in oil for a couple of minutes. The oil begins to color immediately, and it only took a couple of minutes to get a deep red. This was a slightly problematic method only because I let the oil get a little too hot and there was a big of splattering. This turns everything it touches orange. Including my arm and the stove and the floor. Just keep the heat low.

I sauteed the onions and garlic in the achuete oil and added that to the stew.


The one element I am disappointed didn't work out for me is the toasted ground rice. It is used to thicken the stew, and while I don't think it's an absolute necessity, I was curious to try it. I tried to grind some raw rice with the Cuisinart, but it totally didn't work. I think this would require a spice grinder or coffee grinder, but my coffee grinder is too coffeed-out to use on anything else. I really need to invest in a second grinder reserved for non-coffee items. I ended up using some cornstarch to thicken it, but I think the peanut butter did plenty of thickening on its own. I also did not have any bagoong alamang, which is a fermented shrimp paste. This is really to personal taste, but I don't think I would have wanted it anyway, I'm not huge on fermented fish, and bagoong alamang is strong, salty, and very high in cholesterol. If you're into that stuff, it does help to cut the richness of the peanut butter sauce.

My final lesson in this experiment was the revelation that natural ingredients are not necessarily the best. I used a natural peanut butter that had no added sugar. Bad idea, I just had to add sugar to get the right flavor. This is just a dish that needs the sweetness, any old supermarket peanut butter works best. I also used way too much peanut butter, mistakenly believing that more of it would bring out more flavor. Instead it made it way too rich and overpowered other elements. In this case, a little really did go a long way. Recipe after the jump:


KARE-KARE

Ingredients
3 lbs beef oxtail
2 cups beef stock
2 tbsp peanut oil (or any neutral oil)
1 tbsp annatto seeds
1 medium onion, diced
2 cloves garlic, minced
1/2 lb string beans
3 small Japanese or Italian eggplants, chopped into 1-inch pieces
1/3 cup peanut butter
3 tbsp toasted ground rice (or 1 tbsp cornstarch)
salt and pepper, to taste
bagoog alamang, to taste (optional)

Preparation
In a large heavy stockpot over high heat, brown oxtail on all sides. Add beef stock and additional water to just cover meat. Bring to a boil, then lower to a strong simmer for 1 1/2 hours, until beef is very tender but not falling apart. In a skillet over low heat, saute annatto seed in oil until the oil turns red, being careful not to burn the oil or the seeds. It should only take a few minutes. Remove the seeds and discard. Use this oil to saute the onion and garlic until soft, about 5 minutes. Add onions and garlic to the oxtail. Add the green beans, eggplant and peanut butter. In a dry pan, toast the ground rice until it just begins to brown, then add to the stew. Continue to simmer for about 30 minutes more, until the vegetables are cooked through. If desired, add bagoong alamang to taste before adding any additional salt. Serve over steamed white rice, with additional bagoong alamang on the side.

Continue Reading "sunday supper: kare-kare"

Tuesday, January 15, 2008

sunday supper: grain expectations


I took a risotto risk: Sweet Pea Farro Risotto. After my recent pastry debacle, I've been thinking a lot about farro. I was pretty intrigued by its nutty flavor and firm bite, and really wanted to try it in a savory recipe. Some time ago, I had an enchanting risotto made from spelt, so I figured that farro's close resemblance to spelt meant it would be a safe substitute. The results were pretty good, though it certainly took a little more finagling than a classic risotto with arborio. The pastiera recipe had called for soaking the farro for 3 days. It was too late for that. But I had seen Lydia say that it needed to soak for only 1 hour. I ended up soaking for about 30 minutes, then simmering for about 30 minutes before draining and beginning the actual risotto.


From that point, I basically treated it like any risotto, and though it cooked through just fine with the same amount of stock that I usually use, it did seem to be slower, taking more time to absorb the same amount of liquid. It also turned out a little runnier than risotto I've made in the past, but I've never been entirely sure how thick or how runny risotto should actually be anyway.

I paired the risotto with rosemary-marinated lamb chops, simply seared on a hot pan. Those were excellent and a great companion with the risotto. All in all, a pretty successful experiment, but I'm not sure it can really take the place of good old arborio rice.


Recipes after the jump:

SWEET PEA FARRO RISOTTO

Ingredients
1 1/2 cups farro
3 tbsp olive oil
1 small onion, diced finely
2 cloves garlic, minced
1/2 cup dry white wine
3-4 cups chicken stock
1 cup sweet peas (fresh or frozen)
1/2 cup parmiggiano-reggiano, grated
1/3 cup parsley, chopped
salt and pepper, to taste

Preparation
Soak the farro in cold water for 30 minutes. Drain and place in a saucepan with enough water to cover by 2 inches. Bring to a boil, then lower to a simmer for 20 minutes. Drain well and set aside.

In a risotto pot or large saute pan, heat olive oil on medium heat. Add the onion and saute until softened, about 6 minutes. Add the garlic and saute another minute. Add the farro and saute to coat with oil. Add wine and simmer, stirring frequently, until the liquid is absorbed by the grain. Add a ladle of chicken stock and continue to stir frequently until liquid is absorbed. Continue adding stock a ladle at a time, stirring until absorbed, until the farro is almost al dente and the liquid has taken on a creamy consistency. If using fresh peas, add the peas when you have about 2 ladles of stocks left to add. If using frozen, add with the last ladle. When the farro has reached al dente, remove from heat and stir in the cheese and parsley. Test for seasoning and add salt and pepper if desired. Serve with additional grated cheese and chopped parsley for garnish.


ROSEMARY LAMB CHOPS

Ingredients
(Proportions are for 2 servings of 2 chops each, about 5-6 ounces per serving)

4 single cut lamb rib chops, frenched if desired
3 tbsp fresh rosemary, chopped fine
2 cloves garlic, minced
juice of 1 lemon
3 tbsp olive oil
salt and pepper

Preparation
Lightly salt the lamb chops on both sides. Whisk together rosemary, garlic, lemon juice, olive oil, and pepper and spoon over the chops, being sure to get marinade on both sides of the chops. Set aside to marinate for 20 minutes or up to an hour.

Heat a heavy skillet or grill pan over high heat. Sear lamb chops about 4 minutes per side for medium rare.

Continue Reading "sunday supper: grain expectations"

Thursday, January 10, 2008

achieving taco stability

The night after my pernil adventure, we were somehow not overdosed on pork, so I gathered together the ingredients for some soft tacos. J-Cat and I eat Mexican food almost weekly, which is partially due to our neighborhood's offerings and partially due to our obsession with tacos. We had tacos Saturday night, and knowing that I would be preparing the pernil the next day, I paid close attention to every ingredient so that I could use leftovers for tacos on Monday. It turned out that this plan was pure brilliance; the tacos were fantastic, and perfect in their simplicity. I think it was key that I got some crema instead of sour cream. Though they are not terribly different, the crema has a looser consistency and a saltier, tangier flavor, whereas sour cream often seems to overwhelm the rest of the flavors. In addition to the crema, we topped our tacos with shredded lettuce, chopped onions, chopped tomatoes, cilantro, green salsa, and a spritz of lime juice. I chopped the pernil and reheated it in a frying pan with just a bit of it's own fat (YES). Finally, the most important elements in taco construction is the use of two soft corn tortillas per taco, and resisting the temptation to overfill your taco. This is truly the only way to achieve maximum taco stability.

Continue Reading "achieving taco stability"

Monday, January 07, 2008

sunday supper: beans & bread, pt 2


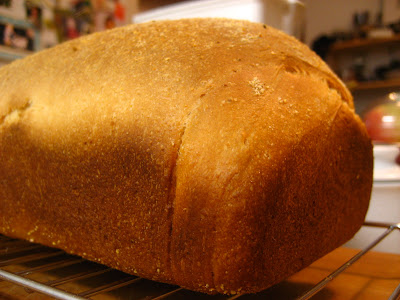
I promised to post about my Pioneer Bread from the other night ages ago but I keep forgetting to update my blog when I have the recipe at hand. So I guess I'll just post this for now and double check my recipe later. Pioneer Bread is nothing more than a classic loaf of white bread with some cornmeal mixed in. I got this recipe from an extremely old Betty Crocker Breads cookbook that used to belong to my mother, which I don't believe is still in print. She has had that book for as long as I remember, and I started making this recipe when I was a kid. I don't know why I zeroed in on this one, but I've always gone back to it over the years. A few years ago my mom gave me the book, saying that I was the only one who ever baked out of it anyway.


I think it was probably the first loaf of homemade bread that I ever made, and it made me think that bread wasn't as intimidating as I had assumed, it just takes a lot of patience. Of course, any homemade bread is awesome, but somehow the addition of the cornmeal gives this loaf just a little bit more dimension and flavor.


It was also a great recipe to learn some of the techniques of classic bread, like the shaping of the loaf after the first rise. The technique described in this recipe insures no huge air holes and a sort of spiral pattern that you can almost see in the sliced loaf in the first picture. I think this causes the loaf to have a very uniform shape and density.


Recipe after the jump:

PIONEER BREAD
Adapted from the Betty Crocker Breads cookbook, copyright 1974.

Ingredients
1 package active dry yeast
3/4 cup warm water (approx 105 to 115 degrees)
1 tsp sugar
1 tsp salt
1/4 cup shortening or butter
1/4 cup yellow cornmeal, plus more for sprinkling
2 to 2 1/2 cups flour
1 tbsp butter, melted

Preparation
In the bowl of a mixer with a dough hook attachment, dissolve yeast in warm water and allow to proof for 10 to 15 minutes. Add sugar, salt, shortening, cornmeal and 1 cup flour, and turn the mixer to medium speed. Slowly add more flour until the dough comes together on the hook. Turn dough out onto a lightly floured surface and knead for about 5 minutes, until it is elastic and smooth. Shape into a ball and place into a large bowl greased with oil, turning to coat. Cover and allow to rise in a warm place for 1 1/2 to 2 hours. The dough is ready when an indentation made with your finger remains. Punch down dough, then turn onto a lightly floured surface. With a rolling pin or your hands, flatten the dough into a large rectangle. Fold the dough into overlapping thirds, like a letter. Starting at one of the open ends, roll the dough up like a jelly roll, using your fingers to seal after each roll. Pinch the seam at the edge, then use the sides of your hands to press down the two open edges, tucking the seams under. Place seam-side down in a greased loaf pan, brush the loaf with melted butter, and sprinkle with cornmeal. Allow to rise 1 hour until doubled in size.

Preheat oven to 375 degrees. Bake 45 minutes or until the crust is golden brown and the loaf sounds hollow when tapped. Cool on a wire rack.

Continue Reading "sunday supper: beans & bread, pt 2"

sunday supper: extreme pork


Can there ever be too much pork? If there could, it would have been last night when I made Pernil, a Puerto Rican-style roast pork shoulder. I saw this recipe in The New York Times last week, from "The Minimalist" Mark Bittman, who I love. The little video made it impossible for me to not make this; that crispy pork skin was calling out to me. It was incredibly simple and yielded an obscene amount of meat, which I'm sure we'll be eating for days.

After looking at Bittman's recipe, I browsed around at other Pernil recipes on the internet to compare. For the most part, his is pretty traditional, although I did do one thing that most recipes called for but he did not. I decided to marinate the meat overnight. I figured it could only make it better. I did find that my sauce was a bit more watery than his appeared in the video. I'm not sure if I just added too much olive oil, but it seemed pretty watery before I even added it, like my onions were watery or something.


One amusing thing about the video is that he had to step away and take a break after processing the onions because his eyes were tearing so badly. Beware - this WILL happen. Pain.

The end result was really fantastic and incredibly indulgent, and the aroma of the pork roasting all day was intoxicating. Crispy delicious skin, moist juicy meat, and enough leftovers for several more meals. I'm already planning on pernil tacos and pork fried rice. But for the first meal, I kept it very simple, serving it with plain white rice and wedges of lime. We really didn't need anything else.


The article and video can be found here. The recipe can be found here. My version with slight variations after the jump:

PERNIL
Adapted from the recipe by Mark Bittman in The New York Times

Ingredients
1 pork shoulder, about 6-7 pounds
4 or more cloves garlic, peeled
1 large onion, quartered
2 tablespoons fresh oregano leaves or 1 tablespoon dried oregano
1 tablespoon ground cumin
1 teaspoon ancho or other mild chili powder
1 tablespoon salt
2 teaspoons freshly ground black pepper
Olive oil as needed
1 tablespoon wine or cider vinegar
Lime wedges for serving

Preparation
1. The day before roasting, score meat’s skin with a sharp knife, making a cross-hatch pattern. Pulse garlic, onion, oregano, cumin, chili, salt and pepper together in a food processor, adding oil in a drizzle and scraping down sides as necessary, until mixture is pasty. (Alternatively, mash ingredients in a mortar and pestle.) Blend in the vinegar.

2. Rub this mixture well into pork, getting it into every nook and cranny. Put pork in a roasting pan, cover with foil, and refrigerate overnight.

3. The next day, remove roast from refrigerator and allow to come to room temperature for about an hour before roasting. Preheat oven to 300 degrees. Start the roast skin side down, adding a little water to the bottom of the pan to keep the meat moist. About halfway through cooking, flip roast over so that the skin will crisp. Roast pork for several hours (at least 5 for a 7-pound shoulder), until meat is very tender. Finish roasting with the skin side up until crisp, raising heat at end of cooking if necessary.

(If you don't want to attempt to flip such a large roast over during cooking - which can be difficult - you can start the roast covered with foil and leave out the water in the pan, then remove foil for the last hour or so to allow the skin to crisp)

4. Let meat rest for 10 to 15 minutes before cutting it up; meat should be so tender that cutting it into uniform slices is almost impossible; rather, whack it up into chunks. Serve with lime wedges.

Continue Reading "sunday supper: extreme pork"

Thursday, January 03, 2008

sunday supper: beans & bread, pt 1


One of the awesome Christmas presents that I got this year was The River Cottage Meat Book, from my brother Gene. Mmmmm meat. This is much more than a cookbook; it is an in-depth guidebook on all things meat. And by all things, I'm talking from raising the animal all the way to curing the bacon. Of course, I spent much of Christmas day perusing the recipes and photos, and decided almost immediately that I had to make the Boston Baked Beans. This was one of those recipes that made J-Cat exclaim "Wow! It tastes like the real thing!". I don't really know why he thinks that what I make isn't actually the real thing, but I guess sometimes I too can be surprised by how things turn out. This recipe did indeed taste exactly like the real thing, even though I wasn't hardcore enough to actually cure my own bacon.


It was also an extremely easy recipe. It took many hours to cook, but the labor was pretty minimal. I had to buy a bottle of molasses for this recipe, which I really never cook with. But that just means that I'll have to look around for other fun recipes that call for molasses.


For the first night, I baked a loaf of Pioneer Bread to go with the beans, which I'll also post about shortly. The next morning it was baked beans on toast with fried eggs. Recipe after the jump:

BOSTON BAKED BEANS
Adapted from THE RIVER COTTAGE MEAT BOOK by Hugh Fearnley-Whittingstall

Ingredients
1 pound dry navy beans
10 ounces slab bacon, salt pork, or pancetta
3 tablespoons brown sugar
3 tablespoons molasses
1 tablespoon dry English mustard
3 small onions, quartered
4 cloves
salt and pepper, to taste

Preparation
Soak navy beans in plenty of cold water overnight. The next day, drain and rinse beans and place in a dutch oven or ovenproof casserole with enough water to cover by two inches. Bring to a boil, then lower to a simmer for 1 hour.

Preheat the oven to 275 degrees. Cut bacon into 2-inch cubes and add to the simmering beans. Press the cloves into the onion quarters and add to the beans. Add the sugar, molasses, mustard, and pepper. Do not salt yet, as the bacon may add plenty of salt. Stir well to combine, then cover and place in the preheated oven for 3 hours, stirring occasionally. After three hours, remove the cover, stir to bring the bacon to the surface, and return to the oven for another hour. Test for seasoning and add salt if necessary.

Continue Reading "sunday supper: beans & bread, pt 1"

Wednesday, January 02, 2008

pastiera napoletana: pastry from hell

It didn't taste like hell, it was just hell to make it. Ironically, the part that caused me the most grief - and there was a lot of grief - was the crust, which I didn't even think twice about when I first saw the recipe. I've never even heard of a Pastiera Napoletana before, but I happened upon the recipe while browsing around for Mario Batali recipes. I was intrigued - it basically sounded like a pie filled with rice pudding. How could that be bad? I could not foresee my troubles.


The filling was actually farro, not rice. Farro is a type of wheat grain, considered the original grain from which all others are derived, whatever that means. I actually thought it was technically the same as spelt, but apparently although they look alike they are somewhat different. For this recipe, the farro must be soaked in water for 3 days. That's a lot of forethought for me, but it was no problem. The grain is then cooked and mixed with milk.


The next step is the ricotta, which you stir vigorously until smooth and creamy, then combine with the farro/milk mixture. It's like cheesecake rice pudding!


Then, the key ingredient - Orange Flower Water. I think the big reason I was drawn into this recipe is because I saw that ingredient and had to know what it was like. I'm sure, now that I've tasted it, that I've had other desserts that contain it but just didn't realize it. I'm lucky enough to work right upstairs from a great Italian market that features dozens of somewhat obscure ingredients imported from Italy, and I was thrilled to find a bottle of Fior d'Arancia there. It's amazingly perfumey and heady, and the flavor is unmistakable. I don't think you could really make this dessert without it.


Finally it was time to make the crust. What can I say about that experience? I'm a dumbass who made dumbass mistakes? I wasted an obscene about of eggs and butter with all of my discarded attempts? THREE TRIES. It took three tries to get the damn thing right. I was incredibly frustrated with the recipe, which I felt was a little unclear in explaining the method for making the dough. Am I wrong to think that if the recipe tells you to mix the butter and egg together in the well, that your butter needs to be pretty much a liquid? Apparently I'm wrong. I melted the butter, then cooled it so that it was liquid but not warm. That didn't work. I thought perhaps that the problem was with the proportion of fat to flour, so I tried again with less flour to start out and added slowly to it. I got as far as rolling it out and trying to put it in the pan. That really didn't work. Much cursing ensued. Finally, I gave up on the traditional handmade technique, broke out the food processor, and made the dough with really cold butter as I would for a pie. That worked. Pretty much. I still couldn't get the crust to work in a 2" tall cake pan, but it worked in a 1.5" tall cake pan. Whatever, as long as it worked.


The final step was folding beaten egg whites into the ricotta/farro mixture, filling the pastry, and cutting a lattice top. At this point, I was looking at the clock and realizing that despite my idea to start early in the day and have it done hours before leaving the house, I was only just going to make it. All day. I spent all day on a freaking pie.


I swore that I would never attempt this recipe again, but I have to admit that after the enthusiastic reception, I may have to reconsider. I guess that now I have conquered all of the stupid mistakes, and I know what should work in the future. But we'll see if I ever do get over my pastry trauma. Recipe after the jump:


PASTIERA NAPOLETANA
Adapted from a recipe by Mario Batali at foodnetwork.com

Ingredients
For the filling:
1/2 pound farro
1 pound fresh ricotta
1 cup granulated sugar
1/4 cup orange flower water
1 tablespoon ground cinnamon
2 cups skim milk
zest of 1 lemon
4 large eggs, separated

For the dough:
2 - 2 1/3 cups all-purpose flour
3/4 cup unsalted butter, chilled
3/4 cup granulated sugar
3 egg yolks

Preparation
Soak the farro in cold water for three days, changing the water daily. On the third day, drain farro, then place in a medium saucepan with enough water to cover by a couple of inches. Bring to a boil then lower to a simmer for 15 minutes. Drain and set aside.

In a medium saucepan, heat milk on medium flame to just below boiling. Add the faro, 1/2 the lemon zest, 1 pinch cinnamon, 1 tablespoon sugar, and let cook over moderate heat, stirring occasionally, until the milk is completely absorbed.

Place the ricotta in a large mixing bowl. Using a wooden spoon, mix the ricotta until the texture becomes creamy. Add the remaining cinnamon, sugar, egg yolks, the remaining lemon zest, orange flower water, and the cooked faro. Use a spatula to mix until well combined then set aside.

To make the dough, combine flour and sugar in a food processor and pulse to combine. I started with 2 cups flour and added more later if it seemed too wet. Cut the chilled butter into small pieces, add to the processor and pulse until the dough is crumbly. Add the egg yolks and pulse until dough comes together. If the dough is too dry, try adding a tablespoon of cold water. Remove the dough, knead by hand for a couple of minutes, then wrap in plastic and place in the fridge to rest for 30 minutes.

Preheat the oven to 350 degrees F.

Cut the dough into 2 pieces, 1 piece 3 times as large as the other. Using a lightly floured rolling pin, roll out the larger dough piece until it forms a large circle, about 11 inches in diameter and about 1/8-inch thick.

Lightly butter and flour a 9-inch round baking pan. Place the larger dough round into the baking pan, using your thumb and forefinger to tuck the dough into the bottom of the pan. The dough should come up the sides of the pan.

In the bowl of an electric mixer fitted with a whisk attachment, whisk the egg whites until they form medium-hard, glossy peaks. Using a spatula, gently fold the egg whites into the ricotta mixture. Gently place the filling into the baking pan, on top of the bottom crust.

Using the lightly floured rolling pin, roll the remaining dough into a circle 1/8-inch thick. Using a sharp knife, cut the dough into strips 1-inch wide. Use these dough strips to decorate the top of the ricotta pie, forming a lattice across the top, just as you would an apple pie.

Place the pie in the oven and bake until the dough on top is golden brown, about 1 hour. Remove from the oven and let cool to room temperature.

Continue Reading "pastiera napoletana: pastry from hell"