Wednesday, December 29, 2010

this one's for beth: nut balls


Buttery, nutty, shaped like a ball. A little snowball, appropriate for the blizzard apocalypse we are still trying to dig ourselves out of here in NYC. It's one of the most basic, classic holiday cookies and one of my all time favorites. It also comes together really quickly, and with ingredients that most of us always have in our pantry.

Be careful not to overbake these so they don't dry out. They are fragile while hot and may seem overly crumbly, but given some time to chill out, they almost melt back into a comfortable little morsel of butter and nuts and that faint dusting of powdered sugar. Don't inhale when you take a bite. Don't wear black. Recipe after the jump:


OLD-FASHIONED WALNUT BALLS

1 cup butter
1/3 cup brown sugar
1 teaspoon vanilla
2 cups flour, sifted
1/2 teaspoon salt
2 cups finely chopped walnuts
powdered sugar

Preheat oven to 375 degrees. Cream butter, sugar, and vanilla until fluffy. Sift flour and salt together, and mix into creamed mixture. Stir in walnuts. Shape dough into smalls balls, about the size of a walnut (maybe 1 to 1 1/2 inches in diameter. I used a small scoop). If you have the time, you can freeze the balls for 20 minutes or so, this helps them hold their ball shape a little better when baked. Bake on an ungreased cookie sheet at 375 degrees for 11-13 minutes. Let rest on cookie sheet for 5 minutes, then use a spatula to transfer to a wire cooling rack. When still warm but cool enough to handle, roll in powdered sugar.
Makes about 4 dozen.

Continue Reading "this one's for beth: nut balls"

Wednesday, December 22, 2010

10 minute dinner: garganelli with zucchini and ricotta salata


It's the week when you scramble to make and/or buy presents for everyone on your list, plan the necessary baking, realize at the last minute that you have all the presents but nothing to package them in, attempt to keep the cats out of the strange big tree in the living room. The last thing I think about is what to make for dinner. So it's a good week for a 10-minute dinner. It's not exactly zucchini season, but I occasionally break with seasonality to bring a bit of brightness to the beginning of winter. Recipe after the jump:

GARGANELLI WITH ZUCCHINI, LEMON, AND RICOTTA SALATA

1 lb garganelli or similar short pasta (penne or cavatini is great for this)
2 tbsp extra virgin olive oil
1 medium onion, diced
3 cloves garlic, minced
2 medium zucchini, quartered lengthwise then sliced into 1/4-inch pieces
juice of 1 small lemon
1/4 cup flat-leaf parsley, minced
salt and pepper, to taste
1/4 cup grated ricotta salata

Boil a large pot of salted water for the pasta. When the pasta goes in, heat the olive oil over medium high heat in a heavy bottomed saute pan or large skillet. Saute the onions until beginning to soften, about 5 minutes. Add the garlic and saute another minute. Add the zucchini and saute until tender crisp, about 5 minutes. Add the lemon juice and season to taste with salt and pepper. When the pasta is al dente, drain and add to the pan with the zucchini. Toss to mix well, then add the parsley. Serve top with the grated ricotta salata.

Continue Reading "10 minute dinner: garganelli with zucchini and ricotta salata"

Wednesday, December 08, 2010

smokey beans


At what point do I just rename this blog "Beans and Baking"? More beans! It's cold outside. It's the season for stewing and braising and having pots bubbling away on the stove for hours, perfuming your home with the aroma of cozy. These beans are extra warm from the added smokiness of chipotle. A bit of kick and heat, tons of flavor, it transforms the humble black bean into the ultimate comfort food. Mound some on top of some rice, top with fresh cilantro and a dollop of sour cream, maybe a squeeze of lime or even some raw minced red onion.

And as with every giant pot of beans, leftovers go very far. Wrap these beans up in a tortilla with leftover rice, some raw sliced red cabbage, sour cream, shredded cheese, maybe some guac and salsa. Recipe after the jump:

SMOKEY CHIPOTLE BLACK BEANS

1 lb dried black beans
1 tablespoon canola oil
1 medium onion, chopped
4 cloves of garlic, chopped
1 carrot, chopped
4 chipotles in adobo, chopped
1/2 teaspoon of cumin
1/2 cup cilantro plus additional for garnish, chopped
1 tablespoon tomato paste
1/4 cup fresh lime juice
Six cups of water
Two cups of vegetable broth
Salt to taste

Soak the beans covered by two inches in cold water for at least 6 hours or overnight. Drain the soaked beans.

Combine the onions, carrots and garlic in a food processor and pulse until finely minced. In a large heavy dutch oven over medium heat, sauté the "sofrito" in oil for a few minutes until fragrant. Add the beans, chipotles, and 1/2 cup cilantro.

Cover beans with water and broth, bring to a boil, and then reduce heat to low. Stir occasionally.

After 1 1/2 hours, add the cumin, tomato paste, lime juice, salt and remaining cilantro and cook for 30 more minutes or until beans are tender. Serve over rice garnished with chopped cilantro and a dollop of sour cream or crema.

Continue Reading "smokey beans"

Friday, December 03, 2010

autumn in a jar


I'm almost ashamed that I made something already ridiculously simple to make even simpler. How lazy can I be? I can try to justify this by claiming that there's an additional upside to making applesauce in a slow cooker than just convenience; it's the way that it perfumes your house with the aroma of coziness for 5 hours.

Peel some apples, chop them up, throw them in a crockpot with a touch of cider, some spices, some sugar, and then do nothing. Make sure to eat this while it is still warm, that's the most important bonus of making your own applesauce. Recipe after the jump:


SLOW COOKER APPLESAUCE

8 apples, peeled, cored, and sliced*
1/3 cup apple cider or water
juice of one lemon
1/4-1/3 cup cane sugar, to taste (amount will vary depending on your apples)
1/2 tsp ground cinnamon
1/4 tsp ground nutmeg
pinch ground clove

Place the sliced apples in the slow cooker with the apple cider and lemon juice and set on low for 4-5 hours. About 30 minutes before cooking is complete, taste the sauce and add sugar to taste. Add the remaining ingredients and let cook for the remaining 30 minutes. If desired, blend with an immersion mixer to make smooth. Store in the refrigerator in airtight containers, or jar for long term storage.

*Note: I always use a combination of apples for depth of flavor, like macoun, empire, cortland, fuji, honeycrisp, golden delicious. Whatever you love, or whatever you have that is past its raw eating prime.

Continue Reading "autumn in a jar"

Monday, November 08, 2010

presenting perfect pear pie


When you've made a few too many apple pies and need a change - but not a huge one - make a pear pie instead. Maybe don't even mention that this is a pear pie when you serve it and see the thoughtful and slightly confused looks on people's faces when they taste it.


Use fairly firm anjou pears for a stunning texture and sweet, mild flavor. Grate a pile of fresh nutmeg. Make a thick, rustic pie crust, preferably with lard and butter. Serve warm or cold, with ice cream or whipped cream, or with nothing because it's that tasty. And that's it. Pears and nutmeg, whoulda thunk? Recipe after the jump:


ANJOU PEAR AND NUTMEG PIE

2 1/2 lb firm-ripe Anjou pears, peeled, cored and sliced into 1/4-inch slices
3 tablespoons all-purpose flour
1/2 teaspoon freshly grated nutmeg
1/8 teaspoon salt
2/3 cup plus 1 tablespoon sugar
1 tablespoon fresh lemon juice
1 recipe pie crust for a double crust 9" pie
1 egg

Prepare the dough for the crust and set to rest in the refrigerator for at least one hour. In the meantime, prepare the pears and toss in a large bowl with the flour, nutmeg, salt, lemon juice, and 2/3 cup sugar. Set aside to prep you crusts.

Preheat oven to 425F. Roll out the bottom crust and line a 9" deep-dish pie plate, trimming the overhang to about 1/2 inch. Fill the crust with the pear mixture. Top with the second crust, trim, and crimp the edges. Cut a cross in the middle of the top crust and fold back the corners to expose a square. Brush the crust (but not the edges) with a beaten egg, then sprinkle the remaining tablespoon sugar over top.

Bake pie on a baking sheet at 425F for20 minutes, then lower the temperature to 375 and bake for an additional 45-55 minutes, until filling is bubbling and crust is golden brown. Cool the pie on a rack for at least 2 hours before serving.

Continue Reading "presenting perfect pear pie"

Monday, November 01, 2010

pumpkin for halloween. or squash, whatever.


Other than the bag of mini-Kit Kats and a showing of Psycho at Film Forum on Friday night, Halloween passed in our household without much notice. We are fairly party pooper-ish about Halloween, due mostly to laziness about putting together costumes. When most of the world was out partying on Saturday night, we were out seeing that movie about Stephin Merritt and The Magnetic Fields. Stephin Merritt is kinda spooky. Then for Halloween proper, the extent of celebrating was including pumpkin in my Moroccan Lamb Stew. Technically it was butternut squash, but that's close enough. And Opaw hissed at least once. Happy Halloween!


My main catalyst for the lamb stew was a jar of preserved lemons that has been criminally neglected. I guess I go through stages and have a tendency to forget how magical they are. I want to dab preserved lemon behind my ears, the scent of them is so intoxicating.


I also really wanted to make some homemade harissa, because I always buy that stuff prepared and it's so silly to do so. I already have every ingredient in my house, and it takes all of 2 minutes to throw it together. Plus, I had the perfect little jar to pour it into, which brings me more satisfaction than one might think.


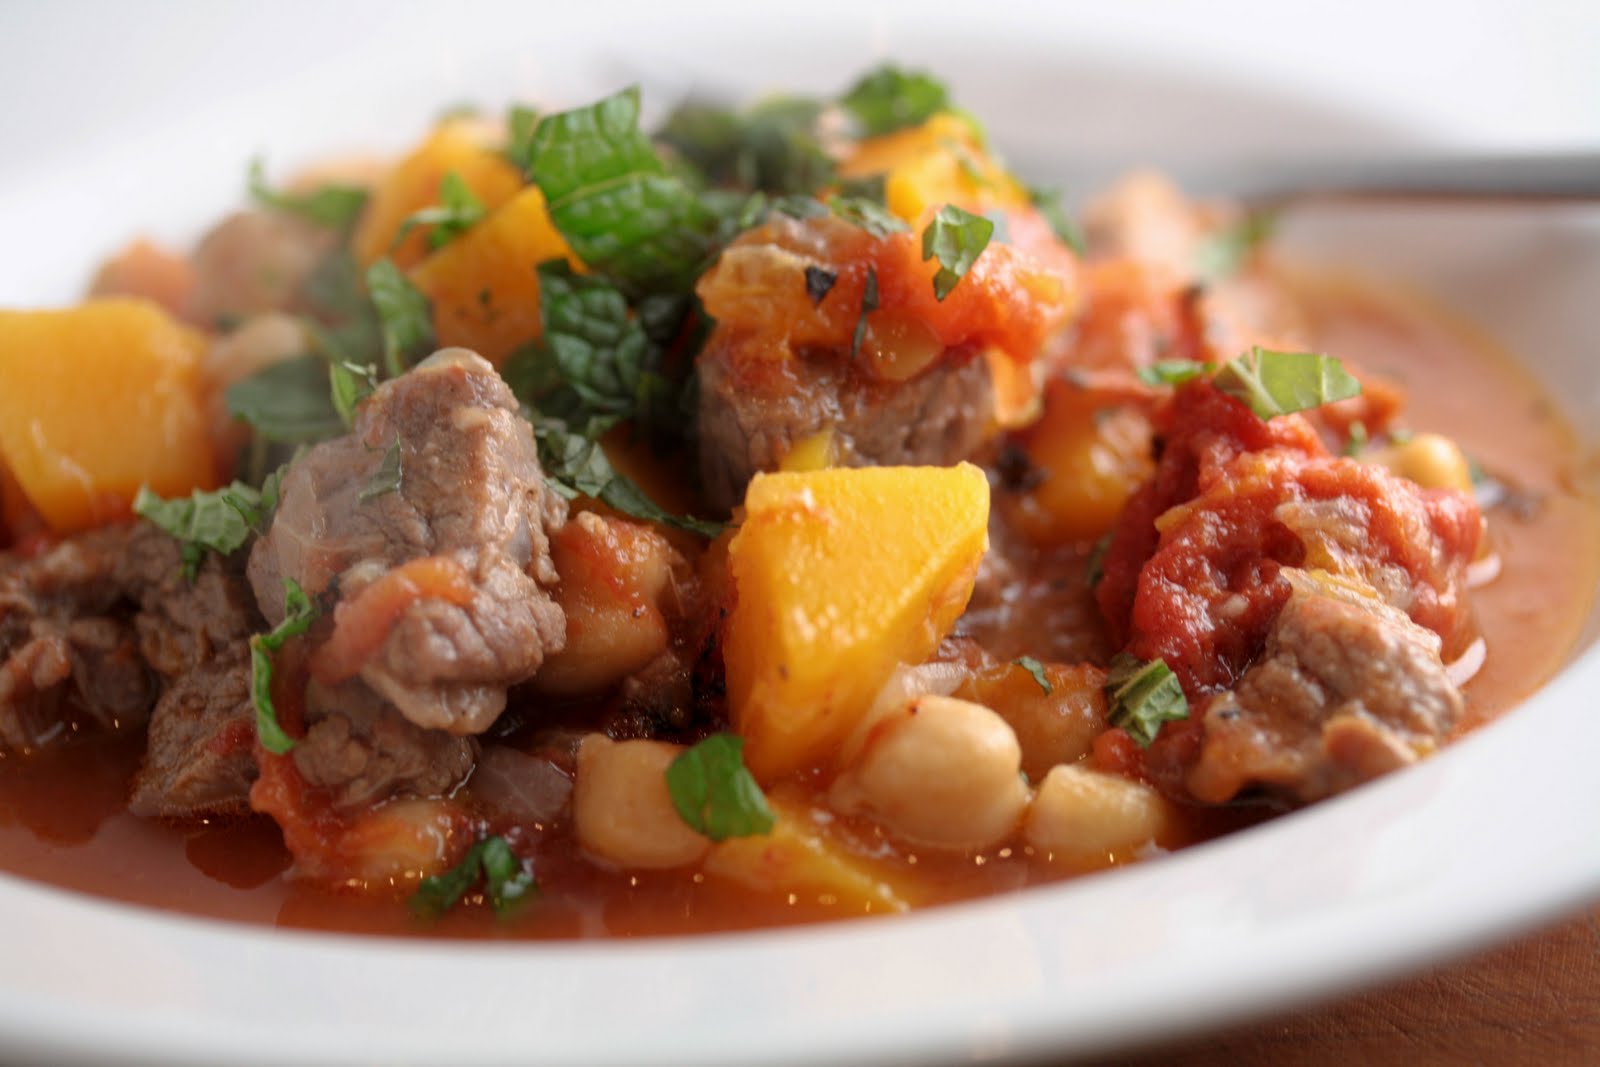
Tender lamb, chickpeas, squash, warm aleppo pepper, tomatoes for balance, golden raisins for a hint of sweetness, preserved lemons for tang, and a sprinkle of fresh mint to wake up the whole combination. The weather is finally cooling down, and this is the dish to warm you up. Recipe after the jump:


MOROCCAN LAMB STEW WITH PRESERVED LEMONS AND HARISSA

2 pounds lean shoulder of lamb, cut into 1-inch cubes
Kosher salt and freshly ground black pepper
2 tablespoons olive oil
1 medium onion, chopped
2 cloves garlic, minced
2 tablespoons harissa sauce (recipe follows), plus more for serving
4 cups peeled, uncooked butternut squash in 1/2-inch cubes
1 28-ounce can whole peeled tomatoes, drained and chopped
1 15-ounce can cooked chickpeas, drained and rinsed
1 preserved lemon, rind and pulp finely diced, plus additional pulp from 1 preserved lemon
1/4 cup golden raisins
1/4 cup fresh chopped mint for garnish

Cooked couscous or bulghur for serving.

Season the lamb cubes with salt and pepper. Heat the olive oil in a large dutch oven set over medium-high heat and cook the lamb, stirring, until lightly browned, about 5 minutes. Add the onion and garlic and continue to cook until the onion is soft. Add the 2 tbsp of harissa sauce and cook another 5 minutes.

Add 2 cups water, bring to a boil, lower heat and simmer, covered, until the lamb is tender, about 45 minutes. Add the squash, tomatoes, chickpeas and additional water to almost cover the ingredients. Simmer, uncovered, until the squash is tender, about 20 minutes.

Stir in the preserved lemon and raisins and cook another 2 minutes. Remove from the heat, garnish with mint and serve with couscous or bulghur and more harissa on the side.

Serves 4-6.

HARISSA SAUCE

1/2 cup olive oil
3 tbsp tomato paste
2 tbsp fresh lime juice
1 tbsp Aleppo pepper
1 tsp cumin
1/2 tsp coriander
1/4 to 1/2 tsp cayenne pepper, depending on desired heat level
1/4 tsp kosher salt

In a small bowl, whisk together all the ingredients. Let sit at least an hour before serving with lamb stew.

Continue Reading "pumpkin for halloween. or squash, whatever."

Monday, October 25, 2010

life events and lemon loaf


Straddling the line between savory and sweet, it's where I often love to be. It's a bit cake, a bit bread, bright lemon, woodsy rosemary, fruity olive oil, a touch of salt. It's unexpected.

Foods that surprise me are often the ones I find most memorable. Unusual flavor combinations, strange ingredients, or foods that don't sound like they would work, but they just do. Lemon, rosemary, and olive oil is not a particularly unusual combination, but perhaps in the context of a cake it's a little surprising.


It's corny to say, but surprising combinations are a lot like J-Cat and me. Who woulda thunk, 13 years after first meeting, after all that time that I thought we were a combination that didn't work, we did. So we did a little surprising of our own a couple of weeks ago when we went here:


The rest is history, and the recipe is after the jump:

LEMON ROSEMARY OLIVE OIL LOAF

4 eggs
3/4 cup granulated sugar
zest and juice of 1 lemon
1/2 cup extra virgin olive oil
1 1/2 cups all-purpose flour
2 tsp baking powder
1/2 tsp salt
2 sprigs rosemary leaves, finely chopped

Preheat the oven to 350 degrees. Grease a loaf pan or line with parchment paper. Using a hand mixer, beat eggs in a large bowl until frothy, about 1 minute. Add the sugar and beat another couple of minutes until thick and pale. Add the lemon juice, zest, and olive oil and mix until well incorporated.

In a separate bowl, whisk together the flour, baking powder, salt, and chopped rosemary. Add the dry ingredients into the wet, stirring with a wooden spoon just until incorporated. Pour into prepared loaf ban. Bake in center of oven for 35-40 minutes until golden brown.

Continue Reading "life events and lemon loaf"

Monday, September 27, 2010

butterscotch


Butterscotch. It sounds strange to say, but I didn't really like butterscotch until recently. It should be the other way around, but as a kid I just thought butterscotch was sweet and not much else. I imagine that might be due to many really bad butterscotch candies or instant butterscotch puddings. It's not until I started actively working with candy and sugar that I started to understand what real butterscotch was about. It's about butter. The amazingness of butter. THAT is something to appreciate.

When butterscotch is made properly - no corn syrup, no weird additives, no hydrogenated fats - it tastes so deeply of browned butter and molasses-y brown sugar, how could that be a bad thing? Though true butterscotch is a candy confection, the classic butterscotch flavor is used in a ton of alternative ways - in puddings, sauces for ice cream, cakes, and cookies. And here are some butterscotch cookies.

A touch of crisp on the outside, dense and slightly chewy on the inside, a sprinkling of flaky sea salt brings out the deep nutty flavor and balances the richness. Recipe after the jump:


SALTY BUTTERSCOTCH BUTTONS
Adapted from Simply Recipes

12 tablespoons unsalted butter, cut into tablespoon sized slices
1 3/4 cups dark brown sugar
1/2 teaspoon salt
1 egg
1 egg yolk
1 tablespoon vanilla extract
2 1/2 cups all-purpose flour
1/2 teaspoon baking soda
1/4 teaspoon baking powder

1/4 cup granulated sugar, for dredging
Fleur de sel, Maldon, sea salt, or Kosher salt for sprinkling

Preheat oven to 375°F and line two baking sheets with parchment paper. Whisk or sift together the flour, baking soda, and baking powder and set aside. Place the sugar for dredging in another bowl and set aside.

Place 10 tablespoons of butter into a thick-bottomed skillet over medium heat. The butter will foam a bit before subsiding. Once the butter takes on a tan color and begins to smell nutty take it off of the heat. Add the other two tablespoons of butter and mix it in until it melts.

Pour the brown butter into a mixing bowl fitted with a paddle attachment. Add the brown sugar and salt and mix well. Add the egg, egg yolk, and vanilla extract and mix together, scraping down the sides and bottom of the bowl at least once. Add the flour mixture in three increments being sure to scrape down the sides and bottom once or twice. Mix just until the flour is incorporated. The dough will be very thick.

Take 1/2 tablespoon sized pieces of dough (I used a 1-inch diameter scoop to insure that all cookies were about the same size) and gently roll them into ball shapes. Dredge them in the sugar until well-coated. Place on the baking sheet and sprinkle with a little bit of the sprinkling salt.

Bake for 10-11 minutes or until the edges have browned a bit. Be careful not to over-bake. Allow to cool on the sheet for one minute before transferring to a wire rack to cool completely.

Makes 4 dozen.

Continue Reading "butterscotch"

Monday, August 23, 2010

break the butter rules


If you ask me to describe myself in a nutshell, I will answer with one simple fact: I put salt in all my sweets. I think this is actually a profound statement that speaks to just about all aspects of my personality. And I don't mean that little pinch of salt that every baking recipe calls for, claiming it enhances the sweetness of the sweet. If it calls for a pinch, I throw in two or three, and I'll still top that cookie with some flaky sea salt for good measure. So it only makes sense that I would be inextricably drawn to a recipe for cookies that actually calls for salted butter. And not just run-of-the-mill salted butter, but beautiful French butter with fleur de sel. I used a brand called Pamplie, an old brand made in a region of France called Deux-Sevres, which is apparently known for its fine dairy products.

I took the recipe one step further by sprinkling some more flaky sea salt atop the cookie. I imagine that might push it over the salty edge for some people, but for me it was perfection. It's all about balance - sweet needs salty, chewy needs crunchy. I try to live by the wisdom of the salted butter chocolate chip cookie. Recipe after the jump:


SALTED BUTTER CHOCOLATE CHIP COOKIES
Adapted from the recipe by David Lebovitz

4 ounces salted butter, at room temperature
1/2 cup packed dark or light brown sugar
1/2 cup granulated sugar
1 large egg, at room temperature
1/2 teaspoon vanilla extract
1 1/3 cup flour
1/2 teaspoon baking soda
1/2 teaspoon flaky sea salt or kosher salt
1 cup coarsely chopped bittersweet chocolate
1 cup toasted walnuts, coarsely chopped
flaky sea salt for sprinkling

In a large bowl, use a hand mixer to beat the butter with the sugars until smooth and creamy. Beat in the egg and the vanilla.

In a small bowl, whisk together the flour, baking soda, and salt.

Add the flour mixture into the beaten butter until well combined, then mix in the chopped chocolate (including any chocolate dust) and the chopped nuts.

Cover the dough and refrigerate for at least 12 hours, preferably 24.

Preheat the oven to 350 degrees. Line two baking sheets with Silpat or parchment paper. Use a small ice cream scoop to make rounds about 1.5 inches in diameter. Place the mounds evenly spaced apart on the baking sheets, and press down the tops to flatten them so they are no longer domed and the dough is even. Sprinkle each cookie lightly with flaky sea salt.

Bake the cookies for ten minutes, rotating the baking sheets midway during baking, until the cookies look about set, but are not browned.

Remove from the oven and quickly tap the top of each with a spatula, then return to the oven for two more minutes, until the tops of the cookies are light golden brown.

Remove from oven and let cool on a rack.

Storage: The cookies can be stored at room temperature for up to five days in an airtight container. The dough can be refrigerated for up to one week or frozen for one or two months.

Continue Reading "break the butter rules"

Wednesday, August 18, 2010

lemony creme fraiche ice cream


Sometimes I love an ice cream that you don't have to turn a stove on for. The tanginess of creme fraiche and buttermilk, the brightness of lemon juice and zest, and that's all it takes. This would be the perfect accompaniment to a subtle olive oil cake or a pear tart, but it's also good just on it's own, maybe with some chopped pecans for crunch. Twenty minutes to greatness. Recipe after the jump:


LEMON CREME FRAICHE ICE CREAM

2 cups creme fraiche
2 cups buttermilk
zest of 1/2 lemon
1/3 cup fresh lemon juice
1 1/4 cups sugar
pinch of salt

Blend all ingredients together in a blender or food processor, making sure to scrape down the sides of the bowl. Chill until very cold, at least 4 hours, then freeze in an ice cream maker according to manufacturer's direction. Makes about 1 1/4 quarts.


Continue Reading "lemony creme fraiche ice cream"

Wednesday, August 11, 2010

rancho gordo: the beauty of beans


I'm having a very bean-y summer. It's not unusual for me to move away from eating heavy meat when it's hot out, but I generally consider beans a hearty and warming food, too, so it's odd that beans are where I keep finding myself right now. The textures of beans - both fresh and dried - are constantly calling to me. I ignore common sense and let a pot bubble on my stove for hours when it's 95 degrees out.


It is hard not to want beans all the time when the beans are as gorgeous as the ones from Rancho Gordo. Steve Sando has made the humble bean a sexy ingredient by growing and selling dozens of heirloom breeds that most of us had never seen or heard of before. Each type of bean is beautiful and unique, all sizes and colors, stripes and spots, flavors and textures.

One of my favorites varieties - and the one that Sando claims started this whole business when he first took a bite - is Rio Zape. A gorgeous mauve-colored bean with dark purple stripes and little white eye, Rio Zapes are similar to Pinto beans, but are denser and richer in flavor. The best way to start using heirloom beans if you want to understand why they are so amazing is to go simple simple simple. A bit of bacon, some aromatics, maybe a nice dark beer, finish it off with some tomatoes for acid and a fresh cilantro relish for bite. Simple and hearty, really taste the bean. Recipe after the jump:


BEER AND BACON BEANS WITH CILANTRO RELISH

For the beans:
1 pound Rancho Gordo Rio Zape Beans (use can substitute pintos or any beans you like)
2 tbsp olive oil
1/4 lb smokey bacon, diced
1 medium yellow onion, diced
3 cloves of garlic, minced
1 jalapeno pepper, minced
6 fresh sage leaves
1 sprig fresh rosemary
1 bottle stout or other dark beer
1 15-oz can diced tomatoes
juice of 1/2 lemon (use the 1/2 lemon left over from making the relish)
salt and pepper to taste

For the relish:
1 large bunch cilantro
1 medium shallot
1 clove garlic
zest of 1 lemon
juice of 1/2 lemon
salt
olive oil

To make the beans:
Cover the dried beans with cold water allowing at least two inches of water covering the surface of the beans. Soak for at least 6 hours or overnight. Do not discard the soaking liquid.

In a large heavy pot, heat the olive oil. Add the diced bacon and saute, rendering out the fat and crisping the bacon. When it is brown and crispy, remove the bacon with a slotted spoon and set aside to drain on paper towels. You will use this bacon to finish the beans.

Remove all but 2-3 tablespoons of fat from the pot. Saute the onion and garlic until fragrant. Add the sage, rosemary and minced jalapeno and saute until fragrant. Add the beans with their soaking liquid, plus the bottle of beer. If necessary, add additional water to cover the beans. Bring to a boil, then lower to a very slow simmer until the beans are tender. This will take anywhere from 1-2 hours depending on how long they soaked and how firm you like your beans. I tend to like my beans with a bite. When the beans are tender, add the tomatoes, lemon juice, and bacon, and season well with salt and pepper. Cook a few minutes more to incorporate the acids and the bacon. Remove the sage leaves and rosemary before serving. Serve on rice or with crusty bread, topped with a dollop of the cilantro relish and the crispy bacon bits.

For the cilantro relish:
Mince the cilantro, shallot, and garlic very finely, you can use a mini-prep if you like. Add the lemon zest, juice and salt to taste. Add enough olive oil to make a thick pesto-like sauce. Serve alongside the beans.

Continue Reading "rancho gordo: the beauty of beans"

Tuesday, August 03, 2010

in season: cardamom apricot pistachio crostata


My favorite scents are all foods. I like to wear lemon verbena. The hand soaps in my bathrooms are ginger and lemon, or coconut and honey. My deodorant smells like lemongrass. My body lotion actually has real vanilla beans in it. I even caught myself sniffing a delicious anti-bacterial wipe with lemongrass and thyme scent. Deliciously clean. Now I want a perfume scented with warm cardamom and ripe apricots.

This rustic tart was one of those great recipes that built in my head throughout the day. First I got the gorgeous apricots and sniffed and sniffed them. Then I decided I wanted some crunch and thought that the subtle sweetness of pistachios would be the perfect thing to offset the tartness of the fruit. Then, for some reason, pistachios make me thing of cardamom. It just seemed to make perfect sense.

The tart is true simplicity. A classic pate brisee crust made free-form over the fresh fruit, just tossed in sugar and spice and sprinkled liberally with chopped nuts. I did think after I already baked it that I should have used honey instead of sugar for another layer of flavor, but the good thing about cooking revelations that come a little too late is always having an excuse to make it again. Recipe after the jump:


APRICOT PISTACHIO CROSTATA

For the pate brisee:
1 1/4 cups all-purpose flour
1 tablespoon granulated sugar
1/4 tsp salt
1/2 cup (1 stick) cold unsalted butter, cut into small dice
3-5 tablespoons ice cold water

For the filling:
1 1/2 pounds ripe apricots (About a dozen small)
1/3 cup granulated sugar
1/2 tsp ground cardamom
1/8 tsp kosher salt

For the topping: 1/3 cup chopped unsalted pistachios

To make the crust: Combine the flour, sugar, and salt the bowl of a food processor and pulse a couple times to mix and aerate. Add the cubed butter and pulse until the mixture resembles a coarse meal. Slowly add the ice water a tablespoon at a time through the feed tube as the processor runs. Add just enough water for the dough to start to come together. Turn the dough out onto the counter, shape into a disk, cover with plastic wrap and refrigerate for at least 1 hour. Preheat your oven to 400 degrees.

To make the filling: Slice the apricots along the seam and remove the pit. Cut each half into 2 or 3 wedges, depending on the size of the apricot. Toss the wedges with the sugar, cardamom and salt until well coated. Let sit for a few minutes while you roll out your crust.

Roll your crust into a 13-inch circle. Arrange the apricot wedges in a decorative pattern from the inside out, leaving a 2-inch border of crust all around. Pour over any syrup that may have collected at the bottom of the bowl of fruit. Fold the overhang of the crust over the fruit all around the tart. Bake in the preheated oven for 30 minutes, then scatter the chopped pistachios evenly over the fruit, return to the oven and bake an additional 5-10 minutes until the crust is golden brown and the fruit is bubbly. Serve warm with a dollop of lightly sweetened whipped cream.

Continue Reading "in season: cardamom apricot pistachio crostata"

Monday, July 26, 2010

greek diner dinner


I remember once that a friend was visiting from a faraway state and was unfamiliar with the NY-style diner. It's really 24 hours? This huge thing is the menu? You can really get ANY of this stuff at ANY time? What's with all the Greek food? I don't know diners any other way. Everywhere else I've been in the states, a "diner" is not remotely a diner. I think the word "diner" in most of the country suggests simple comfort grub, like burgers and fries and eggs and pancakes. To me, the quintessential diner dinner is spinach pie with a Greek salad.

Spanakopita is probably more commonly known as an hors d'oeuvres at weddings, wrapped as little crispy triangles. Diner style spanakopita is pie-style, a huge square cut from a huge tray. It is certainly easier to make that way, though perhaps not easier to eat. And it's a very simple dish, just a little time-consuming and perhaps a little frustrating, depending on how you feel about phyllo. Phyllo is a pain in the ass, but at least for this dish you're putting on so many layers that no one will care if there's a tear or two. Serve this with a big salad piled with crumbled feta, kalamata olives, grape tomatoes, chopped cucumber, and thinly sliced red onion for the complete diner experience. Recipe after the jump:


SPANAKOPITA (SPINACH PIE)

2 lbs fresh spinach, washed well and spun dry
3 tbsps extra virgin olive oil
1 medium yellow onion
1/4 cup fresh dill
juice of 1/2 lemon
1/2 lb greek feta
1 egg, beaten
1 lb phyllo leaves
1/2 cup (1 stick) unsalted butter
salt and pepper to taste

In a large pot, heat 2 tbsps olive oil. Add the spinach and saute until wilted. You may need to do this in 2 batches. Remove the spinach to a large bowl and allow to cool. Add the remaining oil to the same pot and saute the onions until translucent. Set aside to cool. When the spinach is cool enough to handle, squeeze out the excess liquid, then chop well. Add the onions, dill, and lemon juice and season with salt and pepper to taste. Crumble the feta into the spinach mixture, then add the beaten egg and stir well to combine.

Preheat the oven to 350 degrees. Melt the butter in a small pan. Using a pastry brush, butter the sides and bottom of a 9/13 baking pan. Place 10 layers of phyllo dough in the bottom of the dish, buttering each layer (you may need to cut down the sheets to the correct size of the dish, but it is not a big deal if it is slightly large and the sides go up the sides of the pan slightly). Be sure to keep the phyllo damp by covering the unused sheets with a damp towel until you use them. After 10 layers of phyllo, spoon the spinach mixture evenly over the pie. Top with another 10 layers of phyllo, again buttering every layer. Bake in the preheated oven for 40 to 45 minutes, or until the top is golden brown and crispy. Allow to cool for 10 minutes before slicing into large squares.

Continue Reading "greek diner dinner"

Thursday, July 22, 2010

milk & honey


Okay, it's been awhile. It's not that I haven't been cooking, it's just that all I want to make is mint chip ice cream. That's not very exciting for all of you readers, but it is very exciting for me.

To give you something to chew on, I decided to take a very brief break from mintiness this week and instead make this Honey Vanilla Goat's Milk Ice Cream. Why goat's milk? Mostly, I was just curious. And the answer is that it really doesn't taste any different from cow's milk, especially when made into an ice cream. Actually this is more like a gelato because it is only milk, no cream. And the choice of honey was simply due to a lovely gift of some wonderful Blueberry Blossom Honey from Red Bee Artisanal Honeys, who came and did a truly fascinating honey tasting with us the other day.

How to describe the result? I know it doesn't look exciting, but it was fairly exciting nonetheless. It was a little less creamy than a full on ice cream, as expected, but the texture was still very lovely. And the flavor of wonderful honey with vanilla bean was, to put it simply, Honeycomb Cereal-esque. Sort of like how you might expect Honeycomb Cereal Ice Cream to taste in the best way you could imagine. I hope that reads as a big positive, because I do love Honeycomb Cereal. Recipe after the jump:


HONEY-VANILLA GOAT'S MILK ICE CREAM

3 cups goat milk
1/2 cup honey
1 vanilla bean
4 egg yolks

Pour the milk into a medium saucepan and set over medium heat. Scrape the seeds out of a vanilla bean and add the seeds and pod to the milk. Heat until steaming, being careful not to boil or scorch. Add the honey and stir well to dissolve. Remove the vanilla pod and discard. Whisk the egg yolks. Slowly add a ladleful of the hot milk to the egg yolks, whisking briskly to avoid scrambling the eggs. Return the egg/milk mixture to the pot of milk. Cook over medium-low heat, stirring constantly, until the custard thickens enough to coat the back of the spoon. Strain the custard into a bowl over an ice bath and stir to cool down. Transfer to the fridge and allow to chill thoroughly for at least 6 hours or preferably overnight. Freeze in an ice cream maker according to manufacturer directions.

Continue Reading "milk & honey"

Wednesday, June 30, 2010

in season: blueberry buttermilk scones


It's summer now, and summer is blueberry season. There's not much more that I can say than that I am obsessed with blueberries and eat them everyday when they're good. I eat them straight, I bake them into everything, I even toss them on salads. This is just a humble blueberry buttermilk scone. It doesn't get much better than this. And these are good for you. In the sense that they aren't BAD for you. Antioxidants and fiber and all that good stuff. Mostly, they're just good. Recipe after the jump:


BLUEBERRY BUTTERMILK SCONES

1 1/4 cup all-purpose flour
3/4 cup whole wheat pastry flour
1 1/2 tablespoon granulated sugar
2 1/2 tsp baking powder
3/4 tsp salt
4 ounces (1 stick) cold unsalted butter, diced
1 heaping cup fresh blueberries
zest of one small lemon
1/2 cup buttermilk
1 large egg, plus 1 large egg lightly beaten for egg wash
1/2 teaspoon pure vanilla extract
coarse sugar (like demerara) for sprinkling.

Preheat oven to 375 degrees. Line a baking sheet with parchment paper or a silicone mat.

Whisk together flours, granulated sugar, baking powder and salt in a large bowl. Add butter and rub with your fingers until mixture has the texture of course meal. Gently stir in blueberries.

In another bowl whisk together buttermilk, 1 egg , lemon zest and vanilla. Drizzle over flour mixture and stir lightly with a fork until the dough just comes together. Do not overwork the dough.

Turn out dough onto work surface and gently knead dough once or twice just to incorporate the flour. Pat the dough into a 1-inch thick round. Cut the round into approximately 10-12 wedges. Transfer to baking sheet.

Brush the top of each scone with egg wash and sprinkle generously with coarse sugar. Bake until golden brown and cooked through, roughly 25 minutes. Transfer scones to a wire rack to cool.

Continue Reading "in season: blueberry buttermilk scones"

Monday, June 21, 2010

in season: summer (spring) berry pudding


It is really freaking hot out today. We didn't have much of a spring, it's been so hot for so long already. Even though it was not technically summer until today, this berry pudding made a special spring appearance to help combat the weather and take advantage of the super sweet berries gracing the greenmarket.


Since it was still spring when I actually made this, my choice of berries leans toward the early season favorites - strawberries, blueberries, and sweet cherries. This super easy British classic takes modest ingredients and transforms them into an almost fancy dessert with just a little patience and pressure. It's almost as if the bread, soaking up those sweet juices, turns into cake and waits for you cold and refreshing in the fridge to delight you with a dollop of cream. And you don't even need to turn on an oven. Keep one of these in the fridge at all times this summer, choose the best variety of berries that you can find in the market, you won't regret it. Recipe after the jump:


SUMMER BERRY PUDDING

6 cups assorted seasonal berries (strawberries, blueberries, cherries, blackberries, raspberries, currants, etc)
3/4 cup sugar
1 tbsp kirsch
1 small bundle of mint
1 loaf of soft, dense sliced white bread, crusts removed (brioche also works great)

Prep any berries that need stemming or pitting, slicing any larger berries. In a medium saucepan, combine the berries with the sugar, kirsch, and mint bundle. Bring to a simmer over medium heat and cook until the juices release and the berries soften, about 8-10 minutes. Remove the mint bundle and discard, then set the berries aside to cool slightly.

Line a 6-cup pudding bowl with plastic wrap, leaving enough overhang to cover the opening once it is full. Line the bowl along the bottom and all the way up the sides with slices of bread, dipping the outer side of the bread into the berry syrup before placing. Be sure the bowl is completely lined, you will probably need to cut slices to size to fill gaps. Using a slotted spoon, fill the bowl with about 1/3 of the berries. Top with a layer of bread. Repeat the layering twice, finish with a cover of bread dipped in the syrup. Pour the remaining syrup over the top layer. Fold over the plastic wrap overhang. Cover with a plate, pressing down on the pudding. Top the plate with a heavy can to weight it down. Store in the fridge for at least 12 hours, but the longer you let it chill the better.

To serve, unmold the pudding and remove the plastic wrap. Slice into wedges and serve topped with fresh berries, a dollop of whipped cream, and a garnish of mint.

Continue Reading "in season: summer (spring) berry pudding"

Monday, June 14, 2010

ice cream garden


I don't know how it is that I had never made mint chocolate chip ice cream. It is easily my all-time favorite ice cream flavor. And now that I have made it and realize how much fresh mint blows away any store-bought mint extract-based green stuff, I may have to continually make this every few days.


Because J and I finished the whole quart in two days. QUART. In TWO DAYS. I'm not proud of that, but it was just so freaking good. Creamy and extra cool, with this added fresh grassy flavor that only real herbs could bring. I added the bittersweet chocolate in a straciatella style, by melting it, drizzling ribbons onto the softly frozen ice cream, and breaking up the chocolate by hand. This results in super crackly thin bits of chocolate, incredibly well distributed.


And look, it's actually green! Recipe after the jump:

MINT CHOCOLATE CHIP ICE CREAM
Adapted from the recipe by David Leibovitz

For the mint ice cream:

3 cups half and half, divided
3/4 cup sugar
pinch of salt
2 cups packed fresh mint leaves
5 large egg yolks

For the chocolate chips:

4 ounces bittersweet chocolate, chopped

1. In a medium saucepan, warm the sugar with 2 cups of the half and half, salt, and mint.

2. Once the mixture is hot and steaming, remove from heat, cover, and let stand for an hour to infuse the mint flavor.

3. Remove the mint with a strainer, then squeeze out as much liquid from the mint leaves as possible. Discard the mint.

4. Pour the remaining half and half into a large bowl and set the strainer over the top.

5. Rewarm the infused milk. In a separate bowl, whisk the egg yolks, then slowly add some of warmed milk to the eggs to temper, whisking constantly. Add the warmed egg mixture back into the pot of milk.

6. Cook the custard, stirring constantly with a heatproof spatula, until the mixture thickens and coats the spatula. If using an instant read thermometer, it should read around 170ºF.

7. Immediately strain the mixture into the cream, then stir the mixture over an ice bath until cool.

8. Refrigerate the mixture thoroughly, preferably overnight, then freeze it in your ice cream maker according to the manufacturer's instructions.

While the mixture is freezing, melt the chocolate in a small bowl over a pot of simmering water, or in a microwave oven on low power, stirring until smooth. Place a storage container in the freezer.

9. When the ice cream in the machine is ready, scribble some of the chocolate into the container, then add a layer of the just-churned ice cream to the container. Scribble melted chocolate over the top of the ice cream, then quickly stir it in, breaking up the chocolate into irregular pieces. Continue layering the ice cream, scribbling more chocolate and stirring as you go.

When finished, cover and freeze until firm.

Continue Reading "ice cream garden"

Monday, June 07, 2010

apparently, sade sang a song about cherry pie, too


It is confirmed, the teeniest touch of almond makes the flavor of cherries burst to the forefront. Of course, it does help to have beautifully sweet and plump cherries to work with. This cherry-almond pie was - if I can give myself a pat on the back - the BEST cherry pie I've ever had.


It is the essence of cherry flavor, the flavor that makes you understand what all of those artificial cherry flavors are trying to go for, but don't quite get right.


If you can manage to stop yourself from eating all of the cherries before they go into the pie (I think approximately the same amount of cherries went into the pie as went straight into my mouth), this is what you should do with lovely fresh cherries. It will ruin you forever for any store bought pie, or pie filling in a can, or those gut bomb pocket pies covered in glaze. THIS is what cherry pie should be, the only thing it should ever be. This pie is fantastic warm with vanilla ice cream, but was actually even better cold with nothing at all. Recipe after the jump:


FRESH CHERRY AND ALMOND PIE

1 recipe for a double crust 9-inch deep dish pie
2 pounds fresh cherries, pitted
4 tablespoons quick-cooking tapioca
1 cup granulated sugar
1/2 teaspoon pure vanilla extract
1/4 teaspoon almond extract
1 teaspoon kirsch
1/2 cup thinly sliced almonds
1 tablespoon butter, diced
3 tablespoons heavy cream, optional

Preheat oven to 400 degrees. In a large mixing bowl, toss the cherries, sugar, tapioca, extracts, and kirsch and let sit for 15-20 minutes.

Roll out the chilled pie dough for the bottom crust and line a deep dish pie plate, leaving 1/2 inch of overhang. Fill the pie with the cherry mixture, then sprinkle the almond slices over the fruit. Dot with the butter pieces. Cover with the top crust, crimp to seal, and cut slits to allow steam to escape. Brush the crust with the heavy cream. Bake in the preheated oven for 50-55 minutes until crust is golden brown and juices are bubbling. Allow to cool completely before slicing.

Continue Reading "apparently, sade sang a song about cherry pie, too"

Monday, May 31, 2010

labor of love: foodCrafters

Tonight at 9 and 9:30PM, my new show foodCrafters premieres two episodes on the brand new Cooking Channel. This project is very near and dear to my heart, and I hope to do justice to the amazing people whose stories we're telling. Please tune in, and enjoy!


Continue Reading "labor of love: foodCrafters"

Monday, May 17, 2010

signs of spring: strawberry sour cream ice cream


When I was a kid, my mom made amazing waffles. The thin round kind that got perfectly crispy. She would underfill the waffle maker so the edges would be these sort of blobs of batter and get especially crisp. Instead of syrup, my mom would spread the waffles with sour cream - getting it all in the squares - dust it with powdered sugar, then top with thawed frozen strawberries. I have no idea where this combination came from, but to me it is an ultimate comfort food. Sour cream and strawberry waffles are some of my most vivid food memories from childhood.

When I saw this recipe by ice cream maven David Lebovitz for Strawberry Sour Cream Ice Cream, I knew that this would be my first ice cream of the spring season. I waited oh so many weeks for the strawberries to starting popping up at farmer's markets. My wait has finally come to an end.


The sweet, pure flavor of new strawberries, the slightest subtle tang of sour cream, the secret edge of kirsch and lemon juice. The result is smooth and fresh and lovely, and brings back memories of Saturday morning breakfasts. Oh my god, I'm going to go make waffle cones to eat this in. Recipe after the jump:

STRAWBERRY SOUR CREAM ICE CREAM
From The Perfect Scoop by David Lebovitz

Makes about 1 1/4 quarts

1 pound fresh strawberries, rinsed and hulled
3/4 c. sugar
1 tbsp. vodka or kirsch
1 c. sour cream
1 c. heavy cream
1/2 tsp. freshly squeezed lemon juice

1) Slice the strawberries and toss them in a bowl with the sugar and vodka or kirsch. Stir until the sugar begins to dissolve. Let stand at room temperature for 1 hour, stirring every so often.

2) Pulse the strawberries and their liquid with the sour cream, heavy cream and lemon juice in a blender or food processor until almost smooth, but still slightly chunky.

3) Freeze in your ice cream maker according to the manufacturer’s instructions.

Continue Reading "signs of spring: strawberry sour cream ice cream"