Showing posts with label Seasonal. Show all posts

Thursday, August 18, 2011

great grains


I love big filling salads on a summer night, based around some good old starch. Pasta or grains, please. And with grains, there are endless choices. I do lots of salads with quinoa, wheat berries, different rices, freekeh, farro, bulgur, spelt; the list goes on and on. This week, it was barley, a grain I usually only use in soups, but has a wonderfully nutty flavor and satisfying bite when cooked and cooled.

The great thing about having a variety of grains in your pantry is how easy it makes improvising a meal after you've raided the farmer's market for the freshest veg you can find. There's always a base to work off of, they keep for ages, and they keep things interesting. Recipe for my barley, heirloom tomato, arugula, zucchini, mozzarella salad after the jump:


SUMMER BARLEY SALAD

1 cup whole grain barley
1 lb heirloom cherry tomatoes, quartered
1 medium zuchinni, quartered lengthwise and sliced thinly
3 or 4 big handfuls of baby arugula
1/4 cup flat-leaf parsley, chopped
1/2 lb fresh salted mozzarella cheese, cut into small cubes
salt and pepper, to taste

For the dressing:
juice of 1 lemon
1/4 cup extra virgin olive oil
salt and pepper, to taste

Bring 2 cups of water to a boil in a medium saucepot. Add the barley, bring down heat to a simmer, cover, and cook for 35-40 minutes until tender. (You can also soak your barley overnight, which cuts the cooking time down to about 15 minutes. You need less water to cook if you soaked it). Fluff the barley with a fork and set aside to cool well. You can cook the barley well ahead of time and cool it in the fridge so that it's ready for the salad any time.

In a large bowl, toss the cooled barley with all of the vegetables. Whisk together the dressing ingredients and dress to taste, adding more salt and pepper if needed. Top with the cubed mozzarella.

Continue Reading "great grains"

Wednesday, August 10, 2011

variations on a theme: apricot and almond crostata


It takes about an hour to bake a full-on pie, and with the summer we've been battling in the northeast, keeping the oven on for an hour is not advisable. But I really can't go very long without pie. Especially when it's high season for so many delectable fruits. The answer? A crostata. A rustic, free-form tart that bakes in half the time and totally satisfies the pie craving. A simple pate brisee crust, fresh fruit, a touch of sugar, and whatever complementary flavor you're in the mood for.


This time, the apricots at the farmer's market were both adorable and ripe, and I had a bag of sliced almonds that I wanted to use. I always end up pairing fruit with nuts nowadays, because I pretty much want some kind of crunch in everything I eat. Or, as Beth might tell you, because I love nuts. Recipe after the jump:

APRICOT AND ALMOND CROSTATA

For the pate brisee:
1 1/4 cups all purpose flour
1/2 teaspoon salt
1 tablespoon granulated sugar
1/2 cup (1 stick) (unsalted butter, chilled, and cut into 1 inch pieces
3-5 tablespoons ice water

For the filling
1 1/4 pounds fresh apricots
1/3 cup white sugar
1 teaspoon almond extract
pinch salt

Make the crust: Combine the flour, salt, and sugar in a food processor and pulse a few times to mix well. Add the cold cubed butter and pulse until mixture resembles a coarse meal. Add the ice water one tablespoon at a time, pulsing between spoons, only using as much as it takes to get the dough to come together. Turn the dough out onto plastic wrap, flatten into a disk, and refrigerate for at least 1 hour. When it is fully chilled, preheat your oven to 400 degrees.

Make the filling: Split the apricots along the seam and remove the pits. Slice each half into 2 or 4 pieces, depending on how large your apricots are. Combine in a bowl the the sugar, salt, and almond extract and toss to coat. Set aside while you roll out your dough.

Roll your dough into a 13-inch circle and transfer onto a sheet pan. Place the apricot slices in a decorative circular pattern from the center radiating to the edges, leaving at least 1 inch of uncovered crust. Sprinkle with the almond slices. Fold the edges of the crust over the fruit. Bake in the preheated oven for 35-40 minutes until the crust is golden brown and the fruit juices are bubbling. Serve warm with whipped cream or vanilla ice cream.

Continue Reading "variations on a theme: apricot and almond crostata"

Friday, June 24, 2011

not that i don't love pie: strawberry rhubarb cobbler


Sometimes I just don't have the time to make a pie crust. I'm a busy lady, and sometimes the craving for strawberry-rhubarb something or other hits at 6PM. I think that's why cobblers and crisps were invented.


I also like any excuse to eat a biscuit. This cobbler really does look like cobblestones, just like the cobblestones paving the streets of Rome. Where we'll be (finally) honeymooning this September! Woohoo!


Oh, and sorry this is essentially out of season already. To tell you the truth, I baked this back in May and uh...I've been busy. Recipe after the jump:

STRAWBERRY RHUBARB COBBLER

Fruit layer
4 1/2 cups rhubarb stalks trimmed of stringy layer and cut into 1-inch pieces
1 1/2 cups strawberries, stemmed and sliced
1/2 cup white sugar
2 Tablespoons of quick cooking tapioca
1 teaspoon of grated orange peel

Cobbler crust
2 Tbsp white sugar
1 cup all purpose flour
1 1/2 teaspoon baking powder
1/4 teaspoon salt
1/4 cup unsalted butter, cut into small cubes
1/4 cup milk
1 egg

Preheat oven to 350 degrees. In a medium bowl, mix together all of the fruit filling ingredients and let sit while you prepare the cobbler batter.

In another bowl, combine the sugar, flour, baking powder and salt. Cut the butter in with a fork or pastry cutter. Whisk together the milk and egg and slowly add to the batter, mixing just until moistened.

Pour the fruit mixture into a 2-quart casserole dish. Use a large spoon to drop the cobbler batter on top, you can make 4 large cobbles or 6 smaller cobbles, depending on the shape of your dish. Bake in the preheated oven for 35 minute or until the cobbles are golden brown and the fruit is bubbly.

Continue Reading "not that i don't love pie: strawberry rhubarb cobbler"

Monday, May 09, 2011

r is for ramps


Ramps have become code for "foodie". Perhaps not in the most flattering way. If someone asks me what I'm making for dinner and it happens to contain ramps, I get one of two reactions:

1. What the hell is a ramp?
2. You're such a f*&%ing foodie.

Why?


It's still not so easy to find ramps, you generally have to trek to a farmer's market or specialty produce store, but seriously I saw some in the Key Foods recently and that place is full-on ghetto. They are only in season for a couple of weeks, but I don't know if that's reason enough to find them snobbish.


Because, after all, what's not to like? Slightly oniony and a bit garlicky, those are two of the bestest flavors on the planet. To me, ramps are a sign that spring has really arrived, along with fresh peas, good strawberries and rhubarb. So last night's dinner was a simple pesto of peas, ramps, and lemon, followed by a strawberry-rhubarb cobbler. Call me a foodie, I don't care, at least my life is always delicious.

PASTA WITH RAMP AND PEA PESTO

1 1/2 cups fresh shelled English peas
1/2 pound wild ramps (about 6-7 medium-sized ramps), trimmed at the root end
zest of 1 lemon
1 large garlic clove, peeled and smashed
1/4 cup pine nuts
1/2 cup extra virgin olive oil
3/4 cup grated parmiggiano-reggiano cheese
1 tsp kosher salt, to taste
1 lb fettucine or other long flat pasta

Bring a large pot of water to boil. Blanch the peas for 3 minutes, then remove from the water with a skimmer to a bowl of cold water. Add the ramps to the boiling water and blanch for two minutes, also removing with a skimmer and setting aside. Add a handful of kosher salt to the water and bring back to a full rolling boil before adding the pasta, cooking as directed on the package or until al dente.

While the pasta is cooking, drain the peas and add 1 cup to the bowl of a food processor, reserving the remainder. Coarsely chop the blanched ramps and add to the food processor with the pine nuts, garlic, and lemon zest. Turn on the processor and begin to slowly drizzle half of the olive oil through the lid opening until a paste forms. Scrape down the sides of the bowl, add the salt and cheese and begin to process again. Continue drizzling the remaining oil until a shiny paste forms, you may not need all of the oil to reach your desired consistency.

When the pasta is done cooking, drain well, reserving about 1 cup of the pasta cooking water. In a large bowl, toss the hot pasta with the pesto, adding enough cooking water to loosen the paste. You want the pesto to coat the pasta well without being too thick and clumpy. Add in the reserved peas and toss. Serve with additional grated cheese and a drizzle of olive oil.

NOTE: This recipe makes more than enough for a pound of pasta, so store leftovers in an airtight container in the fridge, with a layer of olive oil on the surface to preserve the green color. It is excellent spread on crostini with some fresh ricotta cheese.

Continue Reading "r is for ramps"

Thursday, April 07, 2011

insisting on spring


Weather, what a tease. We had the briefest glimpse of warmth and sun, followed by a plunge back into the depths of a winter than just won't end. Did you know that one year ago today it broke 90 degrees in NYC? Yeah.

Anyway, enough with the winter, I refuse to acknowledge its death grip on the city. I will eat spring foods and I will not wear my winter coat or boots. I will make risotto with fresh peas and leeks and bright happy lemon, and that's that. Recipe after the jump:


RISOTTO WITH PEAS AND LEEKS

1 tbsp unsalted butter
1 tbsp olive oil
1 medium leek, white and light green parts only, thoroughly washed and sliced into half-rings
1 1/2 cups arborio rice
1 cup dry white wine
6 cups vegetable or chicken stock
2 cups fresh shelled peas
zest of one lemon
1 cup freshly grated parmiggiano-reggiano
salt and pepper, to taste
chopped fresh mint, optional

Heat the stock in a small saucepot and keep at a low simmer at a burner adjacent to where you will cook the risotto.

Heat the butter and olive oil in a large heavy skillet or saucepan over medium heat. Add the leek and saute until softened, about 2-3 minutes. Add the dry rice and saute to coat the grains with the fat. Add the wine and stir until fully absorbed. Add 1 cup of the hot stock and stir until absorbed. Continue adding the stock 1 ladleful at a time, stirring continuously until absorbed before adding the next ladle.

When the rice is almost al dente, about 30 minutes, add the peas. Continue to cook until peas are tender, about 5 minutes. Take off the heat, add the lemon zest and cheese and stir to incorporate. Test for seasoning and add salt and pepper to taste. Serve warm topped with chopped mint.

Continue Reading "insisting on spring"

Friday, December 03, 2010

autumn in a jar


I'm almost ashamed that I made something already ridiculously simple to make even simpler. How lazy can I be? I can try to justify this by claiming that there's an additional upside to making applesauce in a slow cooker than just convenience; it's the way that it perfumes your house with the aroma of coziness for 5 hours.

Peel some apples, chop them up, throw them in a crockpot with a touch of cider, some spices, some sugar, and then do nothing. Make sure to eat this while it is still warm, that's the most important bonus of making your own applesauce. Recipe after the jump:


SLOW COOKER APPLESAUCE

8 apples, peeled, cored, and sliced*
1/3 cup apple cider or water
juice of one lemon
1/4-1/3 cup cane sugar, to taste (amount will vary depending on your apples)
1/2 tsp ground cinnamon
1/4 tsp ground nutmeg
pinch ground clove

Place the sliced apples in the slow cooker with the apple cider and lemon juice and set on low for 4-5 hours. About 30 minutes before cooking is complete, taste the sauce and add sugar to taste. Add the remaining ingredients and let cook for the remaining 30 minutes. If desired, blend with an immersion mixer to make smooth. Store in the refrigerator in airtight containers, or jar for long term storage.

*Note: I always use a combination of apples for depth of flavor, like macoun, empire, cortland, fuji, honeycrisp, golden delicious. Whatever you love, or whatever you have that is past its raw eating prime.

Continue Reading "autumn in a jar"

Monday, November 08, 2010

presenting perfect pear pie


When you've made a few too many apple pies and need a change - but not a huge one - make a pear pie instead. Maybe don't even mention that this is a pear pie when you serve it and see the thoughtful and slightly confused looks on people's faces when they taste it.


Use fairly firm anjou pears for a stunning texture and sweet, mild flavor. Grate a pile of fresh nutmeg. Make a thick, rustic pie crust, preferably with lard and butter. Serve warm or cold, with ice cream or whipped cream, or with nothing because it's that tasty. And that's it. Pears and nutmeg, whoulda thunk? Recipe after the jump:


ANJOU PEAR AND NUTMEG PIE

2 1/2 lb firm-ripe Anjou pears, peeled, cored and sliced into 1/4-inch slices
3 tablespoons all-purpose flour
1/2 teaspoon freshly grated nutmeg
1/8 teaspoon salt
2/3 cup plus 1 tablespoon sugar
1 tablespoon fresh lemon juice
1 recipe pie crust for a double crust 9" pie
1 egg

Prepare the dough for the crust and set to rest in the refrigerator for at least one hour. In the meantime, prepare the pears and toss in a large bowl with the flour, nutmeg, salt, lemon juice, and 2/3 cup sugar. Set aside to prep you crusts.

Preheat oven to 425F. Roll out the bottom crust and line a 9" deep-dish pie plate, trimming the overhang to about 1/2 inch. Fill the crust with the pear mixture. Top with the second crust, trim, and crimp the edges. Cut a cross in the middle of the top crust and fold back the corners to expose a square. Brush the crust (but not the edges) with a beaten egg, then sprinkle the remaining tablespoon sugar over top.

Bake pie on a baking sheet at 425F for20 minutes, then lower the temperature to 375 and bake for an additional 45-55 minutes, until filling is bubbling and crust is golden brown. Cool the pie on a rack for at least 2 hours before serving.

Continue Reading "presenting perfect pear pie"

Tuesday, August 03, 2010

in season: cardamom apricot pistachio crostata


My favorite scents are all foods. I like to wear lemon verbena. The hand soaps in my bathrooms are ginger and lemon, or coconut and honey. My deodorant smells like lemongrass. My body lotion actually has real vanilla beans in it. I even caught myself sniffing a delicious anti-bacterial wipe with lemongrass and thyme scent. Deliciously clean. Now I want a perfume scented with warm cardamom and ripe apricots.

This rustic tart was one of those great recipes that built in my head throughout the day. First I got the gorgeous apricots and sniffed and sniffed them. Then I decided I wanted some crunch and thought that the subtle sweetness of pistachios would be the perfect thing to offset the tartness of the fruit. Then, for some reason, pistachios make me thing of cardamom. It just seemed to make perfect sense.

The tart is true simplicity. A classic pate brisee crust made free-form over the fresh fruit, just tossed in sugar and spice and sprinkled liberally with chopped nuts. I did think after I already baked it that I should have used honey instead of sugar for another layer of flavor, but the good thing about cooking revelations that come a little too late is always having an excuse to make it again. Recipe after the jump:


APRICOT PISTACHIO CROSTATA

For the pate brisee:
1 1/4 cups all-purpose flour
1 tablespoon granulated sugar
1/4 tsp salt
1/2 cup (1 stick) cold unsalted butter, cut into small dice
3-5 tablespoons ice cold water

For the filling:
1 1/2 pounds ripe apricots (About a dozen small)
1/3 cup granulated sugar
1/2 tsp ground cardamom
1/8 tsp kosher salt

For the topping: 1/3 cup chopped unsalted pistachios

To make the crust: Combine the flour, sugar, and salt the bowl of a food processor and pulse a couple times to mix and aerate. Add the cubed butter and pulse until the mixture resembles a coarse meal. Slowly add the ice water a tablespoon at a time through the feed tube as the processor runs. Add just enough water for the dough to start to come together. Turn the dough out onto the counter, shape into a disk, cover with plastic wrap and refrigerate for at least 1 hour. Preheat your oven to 400 degrees.

To make the filling: Slice the apricots along the seam and remove the pit. Cut each half into 2 or 3 wedges, depending on the size of the apricot. Toss the wedges with the sugar, cardamom and salt until well coated. Let sit for a few minutes while you roll out your crust.

Roll your crust into a 13-inch circle. Arrange the apricot wedges in a decorative pattern from the inside out, leaving a 2-inch border of crust all around. Pour over any syrup that may have collected at the bottom of the bowl of fruit. Fold the overhang of the crust over the fruit all around the tart. Bake in the preheated oven for 30 minutes, then scatter the chopped pistachios evenly over the fruit, return to the oven and bake an additional 5-10 minutes until the crust is golden brown and the fruit is bubbly. Serve warm with a dollop of lightly sweetened whipped cream.

Continue Reading "in season: cardamom apricot pistachio crostata"

Wednesday, June 30, 2010

in season: blueberry buttermilk scones


It's summer now, and summer is blueberry season. There's not much more that I can say than that I am obsessed with blueberries and eat them everyday when they're good. I eat them straight, I bake them into everything, I even toss them on salads. This is just a humble blueberry buttermilk scone. It doesn't get much better than this. And these are good for you. In the sense that they aren't BAD for you. Antioxidants and fiber and all that good stuff. Mostly, they're just good. Recipe after the jump:


BLUEBERRY BUTTERMILK SCONES

1 1/4 cup all-purpose flour
3/4 cup whole wheat pastry flour
1 1/2 tablespoon granulated sugar
2 1/2 tsp baking powder
3/4 tsp salt
4 ounces (1 stick) cold unsalted butter, diced
1 heaping cup fresh blueberries
zest of one small lemon
1/2 cup buttermilk
1 large egg, plus 1 large egg lightly beaten for egg wash
1/2 teaspoon pure vanilla extract
coarse sugar (like demerara) for sprinkling.

Preheat oven to 375 degrees. Line a baking sheet with parchment paper or a silicone mat.

Whisk together flours, granulated sugar, baking powder and salt in a large bowl. Add butter and rub with your fingers until mixture has the texture of course meal. Gently stir in blueberries.

In another bowl whisk together buttermilk, 1 egg , lemon zest and vanilla. Drizzle over flour mixture and stir lightly with a fork until the dough just comes together. Do not overwork the dough.

Turn out dough onto work surface and gently knead dough once or twice just to incorporate the flour. Pat the dough into a 1-inch thick round. Cut the round into approximately 10-12 wedges. Transfer to baking sheet.

Brush the top of each scone with egg wash and sprinkle generously with coarse sugar. Bake until golden brown and cooked through, roughly 25 minutes. Transfer scones to a wire rack to cool.

Continue Reading "in season: blueberry buttermilk scones"

Monday, June 21, 2010

in season: summer (spring) berry pudding


It is really freaking hot out today. We didn't have much of a spring, it's been so hot for so long already. Even though it was not technically summer until today, this berry pudding made a special spring appearance to help combat the weather and take advantage of the super sweet berries gracing the greenmarket.


Since it was still spring when I actually made this, my choice of berries leans toward the early season favorites - strawberries, blueberries, and sweet cherries. This super easy British classic takes modest ingredients and transforms them into an almost fancy dessert with just a little patience and pressure. It's almost as if the bread, soaking up those sweet juices, turns into cake and waits for you cold and refreshing in the fridge to delight you with a dollop of cream. And you don't even need to turn on an oven. Keep one of these in the fridge at all times this summer, choose the best variety of berries that you can find in the market, you won't regret it. Recipe after the jump:


SUMMER BERRY PUDDING

6 cups assorted seasonal berries (strawberries, blueberries, cherries, blackberries, raspberries, currants, etc)
3/4 cup sugar
1 tbsp kirsch
1 small bundle of mint
1 loaf of soft, dense sliced white bread, crusts removed (brioche also works great)

Prep any berries that need stemming or pitting, slicing any larger berries. In a medium saucepan, combine the berries with the sugar, kirsch, and mint bundle. Bring to a simmer over medium heat and cook until the juices release and the berries soften, about 8-10 minutes. Remove the mint bundle and discard, then set the berries aside to cool slightly.

Line a 6-cup pudding bowl with plastic wrap, leaving enough overhang to cover the opening once it is full. Line the bowl along the bottom and all the way up the sides with slices of bread, dipping the outer side of the bread into the berry syrup before placing. Be sure the bowl is completely lined, you will probably need to cut slices to size to fill gaps. Using a slotted spoon, fill the bowl with about 1/3 of the berries. Top with a layer of bread. Repeat the layering twice, finish with a cover of bread dipped in the syrup. Pour the remaining syrup over the top layer. Fold over the plastic wrap overhang. Cover with a plate, pressing down on the pudding. Top the plate with a heavy can to weight it down. Store in the fridge for at least 12 hours, but the longer you let it chill the better.

To serve, unmold the pudding and remove the plastic wrap. Slice into wedges and serve topped with fresh berries, a dollop of whipped cream, and a garnish of mint.

Continue Reading "in season: summer (spring) berry pudding"

Monday, June 14, 2010

ice cream garden


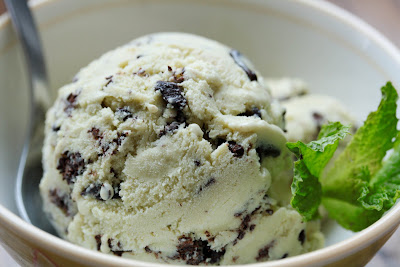
I don't know how it is that I had never made mint chocolate chip ice cream. It is easily my all-time favorite ice cream flavor. And now that I have made it and realize how much fresh mint blows away any store-bought mint extract-based green stuff, I may have to continually make this every few days.


Because J and I finished the whole quart in two days. QUART. In TWO DAYS. I'm not proud of that, but it was just so freaking good. Creamy and extra cool, with this added fresh grassy flavor that only real herbs could bring. I added the bittersweet chocolate in a straciatella style, by melting it, drizzling ribbons onto the softly frozen ice cream, and breaking up the chocolate by hand. This results in super crackly thin bits of chocolate, incredibly well distributed.


And look, it's actually green! Recipe after the jump:

MINT CHOCOLATE CHIP ICE CREAM
Adapted from the recipe by David Leibovitz

For the mint ice cream:

3 cups half and half, divided
3/4 cup sugar
pinch of salt
2 cups packed fresh mint leaves
5 large egg yolks

For the chocolate chips:

4 ounces bittersweet chocolate, chopped

1. In a medium saucepan, warm the sugar with 2 cups of the half and half, salt, and mint.

2. Once the mixture is hot and steaming, remove from heat, cover, and let stand for an hour to infuse the mint flavor.

3. Remove the mint with a strainer, then squeeze out as much liquid from the mint leaves as possible. Discard the mint.

4. Pour the remaining half and half into a large bowl and set the strainer over the top.

5. Rewarm the infused milk. In a separate bowl, whisk the egg yolks, then slowly add some of warmed milk to the eggs to temper, whisking constantly. Add the warmed egg mixture back into the pot of milk.

6. Cook the custard, stirring constantly with a heatproof spatula, until the mixture thickens and coats the spatula. If using an instant read thermometer, it should read around 170ºF.

7. Immediately strain the mixture into the cream, then stir the mixture over an ice bath until cool.

8. Refrigerate the mixture thoroughly, preferably overnight, then freeze it in your ice cream maker according to the manufacturer's instructions.

While the mixture is freezing, melt the chocolate in a small bowl over a pot of simmering water, or in a microwave oven on low power, stirring until smooth. Place a storage container in the freezer.

9. When the ice cream in the machine is ready, scribble some of the chocolate into the container, then add a layer of the just-churned ice cream to the container. Scribble melted chocolate over the top of the ice cream, then quickly stir it in, breaking up the chocolate into irregular pieces. Continue layering the ice cream, scribbling more chocolate and stirring as you go.

When finished, cover and freeze until firm.

Continue Reading "ice cream garden"

Monday, June 07, 2010

apparently, sade sang a song about cherry pie, too


It is confirmed, the teeniest touch of almond makes the flavor of cherries burst to the forefront. Of course, it does help to have beautifully sweet and plump cherries to work with. This cherry-almond pie was - if I can give myself a pat on the back - the BEST cherry pie I've ever had.


It is the essence of cherry flavor, the flavor that makes you understand what all of those artificial cherry flavors are trying to go for, but don't quite get right.


If you can manage to stop yourself from eating all of the cherries before they go into the pie (I think approximately the same amount of cherries went into the pie as went straight into my mouth), this is what you should do with lovely fresh cherries. It will ruin you forever for any store bought pie, or pie filling in a can, or those gut bomb pocket pies covered in glaze. THIS is what cherry pie should be, the only thing it should ever be. This pie is fantastic warm with vanilla ice cream, but was actually even better cold with nothing at all. Recipe after the jump:


FRESH CHERRY AND ALMOND PIE

1 recipe for a double crust 9-inch deep dish pie
2 pounds fresh cherries, pitted
4 tablespoons quick-cooking tapioca
1 cup granulated sugar
1/2 teaspoon pure vanilla extract
1/4 teaspoon almond extract
1 teaspoon kirsch
1/2 cup thinly sliced almonds
1 tablespoon butter, diced
3 tablespoons heavy cream, optional

Preheat oven to 400 degrees. In a large mixing bowl, toss the cherries, sugar, tapioca, extracts, and kirsch and let sit for 15-20 minutes.

Roll out the chilled pie dough for the bottom crust and line a deep dish pie plate, leaving 1/2 inch of overhang. Fill the pie with the cherry mixture, then sprinkle the almond slices over the fruit. Dot with the butter pieces. Cover with the top crust, crimp to seal, and cut slits to allow steam to escape. Brush the crust with the heavy cream. Bake in the preheated oven for 50-55 minutes until crust is golden brown and juices are bubbling. Allow to cool completely before slicing.

Continue Reading "apparently, sade sang a song about cherry pie, too"

Monday, May 17, 2010

signs of spring: strawberry sour cream ice cream


When I was a kid, my mom made amazing waffles. The thin round kind that got perfectly crispy. She would underfill the waffle maker so the edges would be these sort of blobs of batter and get especially crisp. Instead of syrup, my mom would spread the waffles with sour cream - getting it all in the squares - dust it with powdered sugar, then top with thawed frozen strawberries. I have no idea where this combination came from, but to me it is an ultimate comfort food. Sour cream and strawberry waffles are some of my most vivid food memories from childhood.

When I saw this recipe by ice cream maven David Lebovitz for Strawberry Sour Cream Ice Cream, I knew that this would be my first ice cream of the spring season. I waited oh so many weeks for the strawberries to starting popping up at farmer's markets. My wait has finally come to an end.


The sweet, pure flavor of new strawberries, the slightest subtle tang of sour cream, the secret edge of kirsch and lemon juice. The result is smooth and fresh and lovely, and brings back memories of Saturday morning breakfasts. Oh my god, I'm going to go make waffle cones to eat this in. Recipe after the jump:

STRAWBERRY SOUR CREAM ICE CREAM
From The Perfect Scoop by David Lebovitz

Makes about 1 1/4 quarts

1 pound fresh strawberries, rinsed and hulled
3/4 c. sugar
1 tbsp. vodka or kirsch
1 c. sour cream
1 c. heavy cream
1/2 tsp. freshly squeezed lemon juice

1) Slice the strawberries and toss them in a bowl with the sugar and vodka or kirsch. Stir until the sugar begins to dissolve. Let stand at room temperature for 1 hour, stirring every so often.

2) Pulse the strawberries and their liquid with the sour cream, heavy cream and lemon juice in a blender or food processor until almost smooth, but still slightly chunky.

3) Freeze in your ice cream maker according to the manufacturer’s instructions.

Continue Reading "signs of spring: strawberry sour cream ice cream"

Sunday, May 09, 2010

signs of spring: asparagus pesto


After a long couple of weeks of nonstop work, I was WIPED OUT by Sunday evening, and my plans of ice cream experimenting and pie making and who knows what else was slowly slipping away. I needed a simple easy dinner that left very little clean-up, but I still wanted SPRING. So, the logical decision, take a cue from Mark Bittman in this week's NY Times, and turn that lovely asparagus into a pesto.

It doesn't get much easier than breaking out the food processor and blending a bunch of stuff up and tossing it with pasta. All it takes is about 8 minutes of blanching (in the same water I ended up boiling the pasta in), and the asparagus was ready to toss in the processor with the classic pine nuts, cheese, and olive oil. I tweaked his recipe a bit, adding in a bit of basil and more lemon juice. I also iced the asparagus after blanching thinking it might help preserve the vibrant green. I'm not sure that it was really necessary. Tossed with some fresh fettuccine, this dinner was wolfed down enthusiastically. Recipe after the jump:


ASPARAGUS PESTO
Adapted from a recipe by Mark Bittman, New York Times

Salt
1 pound asparagus, trimmed and cut into 2-inch segments
1 clove garlic, or more to taste
1/4 cup pine nuts
1/4 cup basil leaves
1/4 cup olive oil, or more as desired
3/4 cup freshly grated Parmesan cheese
Freshly ground black pepper
Juice of 1/2 lemon, or to taste.

1. Bring a large pot of water to a boil and salt it. Add the asparagus and cook until fully tender but not mushy, 8 to 10 minutes. Drain well, reserving some of the cooking liquid, and let the asparagus cool slightly.

2. Transfer the asparagus to a food processor and add the garlic, pine nuts, 2 tablespoons of the oil, Parmesan, a pinch of salt and a couple of tablespoons of the cooking liquid. Process the mixture, stopping to scrape down the sides of the container if necessary, and gradually add the remaining oil and a bit more of the reserved cooking liquid to moisten if necessary. Add the lemon juice and season with salt and pepper to taste, pulse one last time, and serve over pasta, fish or chicken (or cover and refrigerate for up to a day).

Yield: 4 to 6 servings (about 1 1/2 cups).

Continue Reading "signs of spring: asparagus pesto"

Friday, April 16, 2010

lemon! pie! lemon pie!


What is this, the 50th lemon pie I've made on here? Who is obsessed with lemon pie? I am!

And this one was really pretty interesting: Shaker Lemon Pie. This sour marmalade-like pie is said to be an old specialty of the Ohio Shakers, and is beautiful in both its simplicity and its craftiness. Kind of like their furniture! It uses the whole lemon, peel and all, to add a depth of flavor and let no part go wasted. For a lemon fiend like myself - who also happens to be baking pie crusts like a maniac lately - it is a perfect slice of tart and sweet and fresh and even a tiny bit bitter. Not for the those who are ambivalent about lemons.

I used Meyer lemons for this recipe, well, mostly just because I could. Recipe after the jump:

SHAKER LEMON PIE

1 recipe pie crust for a 2-crust 9" pie (My Favorite)
4 Meyer lemons
2 cups sugar
1 teaspoon salt
1 teaspoon vanilla
4 eggs

Slice the whole lemons as thinly as possible, taking care to remove all seeds (use a mandoline if you have one). Toss with the sugar and salt and set aside.

Preheat oven to 450°F. Roll out half of your chilled pie crust and line a 9" pie plate. Cut off the excess, leaving about 3/4 of an inch overhang all around. Place in the freezer to chill while you prepare the filling.

Beat the eggs well with the vanilla and stir into the lemons. Remove the chilled pie crust from the freezer and pour in the lemons.

Roll out your top crust and place, cutting away overhang. Tuck the edges of the top crust under the overhang of the bottom and crimp to seal. Cut slits or a hole to allow steam to escape. If desired, brush the crust with egg white and sprinkle a thin layer of sugar on top. Put back in the freezer for 15 minutes to chill.

Bake the chilled pie on the lowest rack for 15 minutes at 450°F. Then turn the heat down to 375°F and move to the center rack. Bake for another 30 minutes or until the crust is golden. If the crust edges begin browning too much cover with foil.

Let cool for at least half an hour before eating. This pie is great with some whipped cream or vanilla ice cream.

Continue Reading "lemon! pie! lemon pie!"

Monday, December 28, 2009

delicious christmas


Pretty loaves all in a row.

It should come as no surprise to any who know me that majority of the presents I both give and receive at the holidays are food-based. I also have a thing for homemade presents, whether edible or just delicious-looking. This year, Christmas for my family was a little homemade box of breakfast treats, perhaps a bit less ambitious than my original plan, but satisfying to give nonetheless.


A festive box, tied up in green ribbon, with two tasty loaves and two tiny jars. The loaves - lemon poppyseed and cranberry walnut; the jars - honey butter and vanilla cream cheese. Unfortunately, since my stove was only turned on two days before Christmas, (Merry Christmas to me!) my plan for some homemade orange marmalade didn't come through. Well, there's always next year.


And of course, for the receiving. Not just one, but two people gave me knives this year. A really cool Kyocera ceramic paring knife from Brother #2. I've always wanted a ceramic knife. And these beauties from my honey J-Cat; knives more lovely than I ever thought I'd own. A 3-piece set of Shun Classic knives. So pretty that I hardly dare to use them, except that I want to use them on anything and everything. Dicing onions is a dream.


And of course, as always the very best thing under the tree has her own set of knives built in, and can do plenty of slicing and dicing if provoked.


Happy Holidays to all, and to all two recipes for bread after the jump!


LEMON POPPY SEED BREAD
Adapted from Joyofbaking.com

3 large eggs
1 1/2 teaspoon pure vanilla extract
1/4 cup milk
1 1/2 cups all-purpose flour, sifted
3/4 cup granulated white sugar
1 teaspoon baking powder
1/4 teaspoon salt
1 tablespoon grated lemon zest
3 tablespoons poppy seeds
13 tablespoons unsalted butter, softened

Lemon Syrup:
1/4 cup fresh lemon juice
1/3 cup granulated white sugar

Preheat oven to 350 degrees F and place the oven rack in the center of the oven. Butter and flour (or spray with a non stick vegetable/flour spray) the bottom and sides of 4 1/4-lb mini loaf pans. If the pans are not disposisble, line the bottom of the pans with parchment paper and butter and flour the paper. Set aside.

In a separate bowl, whisk together the eggs, vanilla extract, and milk. Set aside.

In the bowl of your electric mixer, or with a hand mixer, beat the flour, sugar, baking powder, salt, lemon zest, and poppy seeds until combined. Add the softened butter and half the egg mixture and mix on low speed until moistened. Increase the speed to medium and beat for about one minute. Scrape down the sides of the bowl and add the remaining egg mixture in two batches, beating about 30 seconds after each addition.

Scrape the batter into the prepared pans and bake for about 35-40 minutes, or until the bread is golden brown and a toothpick inserted in the center comes out clean. You may have to cover the bread with buttered foil after about 30 minutes if you find the bread over browning.

Meanwhile, in a small saucepan, bring the sugar and lemon juice to a boil, stirring until the sugar dissolves.

When the bread is done, remove from oven and place on a wire rack. Pierce the hot loaves all over with a wooden skewer or toothpick and then brush the top of the loaves with the hot lemon syrup. Store at least overnight before serving to allow the lemon syrup to distribute throughout the loaf.

Makes 4 mini loaves.

CRANBERRY WALNUT BREAD
From SFGate.com, November 29, 2009

Non-stick cooking spray
4 cups cranberries
2/3 cup fresh orange juice (about 2 large oranges)
1 1/2 cups low-fat buttermilk
2 eggs
6 tablespoons unsalted butter, melted
2 cups whole wheat flour
2 cups all-purpose white flour
2 cups sugar
2 teaspoons baking powder
1 teaspoon baking soda
2 1/2 teaspoons salt
1/2 teaspoon cinnamon
1/2 teaspoon cardamom
1 cup roughly chopped walnuts

Topping
1/2 teaspoon cinnamon
1/2 teaspoon cardamom
1 tablespoon sugar

Instructions: Preheat oven to 375°. Coat 6 mini or 2 regular size loaf pans with non-stick cooking spray.

Coarsely chop 1 1/2 cups of the cranberries by hand or in a food processor; set aside.

In a medium bowl, whisk together the orange juice, buttermilk and eggs. Whisk in the melted butter.

In a separate large bowl, combine the whole wheat flour, all-purpose flour, sugar, baking powder, baking soda, salt, cinnamon and cardamom. Stir with a fork until thoroughly mixed.

Add the liquid ingredients to the dry ingredients and gently fold together with a rubber spatula until just combined; do not over mix. Gently add the whole and chopped cranberries and walnuts. Mix just enough to distribute them throughout the batter.

Divide the batter evenly between the loaf pans. Prepare the topping by mixing the cinnamon, cardamom and sugar in a bowl; sprinkle over the top of the loaves.

Bake until a tester inserted in the center comes out clean - 30 to 35 minutes for mini loaves, about 45 to 50 minutes for standard loaves. Let cool on a wire rack.

Continue Reading "delicious christmas"

Monday, October 26, 2009

in season: hide the cauliflower


That's not a particularly attractive dish right there. But it's one of those special recipes with hidden surprises. It is perfect fall food in several ways. Cauliflower is at it's best right now, and nothing is more warming and yummy on a chilly autumn day than a bowl of steamy, creamy risotto. This is a cauliflower and leek risotto. You can't really see the cauliflower hiding amidst the rice, but you take a bite and it bites back, just a tiny bit. Surprise. Need I say more? Recipe after the jump:

CAULIFLOWER LEEK RISOTTO

3 tbsp butter, separated
1 medium leek, chopped into half-moons
1 small head cauliflower, about 1 to 2 lb, cut into small florets
1 cup arborio or carnaroli rice
1 cup dry white wine
4 cups chicken broth (vegetable broth if you prefer this dish vegetarian)
3/4 cup parmiggiano-reggiano, or more to taste
salt and pepper, to taste

Heat the chicken broth in a medium saucepan until boiling, then lower to a low simmer. Melt 2 tbsp butter in a heavy 4-quart pot over medium heat until foam subsides. Add the leeks and cauliflower and saute until just starting to loose the raw color, about 2 minutes. Add the rice and toast, stirring about 1 minute. Add the wine and stir, allowing a strong simmer until the liquid is completely absorbed. Add 1/2 cup broth and repeat the stirring and simmering process. Continue to add broth 1/2 cup at a time, stirring and simmering, until the rice is tender and creamy looking, about 25 minutes. You may not need all of the broth. Remove from the heat, add the cheese, and season with salt and pepper to taste. Serve immediately.

Continue Reading "in season: hide the cauliflower"

Tuesday, October 06, 2009

french food i DID eat in france: boeuf bourguignon


Technically J-Cat ate it, for our last dinner in Paris at "Josephine" Chez Dumonet. But obviously I had a few bites. With the weather getting chillier by the day, it's time to break out my favorite types of foods - slow-cooked, hearty, warming, intensely flavored, meaty.


There are thousands of recipes for Boeuf Bourguignon out there, ranging from the straightforward to the excessively complicated. And here is where I am conflicted. I love to make dishes in the most authentic way possible. But I also love simplicity and dislike fussiness. So where to find the balance without sacrificing authenticity? When it comes down to it, a dish like Boeuf Bourguignon just doesn't seem like it should be so complicated. Complex in flavor, yes, but at it's roots a simple, rustic stew. So this recipe by Ginette Mathiot, the "French Julia Child", which was published a few weeks ago in The New York Times, seems to strike a nice balance. Authentic in that it is the version that a French cook would cook in their own home, not the complicated beast of a restaurant version popularized by Julia Child. Both recipes authentic in their own way, and both yielding a more than satisfying result. Recipe after the jump:

BOEUF BOURGUIGNON
Adapted from "I Know How to Cook" by Ginette Mathiot

1 tablespoon oil
3 ounces onions or shallots, chopped
3 1/2 ounces thick-cut bacon, diced
1 1/2 pounds stewing beef, cut into 1 1/2 -inch pieces, patted dry
Scant 1/4 cup flour
1 1/4 cups any type of stock, hot
1 1/4 cups red wine
1 bouquet garni (1 bay leaf, 3 sprigs fresh thyme and 3 sprigs parsley, tied together)
Black pepper
3 1/2 ounces mushrooms, diced
Salt

1. In a heavy pan over medium heat, heat oil. Add onions and bacon and cook, stirring, until browned. Remove them and set aside; leave fat in pan.

2. Add beef and brown on all sides (work in two batches if needed to avoid crowding).

3. Sprinkle browned beef with flour, stir until browned and add stock. Stir, scraping bottom of pan, then add reserved bacon and onions, the wine and bouquet garni. Season with pepper.

4. Simmer very gently for 2 hours.

5. Add mushrooms and cook 30 minutes more. Season with salt and serve. Or, even better, reheat and serve the next day.

Yield: 4 to 6 servings.

Continue Reading "french food i DID eat in france: boeuf bourguignon"

Tuesday, September 29, 2009

in season: italian plum torte


A recipe so popular that reader demand insured it's publication in The New York Times just about every year between 1983 and 1995. Now this is something that I had to try. It just looks so incredibly simple on paper, could it be so good as to develop this cult-like following?

Well, as I've said over and over, simplicity is often the best insurance that a recipe will be memorable and perfect. And this was the essence of simplicity. It took no time, it took very few ingredients, it took barely any effort, and it seemed like the kind of thing you can't really mess up. But it looks somewhat impressive, and tastes much more complex than it is. The sweet-tart of the plums, the warmth of the cinnamon, the slight crispness of the cake top dusted in sugar. Recipe after the jump:


ITALIAN PLUM TORTE
From The New Elegant But Easy Cookbook, by Marian Burros and Lois Levine.

3/4 cup PLUS 1 or 2 tablespoons sugar
8 tablespoons (1 stick) unsalted butter
1 cup unbleached all-purpose flour, sifted
1 teaspoon baking powder
2 eggs
Pinch salt
24 halves pitted Italian (aka prune or purple) plums
1 teaspoon ground cinnamon, or more
Vanilla ice cream, optional

1. Arrange a rack in the lower third of the oven. Preheat the oven to 350°F.

2. In an electric mixer, cream the 3/4 cup sugar and butter. Add the flour, baking powder, eggs, and salt and beat to mix well. Place in a 9- or 10-inch ungreased springform pan. Cover the top with the plums, skin side down. Mix the cinnamon with the remaining 1 or 2 tablespoons of sugar and sprinkle over the top.

3. Bake for 40 to 50 minutes (mine took a little over 50), until the center tests done with a toothpick. Remove and cool to room temperature or serve warm. Serve plain or with vanilla ice cream.

Continue Reading "in season: italian plum torte"

Monday, August 17, 2009

omg stop it with the berries already


'Tis summer, didja know? It finally feels like it, with this gross hot weather. So of course it's only fitting that we are moving soon, because it is the rule in my family that we only move when it is blisteringly hot out. Actually, we still have a few weeks until the move, so I'm being dramatic. I imagine it will not be this hot out in mid-September, but for now I am neck deep in boxes and the cats are dropping piles of fur on all of it. Thus I label the boxes: Books-Office (Cat Fur).


So as a small snack to fortify myself between rolls of packing tape and sharpies, here are some summery Blueberry Crumb Bars. Honestly, these are just shortbread and blueberries, ie. butter in a bar. These are exceedingly easy to make; crust doubles as crumb topping, berries go in whole, impossible to mess up. Perhaps one of these days I will make a dessert that is not berry-centric, but I don't imagine it will be one of these hot days. Recipe after the jump:


BLUEBERRY CRUMB BARS

3/4 cup white sugar
1 teaspoon baking powder
3 cups all-purpose flour
1 cup cold unsalted butter (2 sticks)
1 egg
1/4 teaspoon salt
Zest and juice of one lemon
4 cups fresh blueberries (2 pints)
1/3 cup white sugar
3 tbsp flour

1. Preheat the oven to 375 degrees F. Grease a 9×13 inch pan and line with parchment paper.

2. In a medium bowl, stir together 3/4 cup sugar, 3 cups flour, and baking powder. Mix in salt and lemon zest. Use a fork or pastry cutter to blend in the butter and egg. Dough will be crumbly. Pat 2/3 of the dough into the prepared pan.

3. In another bowl, stir together the sugar, 3 tbsp flour, and lemon juice. Gently mix in the blueberries. Sprinkle the blueberry mixture evenly over the crust. Crumble remaining dough over the berry layer.

4. Bake in preheated oven for 50-60 minutes, or until top is light brown. Cool completely. Using the edges of the parchment paper, lift gently out of the pan before cutting into squares. Refridgerate any leftovers in a sealed container.

Continue Reading "omg stop it with the berries already"