Tuesday, January 27, 2009

sunday supper: sick of short ribs yet?


After last week's meat fiesta with the cassoulet, I was actually not going to make a big meat dish this weekend, but then I found short ribs on sale and I just couldn't turn away. Short ribs. On sale. I swear that I'm planning a vegetarian chili next. We may be meated out. But at least this time around I tried a recipe I've never done before - John Besh's Zinfandel Braised Short Ribs.


The verdict is that these ribs were intensely flavorful, but admittedly this will not become my new go-to short ribs recipe, I am still very partial to my simpler red wine recipe and to the beer braise recipe. Part of my issue with this one is that is was quite sweet, and really lacking in acid. Between the Zinfandel, the porcini mushrooms, and the carrots, all of the major flavors were rich, but nothing had bite.


For me, short ribs are the most delicious, beefy, decadent cut of meat, and I just don't think they need such deep intense flavors to be great. Let the beefiness really shine through and keep things simple. But of course, these were still delicious, as any well made short ribs will be. And yes, I served them over rice. Again. Recipe after the jump:


JOHN BESH'S ZINFANDEL BRAISED BEEF SHORT RIBS

Serves: 4
Prep time: 30 minutes
Cooking time: About two hours (with little labor)

4 lbs beef short ribs, cut flanken style (across the bone) or English style (parallel to the bone). Flanken are easier to deal with but slightly more fatty.
Coarse salt and black pepper
3 cups zinfandel
1/2 cup sugar
6 oz canned chopped tomatoes
2 cups beef broth
1 tbsp minced garlic
3 sprigs fresh thyme, picked off stem
2 bay leaves
3 oz canola oil
1 large onion, diced (2 cups)
2 medium carrots, diced (1/2 cup)
2 stalks celery, diced (1/2 cup)
2 oz dried mushrooms, preferably porcini

1. Season short ribs with salt and pepper; be rather generous. In a mixing bowl, whisk together zinfandel, sugar, tomatoes, beef broth, garlic, thyme, bay leaves, and a pinch of salt. Pour wine mixture over short ribs and set in fridge to marinate for at least an hour, or up to 12.

2. Pour canola oil into a heavy pot or Dutch oven (at least 5 quarts) and place over high heat. When oil is hot, working in small batches, brown the meat. Turn each piece to brown on all sides before removing from the pot.

Tip: A sturdy pot that conducts heat well has a lot to do with the success of this dish. Get yourself a cast-iron pot. It'll outlast you.

3. When all beef is browned and removed from pot, add onion, carrots, and celery, allowing onion to cook until browned, about 10 minutes, stirring frequently.

4. Return beef to the pot along with wine mixture. Allow wine to come to a boil before reducing heat, skimming fat from surface.

5. After simmering for several minutes, add mushrooms. Cover and simmer over very low heat until meat is fork tender and nearly falling off the bone, about 1 1/2 to 2 hours.

6. Once the beef has cooked, remove from pot and keep warm. Turn up heat and reduce the pot liquids until thickened, about 10 minutes. Season with salt and pepper to taste.

7. Transfer ribs to four shallow bowls, spooning liquid over top.

Continue Reading "sunday supper: sick of short ribs yet?"

Monday, January 26, 2009

in season: magical meyer lemons


The wait is over: Meyer lemon season is upon us! For someone who loves a lemon dessert as much as I do, Meyer lemon season is the pinnacle of the year, the time when bright, sunshine-y flavors can wipe away the frost of deep winter. What is so magical about this little citrus? It's like all the great things about lemons, but without the tartness or bitterness that can sometimes sideline even the most carefully crafted dessert.


In my opinion, the best way to treat a Meyer lemon is to simply let it's mellow bright flavor shine through, without overwhelming with other flavors. As J-Cat said after scarfing down a slice of this Meyer lemon curd tart, he likes when it tastes more lemony than eggy. It does help that this recipe is also pretty buttery.


And a nice sugar cookie style tart crust goes a long way, too. Although this one turned out crunchier than I intended, in the end it made the tart like a lemon bar, which is pretty awesome in it's own right. It was easier to eat this tart with your hands rather than try to break it up with a fork, that may have been due to too much pressing of the dough into the tart pan to try to get it perfectly even.


It does seem to be a rule with me that there is often some flaw in all of my lemon desserts, but if a crunchy sugar cookie crust is the flaw in this one, I can definitely live with that. The broken crust crumbles found another life as a crumble top, a perfect adornment. Recipe after the jump:

MEYER LEMON CURD TART
Adapted from Baking Bites

1 cup sugar
2/3 cup Meyer lemon juice, freshly squeezed and strained
1 tbsp lemon zest
3 large eggs
2 (large) egg yolks
6 tbsp butter, softened and cut into tbsps
1 9-or 10-inch sugar cookie tart crust

In a medium saucepan, combine sugar and lemon juice and bring to a boil, stirring occasionally to dissolve sugar.

In a large bowl, while the sugar is heating, whisk together lemon zest, eggs and egg yolks. When sugar mixture comes to a boil, add very small amounts of it to the egg mixture while whisking continuously to temper the mixture. Add only a few tablespoons at a time and do not stop stirring (firmly, but not too vigorously) until all of the sugar/lemon mix has been added. Transfer egg mixture back to sauce pan and return to stove. Cook on medium heat until thickened, about 8 minutes, whisking frequently.

Remove custard from stove and whisk in butter, adding in one tablespoon at a time. When all butter has been added, cool curd for 15 minutes before pouring into prepared tart crust.

Refrigerate overnight or at least 8 hours before serving. If storing longer than that, cover tart with plastic wrap when set and completely cool.


SUGAR COOKIE TART CRUST

1/3 cup sugar
1/2 cup butter, room temperature
1 1/4 cups all purpose flour
1/4 tsp salt
2 tbsp milk (low fat is fine)
1 tsp vanilla extract (optional)
Preheat oven to 400F.
In a large bowl, cream together sugar and butter until light. Beat in flour, salt, milk and vanilla, until mixture is moist and crumbly (it should clump together if you press it between your fingers).

Pour dough into a 9 or 10-inch tart pan and press it up the sides, making sure the layer on the bottom is even.

For a no-bake filling: Bake for 20-25 minutes, until crust is golden. Cool.
For a baked filling: Bake for 10-15 minutes, until crust is set and firm at the edges. Cool, then fill with desired filling and bake as that recipe directs.

Continue Reading "in season: magical meyer lemons"

Wednesday, January 21, 2009

wholely clemetine


I cannot resist a recipe that leaves you wondering how it could possibly work. I had that experience with this recipe for Clementine Cake, from domestic goddess Nigella Lawson. These lovely orange clementines find their way into this cake completely whole, peel and all.


Of course, this comes after a long dip in a pot of boiling water, but I still could not understand how the peels would not be bitter in the cake. There's a fair amount of sugar, but nothing I would consider excessive or unusual, so I guess you just have to put your faith in the mellow sweetness of a great clementine. On top of that, this is a flourless cake, turning instead to ground almonds for it's dry component. How many odd things can one recipe contain?


Despite all of the oddness, this really worked. You could taste the bitterness of peel, but balanced so nicely with the sweetness of the fruit. I might even say that the batter tasted a bit like Froot Loops...maybe. But this cake was wonderfully moist, with a lovely gritty texture from the ground almonds, and with the tang and sweetness of the clementines. Simple, interesting, delicious, and a great surprise. I love it when that happens. Recipe after the jump:


NIGELLA LAWSON'S CLEMENTINE CAKE
Adapted from foodnetwork.com

4 to 5 clementines (about 1 pound total weight)
6 large eggs
1 cup plus 2 tablespoons sugar (adjust if your fruit is not sweet)
2 1/3 cups ground almonds
1 heaping teaspoon baking powder
1 tsp pure vanilla extract

Put the clementines in a pot with cold water to cover, bring to the boil, and cook for 2 hours. Drain and, when cool, cut each clementine in half and remove the seeds. Then finely chop the entire fruit in the processor (or by hand, of course).

Preheat the oven to 375 degrees F.

Butter and line an 8-inch springform pan with parchment paper.

Beat the eggs. Add the sugar, almonds, and baking powder. Mix well, adding the chopped clementines.

Pour the cake mixture into the prepared pan and bake for 50 minutes to 1 hour, when a skewer will come out clean; you'll probably have to cover the cake with foil after about 40 minutes to stop the top from burning. Remove from the oven and leave to cool, in the pan on a rack. When the cake is cold, you can take it out of the pan and dust the top with confectioner's sugar. This cake is actually better the second day, reheated a bit to make the edges slightly crisp. I also found that this goes really well with blueberries, but those are opposite season fruits, so don't tell anyone I said that.

This can also be made with an equal weight of oranges and lemons, in which case you increase the sugar to 1 1/4 cups and add a glaze made of confectioners' sugar mixed to a paste with lemon juice and a little water.

Continue Reading "wholely clemetine"

Tuesday, January 20, 2009

sunday supper: perfect day for cassoulet


Apparently cassoulet is much more popular than I thought. As soon as I said I was making it, a handful of people got extremely interested and hungry. There's just something about a hearty cassoulet when the snow is falling and you're cozy at home. I adapted Thomas Keller's recipe for a slow-cooker cassoulet, which somewhat streamlines the process but stays true to the essence of the dish. I did find it odd that his recipe did not call for duck confit, but it is true that not every cassoulet is made with it. Mine was, I couldn't resist. I did not, however, make that part on my own.


I did soak my own beans, which seems to go without saying for a dish like this, but I was surprised to find out in a recent meeting that this is considered time-consuming and a hassle. I don't understand how putting beans in a bowl with water and ignoring it is a hassle, but apparently many people do. I was actually told that people might think it's culinarily snobby to require that, but seriously? Soaking dried beans is like the opposite of culinary snobbery. It's the cheapest, most peasant way to feed a gang of people. Duck confit, that's snobbery.


I adjust the god-chef's recipe a bit because his was written for that fancy schmany All-Clad slow cooker with the cast iron insert that you can use on the stove and in the oven. I have a lesser slow cooker, so I did the first several steps on the stove in a separate pan. I also decided to use pork bones instead of a pork shoulder roast, partially because I couldn't find a particularly small roast, and partially because I thought the bones would add a lot of flavor, which they did. Opposite of snobbery. The supreme cheapness also balanced out the cost of the duck confit. Balancing out the snobbery.


In short, Cassoulet appears to be misinterpreted as both a difficult and snobbish dish. To me, time + simple ingredients + beans = the most down to earth dinner you can get. Recipe after the jump:

SLOW COOKER CASSOULET
Adapted from a recipe by Thomas Keller at Williams Sonoma.com

Ingredients:

4 lb. pork bones
Kosher salt and freshly ground pepper, to taste
2 Tbs. canola oil
1 cup panko
4 oz. thick-cut bacon, cut crosswise into 1/2-inch strips
4 cups coarsely chopped yellow onions
2 cups dry white wine, such as Sauvignon Blanc
1/4 cup tomato paste
1 can (35 oz.) peeled Italian plum tomatoes, drained and
coarsely chopped
2 cups chicken broth
3 cups dried Great Northern beans, picked over, rinsed and
soaked overnight
1 1/2 lb. fresh chorizo sausage, each halved on the bias
2 duck confit legs
1 garlic head, halved crosswise
1/4 cup chopped fresh flat-leaf parsley, plus more for garnish
1 lb. baguette, cut into 1/2-inch-thick slices
Extra-virgin olive oil for brushing
Coarse sea salt, such as sel gris, for garnish

Directions:

Season the pork generously with kosher salt and pepper; set aside.

In a large saute pan over medium-high heat, combine the canola oil and panko. Cook, stirring constantly, until the panko is toasted and golden, 4 to 6 minutes. Transfer the panko to a baking sheet and season with kosher salt and pepper.

Add the bacon to the pan and cook until crisp on both sides, about 5 minutes. Drain on paper towels. Reserve the bacon fat in the pan.

Add half of the pork to the pan and brown on all sides, 7 to 8 minutes total. Transfer to a platter. Repeat with the remaining pork.

Add the onions and 1 tsp. kosher salt to the pan and cook, stirring occasionally, until golden brown and softened, about 7 minutes. Add the wine and simmer until reduced by half, about 8 minutes. Stir in the tomato paste, tomatoes and broth. Transfer the mixture to the slow cooker and add the beans, pork, chorizo, duck legs, and garlic.

Cover and cook on low until the beans are tender and the pork pulls apart easily with a fork, about 7 hours. Skim off the fat, and remove and discard the garlic. Adjust the seasonings with kosher salt and pepper. Fold in the panko and the 1/4 cup parsley. (I chose to simply top the cassoulet with the bread crumbs for two reasons. 1. I wanted to keep them crispy, 2. the cassoulet was already so thick that it did not need the crumbs mixed in.)

Position a rack in the lower third of an oven and preheat the broiler.

Brush the baguette slices with olive oil. Arrange the slices, oiled side up, on top of the cassoulet, overlapping them. Broil until golden brown, 4 to 6 minutes.

Let the cassoulet stand at room temperature for about 30 minutes before serving. Sprinkle each serving with the reserved bacon, sea salt and parsley. Serves 8 to 10.

Continue Reading "sunday supper: perfect day for cassoulet"

Friday, January 16, 2009

an update on the pig-cat


This cat is a pig. This is the face he gets right after he steals your food and you yell at him. "What did I do? How can you yell at this cute innocent face?" He will steal anything and everything edible. He eats at least 3 times as much as Opaw. He's a pig.

I guess I shouldn't judge a cat who loves food so much. He does, after all, belong to J-Cat and me and we are about as food-obsessed as you can get. But I've never seen a cat eat like this before.


In other news, I'm not sure if Opaw and Morty are okay with each other or hate each other's guts. Here they are working together to take down an evil invader bug. But most of the time it seems like Opaw is trying to rip out his intestines. J-Cat insists that they're "just playing", but I'm not sure Opaw doesn't really really mean it.

Continue Reading "an update on the pig-cat"

Tuesday, January 13, 2009

the other perfect veg


I was beginning to worry about my brussels sprouts obsession, and could not remember the last time I cooked a different vegetable. It's not entirely my fault. The other night I asked J-Cat what he would prefer with the Chicken Adobo - brussels sprouts or bok choy. He just looked at me like, do you really have to ask? Whenever he eats brussels sprouts he has a tendency to wistfully sigh and state that he loves them so much. If he ever leaves me for a vegetable, I'll know which one.

But if you remember not so long ago, I was in a different vegetable obsession phase, with my other dear friend cauliflower. I have a feeling this internal battle will go back and forth repeatedly and I'll never be able to declare a victor, but I feel like I can confidently state that my favorite of all time is one of the two. Or beets. Damn. I really love beets.


This is one of those easy easy pastas that tastes like so much more than it is. The pancetta is lovely, but more than the crunchy porky bits is the fat that renders and coats every piece of pasta and cauliflower with an almost buttery flavor. Topped with lightly toasted bread crumbs for crunch, this pasta hits all of the important elements of deliciousness. Recipe after the jump:

GARGANELLI WITH CAULIFLOWER, PANCETTA, AND BREAD CRUMBS
Adapted from Serious Eats, Nov. 4, 2008

1 pound garganelli, or orecchiete, or cavatelli
1 large head cauliflower (about 2 pounds)
1/4 pound pancetta or bacon, cut into small pieces
2/3 cup fresh breadcrumbs
3 tbsp olive oil
2 large garlic cloves, chopped
freshly grated Parmesan

1. Bring a large pot of salty water to boil for the pasta. In the meantime, prepare the cauliflower and grate bread for crumbs, if necessary.

2. In a large heavy skillet, heat 1 tablespoon of olive oil over medium heat, then add the bread crumbs. Toast, stirring often, until golden and slightly crisp. Remove to a small bowl and wipe the skillet clean.

3. Cook the pancetta in the same skillet over medium-high heat a few minutes until the fat renders, then add the cauliflower pieces, garlic, and a good pinch of salt. Cook, stirring only very occasionally, until the pancetta is crisp and the cauliflower is caramelized and golden.

4. In the meantime, cook the pasta until al dente, reserving a cup of pasta water. Drain and add pasta to the skillet, tossing to combine. Add olive oil and pasta water as needed to achieve a rich, slightly creamy consistency.

5. Serve with a shower of breadcrumbs, black pepper, and Parmesan cheese.

Continue Reading "the other perfect veg"

Monday, January 12, 2009

sunday supper: not a pretty picture


I cannot blame my poor photography skills for this one. The fact of that matter is, if you put a chicken in a slow cooker for seven hours, it is generally not going to be attractive. It will, however, be extremely tasty. This is a slow cooker version of the Filipino classic Chicken Adobo. Adobo is a simple combination of soy sauce, vinegar, crushed garlic, peppercorns, and bay leaves and is traditionally made with pork or chicken or both. Some people like to brown the meat after cooking for a nice crisp edge, but because this version cooks for so long, I don't recommend attempting it, the chicken just falls completely off the bones. That, of course, is a good thing in itself. Seven hours in it's salty, tangy bath and the chicken was completely infused with flavor, lovely and tender, and perfect comfort food on a cold Sunday. I went off to spend a lovely day knitting at Leah's house and came home to the delicious aroma of a hot dinner. I love slow cookers. Recipe after the jump:

SLOW COOKER CHICKEN ADOBO

1 3-pound chicken, cut into parts (or parts of your choice)
1 large sweet onion, sliced
1 cup plus two tablespoons of soy sauce
1 teaspoon black peppercorns
10 cloves garlic, crushed
3/4 cup white vinegar
1 cup water
2 bay leaves

Place chicken pieces in a slow cooker. In a small bowl mix the onion, garlic, soy sauce, and vinegar, and pour over the chicken. Add the peppercorns and bay leaves. Cook on Low for 6 to 7 hours. Depending on the fattiness of the chicken, you may end up with quite a bit of fat on the surface of the liquid, I prefer to skim some of it off so that it is not so greasy, but this is to your taste. Serve over steamed white rice.

Continue Reading "sunday supper: not a pretty picture"

Friday, January 09, 2009

easy weeknight dinner: sole meuniere


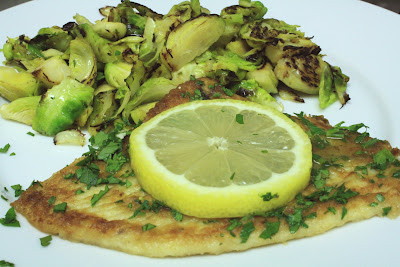
Screw 30-minute meals, this one takes 15 minutes tops. Sole Meuniere, that utterly classic French dish, dispells all myths that French food is complicated. "Meuniere" means miller's wife and apparently refers to the dusting of flour on the fillets. All there is to this dish is a light dredging in flour, salt, and pepper, then a quick saute in brown butter and a good spritz of lemon juice. Top with chopped parsley and a slice of lemon and it looks far fancier than it is. And of course, in my house anything with lemon is universally loved. This is one of the few fish preparations I do that J-Cat will eat tons and tons of. I served it with a hunk of nice crusty baguette and some pan-sauteed brussels sprouts, chopped for quicker cooking. Recipe after the jump:


SOLE MEUNIERE

4 fillets of sole, preferably Dover sole if you can find it (approx. 1 pound)
flour for dredging
salt and pepper, to taste
3 tbsp unsalted butter
2 tbsp olive oil
1/2 cup dry white wine
juice of half a lemon, plus lemon slices (from the other half) for garnish
3 tbsp chopped parsley

Heat 2 tablespoons of the butter with the olive oil in a large skillet or saute pan until the butter stops foaming. Mix the flour, salt and pepper in a large plate or bowl and dredge each fillet in the mixture, shaking off excess flour. Place the fillets in the pan being careful not to crowd the pan. Let the fillets to cook for about 3 minutes without touching them to allow a good browning. Flip and cook on the other side for another 2 to 3 minutes until cooked through.

Lower the heat, add the wine, lemon juice, and remaining 1 tbsp of butter. Let sizzle until the butter has melted and swirl to mix the sauce. Serve topped with chopped parsley, a slice of lemon, and with a good spoonful of sauce over top.

Continue Reading "easy weeknight dinner: sole meuniere"

Thursday, January 08, 2009

puffy pear tart


I can't even take any credit for this tart because it is ridiculous how easy it was. Lately I've been into the magic of frozen puff pastry sheets and I've been looking for excuses to use it. I still sort of feel like it's cheating, like I'm not really cooking when I use them, but I generally get over it quickly when I eat the results. For this, I just used it as the crust for a pretty classic French-style pear tart. It was pretty darn tasty, and I found that you could actually eat this with your hands like a slice of pizza, the puff pastry was quite sturdy. Recipe after the jump:


PUFFY PEAR TART

1 sheet frozen puff pastry, defrosted
2 small pears, peeled, halved, cored, and thinly sliced crosswise
1/4 cup granulated sugar (or more depending on the sweetness of the pears)
1/2 cup apricot preserves
2 tbsp pear brandy
2 tbsp cold unsalted butter, cut into small cubes

Preheat oven to 375 degrees. Unfold the puff pastry sheet and lay out on a parchment-lined baking sheet. Slice a 1/2-inch strip off of all four sides, then place the strip on top of the edge that it was sliced from to create a wall. Dock the rest of the pastry with a fork. Lay the pear slices artfully on the pastry, within the 1/2-inch wall. Sprinkle evenly with the sugar.

In a small saucepan, heat the apricot preserves and the brandy over a low heat until it loosens and becomes syrupy, stirring to combine well. If your preserves are quite chunky, it is best to strain the syrup, although I am generally too lazy to do so. Using a pastry brush, brush the entire top of the tart - including the pastry walls - with the preserves. Dot the top of the fruit with the butter cubes. Bake in the preheated oven for about 30 minutes or until the pastry is browned and the pears are softened. Serve with vanilla ice cream or whipped cream.

Continue Reading "puffy pear tart"

Wednesday, January 07, 2009

short rib showdown: beer vs. wine


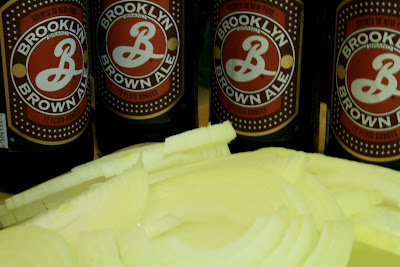
Short ribs are pretty much my favorite thing to braise when it's cold out. They are perhaps the main reason that beef will always win out as my favorite meat, despite my deep appreciation for all things porky. I have two favorite recipes for braising short ribs - one with red wine, and one with beer. I tend to prefer the red wine recipe, J-Cat prefers the beer recipe. This is pretty much the opposite of our actual drinking tastes, where I prefer beer and he prefers wine. I find that strange. In any case, I do love both recipes and since I will likely braise short ribs at least a few times this winter, this time I went for the beer braising because, well, I had beer in the fridge.

The key to this recipe is the combination of tons and tons of onions and a dark beer. The bitterness of the beer, the sweetness of the onions, and the profound beefiness of the short ribs is a truly glorious combination.


I, of course, eat this over rice, as I do with pretty much everything. You do want something to soak up the beery, oniony, beefy sauce. Obviously, mashed potatoes or bread would work just as well. Recipe after the jump:

BEEF SHORT RIBS BRAISED IN BEER
from "Staff Meals from Chanterelle" by David Waltuck and Melicia Phillips

3/4 cup canola or other vegetable oil
5 to 6 pounds beef short ribs, trimmed of fat
4 large onions, halved lengthwise and cut crosswise into thin slices
2 tablespoons sugar
2 tablespoons all-purpose flour
4 bottles (12 ounces each) dark ale or beer
8 cups chicken stock
4 bay leaves
Coarse (kosher) salt and coarsely ground black pepper, to taste

Heat 1/2 cup of the oil in a very large, heavy, flameproof casserole or Dutch oven over medium-high heat. Add only enough of the short ribs to fit into the casserole without crowding and brown well on all sides, 4 to 5 minutes per side. As the ribs are browned, transfer them to a platter and continue browning the remaining ribs in batches.

When all the ribs are browned and removed from the casserole, discard the oil from the casserole, but do not wash it (you want to keep those flavorful brown bits). Return the casserole to the stove. Add the remaining 1/4 cup oil and the onions and cook slowly, covered, over low heat until the onions are very soft but not browned, about 20 minutes.

Uncover the casserole and sprinkle the sugar over the onions. Cook, uncovered, stirring occasionally, until the onions have caramelized slightly and are just light brown in color, about 5 minutes. Sprinkle the flour over the onions and continue cooking stirring frequently, until the flour turns light brown, 3 to 4 minutes. Add 1 bottle of the beer and increase the heat to medium high. Bring to a boil, scraping the bottom of the casserole with a wooden spoon to loosen any browned bits.

Return the ribs to the casserole along with the stock, remaining beer, and bay leaves. Bring to a boil, skimming the top occasionally, then reduce the heat to low and cook, tightly covered, until the meat is very tender, 1 1/2 to 2 hours; you should be able to pull the bones from the meat with ease. Using tongs, transfer the ribs to a platter and let cool.

While the ribs cool, check the liquid in the casserole. If it's thick enough to coat the back of a spoon, it's ready to use as a sauce. If not, increase the heat to medium and reduce the liquid until it reaches the proper thickness. This may take up to an additional 15 minutes. Taste; the sauce should be slightly bitter, with a subtle, balancing touch of sweetness from the caramelized onions. Season with salt and pepper; remove and discard the bay leaves.

When the ribs are cool enough to handle, remove the meat from the bones. Discard the bones and return the meat to the casserole. Simmer until heated through, about 5 minutes. If you'll be serving immediately, skim the fat from the surface of the sauce; otherwise, refrigerate overnight and remove the hardened fat before reheating.

Continue Reading "short rib showdown: beer vs. wine"

Wednesday, December 31, 2008

foodie for life


The result of sitting around bored at work with Castro and trying to think of something fun to do. It was one stop in a day of indulgence that continued into the night and left us a good 10 pounds heavier and a whole lot poorer.

Continue Reading "foodie for life"

Tuesday, December 30, 2008

pizza!


Two of J-Cat's overly generous Christmas presents are represented in this post: the pizzas are made with my new brick walled pizza oven, and the pictures are taken with my new Canon digital SLR (but give me a break, I don't know how to use it yet). Methinks someone was feeling guilty about all the nursing I had to do last month. But it's not like he doesn't benefit at least from the pizza oven. I turned out a batch of 3 small pizzas last night, with gloriously crispy crusts and melty cheese and the aroma of an actual pizzeria.


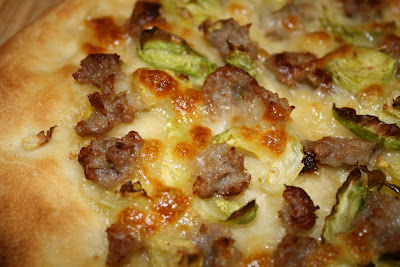
The first pizza turned out to be our favorite by far, a sauceless combination of brussels sprouts and sweet Italian sausage with fior di latte mozzarella. Pizza perfection. See what I mean about brussels sprouts obsession?


The second was a simple classic of tomato sauce, mozzarella, and parmesan. I was pretty happy with my thrown together pizza sauce, it really showed through on this one.


The third was the same as the second with the addition of spicy Italian sausage, and was the one that felt most like a pizzeria pizza. Overall I was really pretty thrilled with the results and how easy it ended up being. The hardest part was waiting for the dough to rise, but really it was an exceedingly simple dough. Recipes for the sauce and the dough after the jump:

THE SIMPLEST PIZZA DOUGH
Makes 4 8" pizzas or 3 10" pizzas, depending on the thickness of your crust.

3 cups all-purpose flour (up to 1/3 can be replaced with whole wheat flour)
1 packet active dry yeast
2 tsp salt
1 cup lukewarm water
2 tbsp olive oil

In a large mixing bowl, combine the dry ingredients and mix well. Add the water and oil and stir just until the dough comes together. Turn the dough out onto a lightly floured surface and knead for 2 minutes until smooth. Lightly oil the mixing bowl. Shape the dough into a ball and return to the mix bowl, turning to coat all sides with a bit of oil. Cover the bowl with plastic wrap and allow to rise for 1 to 2 hours until about doubled in size.

After rising, return the dough to the floured surface and press out the air. Divide into either 3 or 4 balls, depending on what size you want your pizzas. Cover the dough with the plastic wrap and allow to rest for another 20 minutes. In the meantime, preheat your oven as hot as it will get. Shape the dough by stretching or rolling to desired thinness. Top and bake for about 10 minutes on a pizza stone or perforated pizza pan until the crust is browned and crispy. Best served immediately.


THE SIMPLEST PIZZA SAUCE

1 15-oz can plum tomatoes, pureed (I just use an immersion mixer, but this can easily be done in a food processor)
1 tsp olive oil
1 tsp tomato paste
2 tsp salt
1 tsp freshly ground pepper
2 tsp dried oregano
1 tsp garlic powder

Heat olive oil over medium heat in a medium skillet. Add the tomato paste and allow to sizzle for a minute or two. Add the tomato puree and the seasonings. Bring to a strong simmer then lower to a light simmer until it reduces by about a half, approximately 20 minutes.

Continue Reading "pizza!"

Monday, December 29, 2008

i'm terribly late...


...in wishing everyone a Merry Christmas and a Happy Chanukah. So instead, Happy New Year and Season's Eatings!

Continue Reading "i'm terribly late..."

veggie obsession: brussels sprouts pasta


The only vegetable that I eat more often than cauliflower is probably brussels sprouts. This is partly because they are literally the easiest vegetable to make. They require barely any prep, will cook in a myriad of simple ways, are best with little adornment, and make you feel like a giant. I also recently read that brussels sprouts are the "it" vegetable right now, I guess in the restaurant world they're what fennel was last year. As proof, I had an amazing crostini at 'inoteca last week featuring shaved brussels sprouts, lemon oil, and I think a bit of pecorino cheese. A couple of days later I had a pizza with brussels sprouts and speck at Motorino. Both were freaking fantastic.


This recipe for Pasta with Brussels Sprouts and Pine Nuts takes the diminutive wild cabbage one step further into the spotlight for a main dish, offset with toasted pine nuts and served with simply seared diver scallops. Recipes after the jump:

FETTUCCINE WITH ROASTED BRUSSELS SPROUTS AND PINE NUTS
1 pound fettuccine, preferably fresh
2 tbsp butter
2 tbsp olive oil
2 pints brussels sprouts, trimmed and halved lengthwise
3 tbsp toasted pine nuts
salt and pepper, to taste

Preheat the oven to 400 degrees. Toss the brussels sprouts with 2 tsp olive oil and generously salt and pepper. Place in a baking pan and roast in the oven for 15-20 minutes, until tender and lightly charred. You can toast the pine nuts during the last 5 minutes but watch them carefully as they should not be over browned.

In the meantime, bring 4 quarts of salted water to boil for the pasta. When pasta is ready, drain and add to a large mixing bowl with the remaining olive oil, the butter, the brussels sprouts and the pine nuts. Toss to coat well, and taste for salt and pepper. Serve with grated parmesan.


SEARED DIVER SCALLOPS
The best scallops for searing are "dry" scallops. The "wet" scallops are treated for moisture and will never develop a good brown sear. Despite being dry, you should still pat your scallops dry with a paper towel before cooking to insure the best sear.

4-6 large dry scallops
1 tbsp unsalted butter or ghee
1 tbsp vegetable oil
salt and pepper

Heat the oil and butter in a nonstick skillet over high heat until the butter foam subsides. Pat the scallops dry with a paper towel, then season generously with salt and pepper. Place the scallops in the hot pan, being careful not to overcrowd them. If the scallops are too close together, they will steam instead of sear. Do not touch the scallops for at least 2 minutes to insure a good brown crust. When they are nicely browned, flip the scallops and continue to cook for another minute or two. The scallops should still be a bit springy and not too firm. The second side will not brown as nicely as the first, just serve that side down. Remove the scallops from the pan and serve immediately.

Continue Reading "veggie obsession: brussels sprouts pasta"

Tuesday, December 23, 2008

bread gifts


I know this doesn't look that appetizing, but hear me out. The other day my colleague Bill was walking around with a big loaf of bread and he didn't apparently want this gift loaf so of course I'm the obvious person who will take it off his hands. Then I had some intense lapse of mental capacity and forgot about it. How I managed to forget about a nice loaf of bread is beyond me, but by the time I remembered it was hard as a rock. Luckily, the voice of Bosslady Beth singing out "bread pudding!" resounded in my ears and I knew exactly what to do.


I would abandon my plan to make a simple pear tart and instead make a pear bread pudding, dosed with some Pear William Brandy. A little searching found not only a pear bread pudding recipe, but a supposedly healthy Caramelized Pear Bread Pudding. Now, in all seriousness, no bread pudding is going to be healthy, but I guess the use of low-fat milk instead of heavy cream and the moderate amount of sugar makes this somewhat less indulgent. Luckily, it still tasted indulgent, and the mild sweetness of the pears was the perfect balance to the dense custardy bread. I worked the pear brandy in by soaking the golden raisins in it for a while and dumping the whole lot into the mix before baking. A custardy rich bread pudding that you don't have to feel terrible about.

By the way, in other bread gift news, Bosslady Beth just gave me a gift card to Amy's Bread. Yes, that is how much I love carbs. Recipe after the jump:

CARAMELIZED PEAR BREAD PUDDING
Adapted from Eating Well.com

2 1/2 cups low-fat milk
4 large eggs
1/2 cup sugar, divided
1 teaspoon vanilla extract
1/2 teaspoon freshly grated lemon zest
1/8 teaspoon freshly grated nutmeg
1/4 teaspoon ground cinnamon
1/4 teaspoon ground allspice
4 cups cubed, day-old country-style bread, crusts trimmed (4-6 slices), preferably whole-wheat
2 tablespoons golden raisins
3 tablespoons pear brandy (optional)
1 teaspoon unsalted butter, softened, plus 2 tablespoons, divided
2 ripe bosc pears, peeled, halved and cored
1 tablespoon lemon juice

1. Soak the raisins in the pear brandy while you prepare the rest of the ingredients. Heat milk in a medium saucepan over medium-low heat, stirring, until steaming, 4 to 6 minutes. Whisk eggs in a large bowl until blended; gradually whisk in 1/4 cup sugar. Slowly whisk in the hot milk until blended. Whisk in vanilla, lemon zest and nutmeg.
2. Add bread and raisins with the brandy to the milk mixture; gently fold together. Press down lightly with the back of a large spoon. Cover and set aside at room temperature.
3. Butter the bottom and sides of a round 2-quart baking dish with 1 teaspoon butter. Preheat oven to 350°F. Put a kettle of water on to boil.
4. Cut each pear half lengthwise into 4 slices. Place in a medium bowl and toss with lemon juice.
5. Heat a medium skillet over low heat until hot. Add the remaining 2 tablespoons butter and swirl until just melted and the foam subsides. Sprinkle the remaining 1/4 cup sugar over the melted butter. Arrange the pear slices on their sides in the pan in an even layer. Increase the heat to medium-low and, without stirring, let the pears begin to brown and the sauce slowly caramelize, adjusting the heat as needed to prevent burning, about 10 minutes. Remove the pan from the heat and carefully turn each pear slice with a fork. Return to the heat and cook until the sauce is uniformly golden, 2 to 4 minutes more.
6. Carefully transfer the pears one at a time to the prepared baking dish, arranging them decoratively in a circle and slightly overlapping them if necessary. Use a heatproof silicone spatula to scrape any remaining syrup over the pears.
7. Set the baking dish in a shallow baking pan. Spoon the bread and custard mixture into the baking dish. Press down on the bread until it is submerged in the custard. Place the pan in the oven and carefully add the hot water to the shallow baking pan until it is halfway up the sides of the baking dish.
8. Bake until the pudding is browned on top and set in the center, 1 to 1 1/4 hours. Carefully remove the pan from the oven. Transfer the baking dish to a wire rack and let cool for at least 45 minutes. To serve, run a knife around the edge of the pudding. Place a serving platter over it and invert the pudding onto the platter.

Continue Reading "bread gifts"

Monday, December 22, 2008

sunday supper: oven-baked "BBQ" brisket


I never used to believe in liquid smoke. It sounds like some kind of snake oil that only rubes fall for. How could it possibly work? Is a faux-BBQ even worth attempting? Well, I found out the answer yesterday, when I tried Homesick Texan's recipe for Oven-Baked Brisket. I figured, if a Texan found the result acceptable, it couldn't be THAT bad. And I must say, it was THAT good. Now, of course, the whole apt smells of hickory smoke, which certainly is not a bad thing. And I have a hunk of delicious brisket to make sandwiches and - dare I say it - brisket fried rice. And Morty thought it was freaking delicious, too. Recipe after the jump:


OVEN-BAKED BRISKET
From Homesick Texan

Ingredients:
1 four-pound untrimmed brisket
2 tablespoons of salt
2 tablespoons of black pepper
2 teaspoons cayenne
4 cloves of garlic, crushed
1 onion cut into slivers
1/4 cup soy sauce
1/8 cup Worcestershire sauce
1/4 cup liquid smoke plus an additional 1/4 cup.
1/4 cup black coffee
1/4 cup apple cider vinegar
3 fresh jalapenos, sliced

Method:
1. Preheat your oven to 250 degrees.
2. Mix together the salt, black pepper, cayenne and crushed garlic, and rub all over your brisket (more heavily on the meatier side but also a bit on the fat side as well). Allow the brisket to come to room temperature.
3. In a large roasting pan, add the slivered onions, soy sauce, Worcestershire sauce, 1/4 cup of the liquid smoke, 1/4 cup black coffee, 1/4 cup apple cider vinegar and half the sliced jalapenos.
4. Place the brisket in the pan, fat side up, and sprinkle the remaining jalapenos on top of the brisket.
5. Cover the pan tightly with foil, and bake in the oven for four hours. At this point, if you want a more pronounced smoky taste, pour another 1/4 cup of the liquid smoke over the brisket. Otherwise, just continue cooking for another hour, or roughly 1 hour and 15 minutes per pound.
6. Take the brisket out of the oven, and it should be tender to the touch. Let it sit out of the pan for half an hour, and then trim the fat on top and slice against the grain. If you desire a gravy, they pan juice is a fine, fine topping.

Continue Reading "sunday supper: oven-baked "BBQ" brisket"

Friday, December 19, 2008

this is not a post about snow


It's about the easiest side dish ever: garlicky broccoli rabe. It's simply broccoli rabe, lots of garlic, hot red pepper flakes, and olive oil. Yes, it's snowing out, but there's no reason to not eat some fresh springy greens. Recipe after the jump:


GARLICKY BROCCOLI RABE
1 bunch broccoli rabe, chopped into 1-inch lengths
4 cloves garlic, thinly sliced
large pinch hot red pepper flakes, to taste
2 tbsp olive oil
salt and pepper, to taste

Heat oil with the garlic in a large saute pan over medium high heat. When the garlic starts to get fragrant but before it start browning, add the hot pepper and let it sizzle in the oil for a minute. Add the broccoli rabe and saute for a few minutes. Bring down the heat and cover for a few minutes until the broccoli is bright green and tender. Continue to saute to avoid burning.

Continue Reading "this is not a post about snow"

Tuesday, December 16, 2008

easy weeknight dinner: lemon chicken with artichokes


This one literally takes 20 minutes, it's fantastically tasty, and it's quite healthy. I think that's all that needs to be said about it. Recipe after the jump:


SAUTEED LEMON CHICKEN WITH ARTICHOKES

2 tablespoons olive oil
1/2 medium yellow onion, finely chopped
3 medium garlic cloves, thinly sliced
1 1/2 pounds boneless skinless chicken meat (I prefer thighs for flavor, but anything will do) large dice
1 1/2 cups quartered artichoke hearts (canned or jarred – not frozen)
2/3 cup dry white wine
1/3 cup water
1 tablespoon freshly squeezed lemon juice, or more to taste (I used half a lemon)
1/2 cup lightly packed basil leaves, chiffonaded
1 teaspoon lemon zest

1. Heat oil in a large frying pan over medium-high heat. When it shimmers, add onion and garlic, season with salt and freshly ground black pepper, and cook until softened, about 2 minutes.
2. Add chicken and cook, stirring rarely, until well browned on all sides, about 5 minutes. Add artichoke hearts and cook until slightly broken down, about 3 minutes.
3. Add wine, water, and juice and scrape the bottom of the pan to incorporate any browned bits. Cook until alcohol smell is cooked off and sauce is slightly reduced, about 5 minutes. Remove from heat, stir in basil and lemon, and serve over rice or pasta.

Continue Reading "easy weeknight dinner: lemon chicken with artichokes"

Thursday, December 11, 2008

sunday supper: bolognese of my dreams


Marcella Hazan's magical bolognese. As far as I'm concerned, there is no reason to go looking for another recipe. This is exactly what you want bolognese to taste like, smell like, look like, sound like. This is the sauce you turn to when you're simply craving pasta in it's classic and true form. And the only thing difficult about this recipe is having the patience to cook it as long as you should - no shortcuts allowed. If I had one complaint - one teeny, tiny, probably sacrilegious complaint - it's maybe that this can be quite greasy. I know fat is a good thing and I use the fattier chuck meat, but I couldn't stop myself from skimming off a little bit of the fat as it cooked. I don't know, I have a problem. Recipe after the jump:


MARCELLA HAZAN'S PERFECT BOLOGNESE
From Essentials of Classic Italian Cooking

NOTE: I took a few liberties with ingredient amounts, which I've noted below. Still awesome.
1 Tbs vegetable oil
3 Tbs butter plus 1 Tbs for tossing the pasta
1/2 cup chopped onion
2/3 cup chopped celery
2/3 cup chopped carrot
3/4 pound ground beef chuck (I used a whole pound)
Salt
Black pepper, fresh from the mill
1 cup whole milk
Whole nutmeg
1 cup dry white wine
1 1/2 cups canned imported Italian plum tomatoes, cut up, with their juice (I used a whole 28 oz can)
1 1/4 to 1 1/2 pounds pasta (I used 1 pound of dried rigatoni)
Freshly grated parmigiano-reggiano cheese

Put the oil, butter, and chopped onion in the pot and turn the heat to medium. Cook until the onion's translucent, then add the celery and carrot and cook for 2 minutes more until coated well.

Add the ground beef, a large pinch of salt, and a few grindings of pepper; crumble the meat with a fork and stir until the beef has lost its raw, red color.

Now the cool part: add the milk and let it simmer gently, stirring frequently, until it has bubbled away completely. Add a tiny grating--about 1/8 teaspoon--of nutmeg and stir.

Add the wine, let it simmer until it's evaporated, then add the tomatoes and stir thoroughly to coat all the ingredients.

When the tomatoes begin to bubble, turn the heat down so the sauce cooks at the laziest of simmers (just an intermittent bubble here and there). Cook, uncovered, for 3 hours or more, stirring from time to time. While the sauce is cooking, you are likely to find that it begins to dry out and the fat separates from the meat. To keep it from sticking, continue the cooking, adding 1/2 cup of water whenever necessary. At the end, however, no water at all must be left and the fat must separate from the sauce. Taste and correct for salt.

Cook pasta, drain, then add the pasta to the sauce with the remaining tablespoon of butter. Toss to coat evenly and serve with grated parmiggiano-reggiano.

Continue Reading "sunday supper: bolognese of my dreams"

Wednesday, December 10, 2008

the elusive real enchilada sauce


It is very frustrating when searching around for authentic recipes to continually come across ones that appear to take a shortcut. I was determined to make chicken enchiladas one night, but quite a bit of searching kept turning up recipes that called for "enchilada sauce". But WHAT is this mysterious sauce? Why can't I figure out a way to make it from scratch? Do I really have to go back to the market and find this stuff? It just feels like cheating.


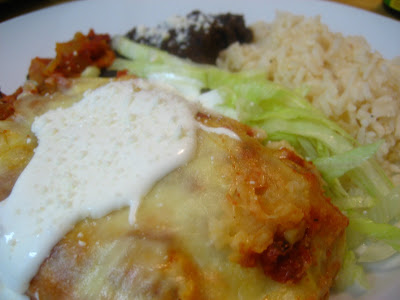
Searching for enchilada sauce recipes also turned up a mish-mash of recipes, some even calling for jarred salsa, which, really? Come on. So whatever, I have to go find myself a real Mexican cookbook to figure this out, but in the meantime I cobbled some things together and made something that mostly resembled chicken enchiladas. They were actually very good, but I wouldn't call them authentic. And that just kills me, to be honest. Recipe after the jump:


SORT OF REAL CHICKEN ENCHILADAS

For the enchiladas:
1/3 cup plus 1 tablespoon vegetable oil
12 6-inch corn tortillas
1 medium onion, chopped
2 small jalapeno peppers, seeded and chopped
1/2 teaspoon dried oregano
3 cups enchilada sauce, recipe to follow
3 cups (about) shredded cooked chicken (use leftovers, or simply poach a couple of chicken breasts in broth or water)
3 cups packed grated Monterey Jack cheese (about 12 ounces)
Sour cream or Mexican crema, to garnish
Cotija cheese, to garnish

Heat 1/3 cup vegetable oil in heavy small skillet over medium-high heat. Using tongs, add 1 tortilla and cook until softened, turning once, about 15 seconds for each side. Transfer tortilla to paper towels and drain well. Repeat with remaining tortillas.

Heat remaining 1 tablespoon vegetable oil in heavy large skillet. Add onion, pepper, and oregano and saute until onion and pepper are tender, about 5 minutes. Season to taste with salt and pepper.

Lightly oil 13x9x2-inch glass or ceramic baking dish. Spoon 1/2 cup enchilada sauce into dish. Place scant 1/4 cup chicken in center of 1 tortilla. Sprinkle with 1 generous tablespoon onion mixture. Set aside 1/2 cup cheese for topping. Spoon 2 generous tablespoons cheese atop chicken. Roll up tortilla and place seam side down in prepared dish. Repeat with remaining tortillas, chicken, onion mixture and cheese. Pour remaining sauce over enchiladas. Sprinkle with reserved 1/2 cup cheese. Cover with foil. (Can be made 1 day ahead. Chill.)

Preheat oven to 350F. Bake enchiladas, covered, until sauce bubbles and cheese melts, about 35 minutes. Remove foil and bake another 5 minutes to lightly brown the top. Serve hot with sour cream and a sprinkling of cotija cheese.

For the sauce:
3 tbsp chili powder
3 tbsp flour
1 tsp cocoa powder
1/2 tsp garlic salt
1 tsp oregano
3 cups chicken broth
1 (8 ounce) can tomato sauce

Combine all dry ingredients in a bowl. Stirring constantly, slowly add enough of the broth to make a thin paste. Pour into pan and add rest of broth. Cook over medium heat, stirring constantly, until mixture thickens. Stir in tomato sauce.

Continue Reading "the elusive real enchilada sauce"